Contents Building-in Page 3 Electrical connection Puget 4 Use and care Page 6 Using the oven Page 7 The analogue programmer Page 8 Using the gill Page 10 Cleaning Page 11 ‘What happens if something goes wrong Page 14 in force, Important The installation of the oven and connecting it to electricity must always be done be competent installers to standards and regulations currently
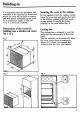
Building-in 1t is important that the dimensions and materials of the surround or cabinet into which the oven will be built are correct and that proper arrangements are made for a continuous supply of sir to the oven 5o it does not overheat, Dimensions of the recess for building into a kitchen unit (mm) fig. 1 &2. Fig. 1 Securing the oven to the cabinet Fit the appliance-int the cabinet recess.
Electrical connection The oven is designed to be connected to 240 electricity supply. Maximum power rating 2548W Even element rating 2600W Grill element rating 2000W The oven has an easily accessible terminal block which is marked as follows: Letter L Live terminal Letter N Neutral terminal @ Barth THIS APPLIANCE MUST BE EARTHED The cable used to connect the oven to the electrical supply should have a minimum roses section of 2.
When the oven is first installed Nee the oven is installed it {s important to remove the protective materials which ‘were put on in the factory. Remove from these parts the plastic film, then wipe with a cloth dripped in mentholated spirit. Then switch the oven control to MAX and leave it to run empty for 30 minutes to burn off any other protective materials, This will also remove any unpleasant new smells, The oven is evenly heated throughout.
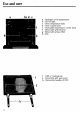
Use and care & Analogue clock/programmer b On/off light ¢ Oven temperature light d Oven control knob e Oven/grill temperature control knob f Removable grill element # Removable grease filter h Fan i Grill or roasting pan j Reversible grill pan insert k Removable handles (2 Off)
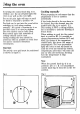
Using the oven 3y turning the control knob {fig. 4) 1o »position { % ) the on/off pilot light will ome on as well as the oven light. The on/off pilot light will stay on until he knob is returned to position «O». The food can be put into the oven before switching on, even when cooking manually the speed of heating up is so ‘ast that there is no need to preheat. I'he oven shelves can be fully filled. Vst normal types and materials of workings utensils can be used.
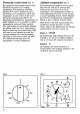
Thermostat control knee (fig. 6 By turning the thermostat control knob clockwise you select the cocking temperature. Temperature selection starts at 50°C and is marked in 25°C increments up to maximum, where the temperature at the center of the oven will reach approximately 280°C; the thermostat controlling the temperature is totally variable so it is possible to select temperatures between those marked.
Setting the clock To set. or adjust the correct time of day, pull out knob B, and turn clockwise or anticlockwise. It will be necessary to do this upon installation, after & power failure or when the clock is fast or slow. Manna operation To operate the oven manually ie, without programming, turn knob B clockwise until the hand symbol is centered on dial D.
Using the grill As with the oven, the grill control can be set t a number of different heat settings, At MAX the thermostat controlling the heat does not operate and the element stays on continuously to give the highest heat possible. Foods to be grilled are placed on the wire trivet in the grill pan, the trivet can be placed either way up to give the required distance from the element. For foods which require slow grilling, the grill pan should be set on a lower shelf position.
Cleaning After every nest roasting it is advisable to wipe the oven over whilst still warm with a warm soapy cloth to prevent a guild up of soil The enameled parts can be cleaned with warm detergent water or any normal vane cleaner. Abrasive scourers should not be used. Stainless steel parts should be carefully rinsed then dried with a soft cloth. Glass parts should be left to cool before cleaning.
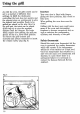
Removing the back panel You may wish to remove the back panel from time to time, to enable you to clean it thoroughly. ‘Warning Before removing the back panel the oven must be disconnected from the electricity supply and the safety plug put into the grill socket (fig. 8). To remove the back panel use & screwdriver as shown (fig. 10). ‘Wash the panel with very hot water and a detergent using a soft cloth.
Removing the oven door fig 124, B,0) 1. Open the oven door so that it is in the horizontal position. 2. With the aid of a coin move the two retaining sides a quarter turn clockwise, so that the two raised bars are to the [eft hand side of the hinges. 2, Raise the door halfway. 4. At this stage the two hinges on either side of the door must be clasped together simultaneously. The door can then be removed by pulling out and downwards, maintaining the angle. Fig. 12/A To replace the door 1.
What happens if something goes wrong If the oven does not come on when rooking manually, first check that the programmer is set for maul, ie. in the position. If this is as it should be and the oven still does not come on: a) Check that it is plugged in properly. b) Check that the socket switch and/or switch from the supply to the oven are ON, ¢) Replace the fuse in the plug, when present, with another of the appropriate rating and check that this plug has been wired up properly.
GAUSSIAN GUARANTEE CONDITIONS ‘This guarantee is in addition to your statutory and other legal rights which will not be excluded or in any way diminished by the return of the enclosed card.