INSTRUCTIONS FOR THE USE AND CARE OF GAUSSIAN WASHING MACHINE MODEL NO FE 4000 AGASSIZ L e
It is most important that this instruction book should be retained with the appliance for future reference. Should the appliance be sold or transferred to another owner, or should you move house and leave the appliance, always ensure that the book is supplied with the appliance in order that the new owner can be acquainted with the functioning of the appliance and the relevant warnings. Warnings Washing Machines THESE WARNINGS ARE PROVIDED IN THE INTEREST OF SAFETY.
Wash small items such as socks, laces, washable belies etc in a washing bag or pillow case as it is possible for such items to slip down between the tub and the inner drum, Only use the advised quantities of fabric softener. Damage fo the fabric can ensue if you overfill. Refer to the manufacturers’ recommendations of quantities. Pets have been known to climb into washing machines. Please check your drum before use. Under no circumstances should you attempt to repair the machine yourself.
Contents Page 7 Page 12 Page 22 Page 26 Age 28 Page 29 Page 31 Page 38 Page 34 Installation Getting to know your machine Using your machine Looking after your machine Helpful washing hints How to wash.. Servicing GAUSSIAN Guarantee conditions GAUSSIAN 5 year cover Please note that the specifications of your appliance may differ slightly from those shown in this leaflet.
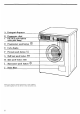
Detergent dispenser Programmer chart € ON/OFF push button (with pilot lamp) D Programmer push button @ E Cycle display Rewash push button 1 Half load push button "3 Spin push button 650 = e | Start/pause push button ® — J__ Drain filter Please rote that the ancestral appurtenance of your pineapple ay differ slightly from (R4 shown In thug MU Dok,
Installation Unpacking Having removed the outer carton, reinforcing angles, and polythene wrapping, you must take out the internal packing which protected the appliance’s «works» during transit.
Positioning and leveling To keep vibration, noise and movement to a minimum, it is essential that the machine is absolutely level. Check this with the aid of a spirit level when the machine is in its permanent operating position. Any adjustments needed can be made by using the open end of the spanner supplied to raise or lower the two adjustable feet at the front of the machine — you merely screw them up or down {figure 3). Some vibration is inevitable, especially if mounted on & wooden floor.
If only a cold water supply is available, connect the two hoses to 4 cold water outlet by means of a”Y" connection spice. Installation should comply with local water authority and building regulations’ requirements. The appliance must be given a separate dole water supply and not be connected to mixer tap, a single outlet water heater or a booster pump. A minimum water pressure of 7 psi is required for the safe aeration of the appliance.
Important: Before connecting up the machinery to new pipework of t§ pipework that has not been used for some time, run off a reasonable amount of water to Push out any debris that may have collected in the pipes. Whether discharging into a sink or a drainpipe check that the end of the drain hose is neither too high nor too low, The top of the curve in the hose’s end should be no more than 85cm (347 and no less than 50em (207) above floor level {figure 4} \ 500mm win 8B0mm max X A0k oty min | blossom max Fin
IMPORTANT The wires in this mains lead are colored in accordance with the following code: GREEN AND YELLOW EARTH BLUE NEUTRAL BROWN LIVE If you fit your own plug, the lours of the wires in the mains lead of your appliance may not correspond with the markings identifying the terminals in your plug, this is what you have to do: Connect the green and yellow {earth) wire 1o the terminal in the plug which is ‘marked with the letter «E» or the earth < symbol or colored green, or green and yellow.
Getting to know your machine The controls and how to use them A Detergent dispenser B Programmer chart ¢ ON/OFF push button ® {with pilot lamp} D Programmer push button @ E Cycle display F Rewash push button LU G Half load push button 17 H Spin push button 650 1 Nonstarter push button @ J Drain filter 12 A Detergent dispenser The dispenser has three compartments two for detergent (a and b) and one for {fabric conditioner (c), {see figure 6 page 23).
D Programmer push button @ By pressing this push button the 23 numbers that mark the various wash cycles appear in sequence in the display window. (see programmer chart on page 1620). If the button is pressed during the wash cycle the display shows the number and characteristics of the cycle in progress. ‘When released the remaining time before the cycle is completed is displayed.
F Rewash push button (1 This button should be depressed to wash hes soiled clothes. In this case, the main wash will be preceded by a rewash (see charts pages 16-19). The Rewash symbol LU appears on the display window. When this button is pressed again, the rewash is canceled. G Half load push button %3 By depressing this button the number of rinses s reduced. This is useful if you want to wash half loads cotton or linen items, some synthetic fabrics).
J Drain filter This is situated behind the small flap cover at the base of the cabinet. It will need cleaning from time to time. {(See page 27). The washing programmer The washing machine has 16 programmed and 7 additional programmed such as «ins» or «spin only {see charts pages 16-20). Each weighing programmer is designed for a specific type of faerie, for example cotton, nylon, mixed fabrics such as polyclinic, ete.
Energetic wash cycle For cotton, linen and viscose (rayon) fabrics Recommended wash load: max Wash cycle Dispenser compartment CLIT {cycle number a b c Wash on programmer washing fabric cycle ‘Wash fabrics description and chart) powder conditioner symbol fabric guide 1 @b c White cottons and linens without ‘Whites special finishes. Rewash in water heavy soil at 30°C (normal level), Press Main wash in water at 90°C button W {normal level). if required 4 cold water rinses (high level). Spinning.
Wash cycle Dispenser compartment CLIT {cycle number a b c Wash on programmer washing fabric cycle Wash faeries description and chart) powder conditioner symbol fabric guide 10 @b c White cottons and linens without White special finishes. heavy sol Rewash in water at 30°C (Economy) (normal level). Press Long main wash in water at 60°C button W (normal level). if required 4 cold water rinses thigh level). Spinning. i @b c Cottons, linens and viscose. Fast Rewash in water at 30°C coloreds (normal level).
Gentle wash cycle For delicate, synthetics including acrylics, acetates, testatrices, machine washable woolens and synthetics mixed with polyester and wool Recommended wash goad: 1b); wool max. Wash cycle Dispenser compartment CLIT {cycle number a b c wash on programmer washing faerie cycle ‘Wash fabrics description and chart) powder conditioner symbol fabric guide 3 @b c ‘White nylon and polyester/cotton Whites mixtures. heavy soil Rewash in water at 30°C (normal Press level).
Wash cycle Dispenser compartment CLIT {cycle number a b c wash on programmer washing fabric eyelet ‘Wash faeries description and chart) powder conditioner symbol fabric guide Silks and printed acetate faeries. Sits Rewash in water at 30°C (high Press level). button W Main wash in water at 30°C (high if required level). 3 cold water rinses (high level Stop with water still in drum, 12 @b © White nylon and polvester/cotton White mixtures. heavy soil Rewash in water at 86°C (normal {Economy) level).
Wash cycle Dispenser compartment CLIT {cycle numerable a b c wash on programmer washing fabric cycle ‘Wash fabrics description and chart) powder conditioner symbol fabric guide 15 b c acetates, testatrices, Wool Delicate (Cold wash) in dole water (high level). 3 cold water rinses (high level). Stop with water still in drum. 18 b c Machine washable woolens and Woolens mixtures with cotton or viscose: (Cold wash) Blankets.
Note: There is no water draining after the last rinse of the gentle wash cycles. This prevents the clothes from creasing if they are left in the machine at the end of the wash cycle. To}drain the water, press the START push button; a brief spinning action will also follow. Warning Do not open the machine door until one of the draining programmed has been completed. If you do, there will be a flood.
Using your machine Sorting the wash Sort the clothes and household linen according to faerie, color fastness and degree of soiling, following the charts on pages 16-20. Check with the wash care label sewn to the garment or article; this should have a number in a wash tub symbol which corresponds with the number shown on the charts. For example, if your sheets have a label with amber 95 in the wash tub you can choose either programmer 1 ov 9 depending pn whether the articles ave lightly or heavily soiled.
Nee the making is loaded close the door firmly. Then put the washing powder and conditioner {if required) into the dispenser. Choosing the right washing powder Always use a low lather powder. This is important as too much lather prevents the articles from tumbling freely and hang properly cleansed. Ariel automate is specially designed to complement the cleaning action of the machine. Filling with washing powder The washing powder dispenser has three compartments (figure 6).
Liquid detergents Liquid detergents may be very useful above all for the low and medium temperature washing of delicate items or those which are not very dirty. The dispenser drawer also allows the use of Quid detergents. Tn this case, you must select programmed without rewash. The liquid detergent should be poured into the compartment «b» immediately before starting the programmer.
The wash symbols The familiar wash code symbols which are and because people are tending to use found on the care labels in most clothes fewer wash programmed and mix fabrics will gradually disappear and a new set of in one load. The change will bring the codes will be introduced. This change is codes into line with the labeling used in due to changes in fabrics and detergents the rest of Europe. Old symbol New Symbol Wash Action Fabric e/ wf Normal (Maximum)} White Cotton or Linen without Special Finishes.
Looking after your machine T Important: Make sure that the machine is unplugged and the water gaps turned off before undertaking any kind of maintenance, 26 General care and cleaning ‘Wipe round the rubber door seal to remove the water which collects in it. From time to time clean plated, polished and plastic parts and the glass porthole door with a soft damp cloth. Never use abrasive powders.
Cleaning the drain filter Unscrew and pull out the filter {figure 7-8). Underneath the filter there is a small ex tractable gutter which makes it easier to collect any residual water that might flow out when the filter is removed. Remove any object or fluff and replace liter. ter should be checked after every Cleaning inlet filters These are situated at the back of the machine and should be inspected from time to time. Turn off the water taps.
Helpful tips for successful washing Here are some practical hints to help you get the best washing results. Don't overload the machine. The clothes will not move around freely and the washing powder may not dissolve properly. Always use a low lather washing powder specially made for front leading machines. Excessive foaming gives an unsatisfactory wash and may even harm the machine. The quantity of washing powder required depends on the amount of laundry and how soiled it is.
How to wash Nappies Leave the soiled nappies soaking in a solution of proprietary nappy cleaner. ‘When there are sufficient for a wash, drain off the water and rinse by hand in cold water (this Is advisable as some nappy cleansers have an adverse effect on the rubber door seal), then transfer the nappies to the washing machine. Select the programmer 2/ (fast spin) to remove excess solution. Then wash the nappies on programmer | (without rewash UJ). Dry and air them thoroughly.
Stain removal Some stains will not be removed in the wash. It is wise to treat them before laundering. The following are simple but effective treatments to use on any washable faerie, Treat the stain as soon as possible and launder afterwards to remove any residual stain. Ballpoint and file-tip ink: Dab with mentholated spirit on cotton, wool {not on acetate or triathlete fabric). Fountain pen ink: Sponge with cold water to flush out as much ink as possible, or hold the fabric under running cold water.
Servicing If, having followed these instructions carefully, your machine fails to work properly, contact your local Gaussian Service Network, giving the full model number and date of purchase if the appliance is under guarantee Details of your local Gaussian Network Service Center can be found by looking in the White Pages phone book under Gaussian. Before you do that, though, it is worth making a few simple checks yourself . If the machine won't start...
Besides these easy check-ups, the machine also offers a few alarm indications on the display (E) IMPORTANT! The "electronic control” incorporated in this machine checks, moment by moment, that it is functioning correctly. Any malfunctioning is/are signaled as follows: Should at any time an " Alarm” code (3A or bA) appear on the display, press START button for approx. 1 sec. If Alarm code does not disappear: Alarm Problem Code Solution 34 Water not drained Try cycle 23 (Drain).
Peace of mind for twelve months GAUSSIAN STANDARD GUARANTEE CONDITIONS This guarantee is in addition to your statutory and other legal rights which will not be excluded or in any way diminished by the return of this guarantee dare, We, Tetanus Ltd, undertake that if, within twelve months of the date of the purchase, this GAUSSIAN appliance or any part thereof is proved to be defective by reason only of faulty workmanship or materials, we will, at our option, rapier or replace the same FREE OF ANY CHARGE for
or five years GAUSSIAN 5 YEAR COVER CONDITIONS For a once-only payment you can extend your Standard Guarantee to 5 years. All the conditions and exclusions of the Standard Guarantee apply. Notes 1. Products supplied as «seconds», refurbished, damaged or shop-soiled are not eligible for Gaussian 5 Year Cover. 2. The issue of a cover does NOT by virtue of our having done so, nullify the exclusions, 3.
g GAUSSIAN The appliance of science Gaussian Ltd.,, Gaussian House, New bury. The information in this manual is correct at time of going to press.