WASHING MACHINE STIRALXNAQ MA{INA FCS 720C INSTRUCTION- A ND I N S TA LLA T I O N B O O K LET RUKOWODSTWO PO USTANOWKE I |KSPLUATACII 822 90From 14-97 Downloaded WashingMachine-Manual.
Contents For the User For the Installer Safety information Description of the appliance 3 Technical specifications 13 4-5 Unpacking the machine 14 6-7 -If the machine is damaged -When lifting the machine -Transit locking devices -Identification of materials -Machine front, Machine rear -Control panel Programme chart General washing information 8 Installation -Detergent and fabric conditioner -Textile care labelling Using your appliance Maintenance -Levelling the machine -Water intake -Wate
Safety information Before installing and first using the washing machine, read the instruction booklet carefully, including its hints and warnings. Doing so will ensure that your machine will perform properly and to best advantage. Anyone using the machine should be thoroughly familiar with its instructions for use and safety features.
Description of the appliance Machine front Control panel Door Door latch All feet adjustable Machine rear Transit locking devices Electrical lead Discharge hose Inlet hose Downloaded From WashingMachine-Manual.
The control panel 7 6 5 1 2 3 Pushbuttons 4 Knob controls and detergent dispenser 1 – After selecting the wash programme and temperature, push this button in to start the machine. (See also, Indicator light). 3 Temperature control – For setting temperatures between and 90°. Follow care label recommendations. 2 – An optional function. When this button is pressed in, the programme will halt at the end of the last rinse, and the rinse water will be retained in the machine.
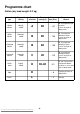
Programme chart Cotton (dry load weight: 3.0 kg) Load type Degree of soiling White articles Heavily soiled White articles Normally soiled Coloured articles Normally soiled Coloured articles Normally soiled Quick wash Lightly soiled Progr. selection Temp. setting (C) A 90 B 90 B 60 40 C D 30-40 Progr. time (min.) Programme content ~ 147 90° C programme with pre-wash. 3 rinses and spin at 700 rpm/min. ~ 135 90° C programme without pre-wash. 3 rinses and spin at 700 rpm/min.
Synthetics and Delicate (dry load weight: 1.5 kg) Wool (dry load weight: 1.0 kg) Load type Degree of soiling Synthetics Normally soiled Synthetics Lightly soiled Delicate fabrics Normally soiled Woollens Lightly soiled Progr. selection Temp. setting (C) F 60 F G 40 30 - 40 H - 30 Progr. time (min.) Programme content ~ 74 60° C programme without pre-wash. 3 rinses and spin at 600 rpm/min. ~ 74 40° C programme without pre-wash. 3 rinses and spin at 600 rpm/min.
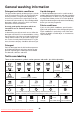
General washing information Detergent and fabric conditioner Liquid detergent The type and the quantity of detergent you use both have an impact on the results you achieve with your washing machine. Using too much detergent is unnecessary and increases overall impact on the environment quite needlessly. Even biodegradable detergents contain substances which can disturb the balance of the environment.
Using your appliance The very first time that the machine is used you should run a wash programme with no load in the drum, to clear any residues which may have been left by the manufac-turing process. Pour approx. 100 ml of detergent straight into the drum and run programme G, 40° C. When the programme has ended the machine will be ready for use. 1 Loading the machine Pull the door latch gently to open the door. Put the items to be washed inside the drum. Large and small items can be mixed.
Maintenance The cabinet Clean the outside surfaces of the machine using a mild (non-abrasive) household cleaning product. Finish by removing remaining traces of the product with a damp cloth. 1 Do not use cleaning products which contain alcohol (spirits), thinners and similar substances. The detergent dispenser In time, residues of detergent and fabric conditioner are likely to build up inside the detergent dispenser. It should be cleaned at regular intervals by flushing it out with water.
Descaling If your water supply is harder than 7° dH, you should descale your washing machine at least once every three months. Use approx. 150 ml of citric acid instead of detergent and run a wash programme at the highest temperature with no wash load in the machine. Limescale deposits on components such as the machine's heating element will reduce their service life. (Contact your water company to find out the hardness level of your local water supply).
If the machine is not working Symptom Check The machine will not start. ■ ■ ■ ■ ■ The machine is not filling with water.
Service Service and spare parts Servicing and possible repairs must be carried out by a service company authorized by the supplier. Use only spare parts supplied by these. Before calling service, use the trouble shooting table ”If the machine is not working” to try to attend to the fault yourself. If service is called in to solve a problem that is in this list, there is a risk that you will be responsible for the cost.
Unpacking the machine If the machine is damaged If the machine has been damaged during transportation, you should immediately notify the company responsible for delivering it. Check that the washing machine is undamaged. If you discover any damage, faults or that anything is missing, you should notify the seller immediately. 1 Never leave packaging material in a place where children may play with it. When lifting the machine Take care when lifting the machine.
Installation Levelling the machine The machine must be installed on a sound and firm surface and must not be touching walls or furniture. Adjust the feet to level the machine. Make sure the machine is resting on all four feet (Fig. 1). 1 Some vibration is normal and unavoidable when the machine is spinning the load, particularly if the floor is not a concrete one. When the appliance location is on carpet floors, attention must be paid so as to ensure that there is no obstruction to the bottom vents.
Installation Water discharge 1 These three alternatives are possible for the discharge hose: Over the top edge of a washtub: If you intend the drain hose from the machine to empty into a sink, make sure that the hose will not move when the machine is emptying. The hose can be fixed to the wall on a hook or tied to a tap with string (Fig. 1). Directly into a waste pipe with a trap: The discharge pipe can be connected directly into the pipe (e.g.
Downloaded From WashingMachine-Manual.