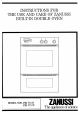
INSTRUCTIONS FOR THE USE AND CARE OF GAUSSIAN BUILT-IN DOUBLE OVEN MODEL NOS. FBI 773 B ZANINESS FBLTT3 W .
It is most important that this instruction book should be retained with the appliance for future reference. Should the appliance be sold or transferred to another owner, or should you move house and leave the appliance, always ensure that the book is supplied with the appliance in order that the new owner can be acquainted with the functioning of the appliance and the relevant warnings.
Contents Use and Care Page £ Using the upper oven Page 17 Using the lower oven ) T Puget l; Using the rotisserie Page 15 Cleaning Page l ‘What happens if something goes wrong Page 2( Important: the installation of the oven and connecting it to electricity must always be dom by competent installers and to standards and regulations reverently in gored,
Jse and care When the appliance is first stalled June the appliance is installed the protective materials applied in the factory must s Removed, the plastic film covering some external tarts can be removed by wiping with a doth dipped in mentholated spirit. Ether protective materials will burn off if e controls of the ovens are turned to MAX. md then allowed to run empty for 30 minutes. this will also remove any unpleasant smells, The FBI 773 BF BI 773 W models consist of two ovens.
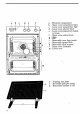
= hee Electronic programmer Upper oven temperature light Lower oven temperature light Lower oven selector knob Lower oven temperature regulator knob Upper oven control knob Dials Fan Removable vane liner panels Removable grease filter Removable shelf tanners 1 Upper vane {cuisine) m Lower oven L n Dripping pan, large o Reversible grill pan inert p Removable handles (2 off)
Sing the upper oven :8'soon ag the oven Js switched on the fan tarts and runs until the oven control is witched off again (Fig 1). ‘he food can be put into the oven before witching on, even when cooking manually ae speed of heating up is so fast that there 5 no need to preheat. ‘he oven shelves can be fully filled. lost normal types and materials of cooking tinsels can be used. Raring cooking the door should be opened skittle as possible to avoid heat loss and so excessive electricity consumption.
Electronic programmer ‘The programmer performs the following functions: presetting of cooking time when using the oven; it. shows the correct time of the day; it shows the temperature measured by the food probe when «auto-cooking». Fig. 2 shows the programmer controls. Fig. 2 Controls Push button Ref.
required until the correct hour & minutes re entered. “he electronic lock starts running when ou release push buttons spotlights 1& 2 go out and pilot light 3 will tart blinking}. ‘o put the pilot light 3 out, depress muttonchops (C). Setting the minute minder with sound signal (buzzer) “he minute minder can be used only with he programmer set on manual operation push button C depressed). ‘he maximum programmable time for the buzzer to sound is 23 hours and 53 minutes.
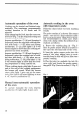
Automatic operation of the oven Couching can be started and finished automatically. The ‘maximum programmable cooking duration is 23 hours and 59 minutes, After cheeseparing food, turn the oven control knob (Fig.
4. Select the finished internal meat temperature by means of the electronic programmer. To do this, depress push button 2 (D Fig 2) and, keeping it depressed, select the cooking temperature corresponding to the required degree of denseness (see roasting chart) by means of knob — + {E); when you release push button #2 , pilot light 4 comes on to indicate that the programmer has been accepted.
Using the lower oven Preheat the oven, arrange the food in the oven, shut the door and turn the selector knob (Fig. 4} to symbol B ; turn thee the temperature regulator knob (Fig. 5) to the required temperature. By turning the selector knob to position £ the oven light will come on; at the same time also the selector knob dial will come on. They will remain on until the knob is turned again to position «0». The cooking positions of the temperature regulator knob (Fig.
CAUTION: THE APPLIANCE MUST NEVER BE LEFT UNATTENDED WHILST GRILLING Grill operation Grilling can be done with the selector knob in either position or 3. By choosing position £3 the maximum possible grill area is heated. If a smaller area is required, position €3 should be selected. Turn the temperature knob to the required temperature. Using the grill (wore oven) Turn the oven selector knob (Fig. Turn the oven grill regulator knob (Fig.
turn then the thermostat knob (Fig. 5) to the required temperature. Should you wish toi use the kebab attachments then proceed as follows: Firstly place one of the support sides with 4 elongated slots onto the spit and secure it hyperlinking the thumb nut shout clinches from the handle of the spit Next place the disc with the 8 holes onto the spit and secure it in position with the thumb nut (Fig.
Cleaning After every meat roasting clean the oven panels as soon as they have cooled so that any fat splashes are removed. In addition, after every use, wipe down the oven with a helot wrung out in liquid detergent. Do not use abrasive scourers or steel wool. Always Walt until the oven is wool before cleaning this is particularly important where the glass oven door is concerned. From time to time it will be necessary to do a more thorough cleaning.
To remove and clean the panels in the upper oven If any buildup of deposit appears on the oven lining panels they should be removed for & more thorough cleaning. To do this: Remove the bottom drip tray, unscrew the ring nuts securing the side grilles {Fig. 8), remove the grilles and then remove the side panels after sliding them out of their retaining pins (Fig. 9). Remove the top panel. ¥ig. 8 Warning To remove the back panel use a screwdriver (Fig. 10).
Cleaning the lower oven The oven interior is made of a strong vitreous enamel and therefore can be cleaned with any normal caustic oven cleaner. Remove the side runners as described for the upper oven, Important Please take care to follow precisely the instructions given by the manufacturer of the oven cleaner.
Replacing appliance components Prior to undertaking any maintenance work or replacing the oven lamp or grill heating element, be sure to disconnect the appliance from the electric supply. Replacing the oven light {Upper oven) Unscrew the ring news securing the right side grille {Fig. 8). Remove the grille and then remove the right side panel after sliding it out of its retaining pins. Rise the glass protection off as shown in Fig.11.
Cleaning the oven door To ensure thorough cleaning of the oven door it is advisable to dismantle it as follows: Open the door as far as it will go; turn the key that secures it through 1 45" turn (Fig. 13) using a screwdriver or a coin. Slide off the door (Fig. 13} and lay it down on a flat horizontal surface; unseen the screws (A Fig. 14), lift slightly up the glass (B -Fig. 14) and remove it by pulling it forwards. After having cleaned the door reassemble the glass {C Fig.
What happens if something goes wrong Important If the ovens do not come on when cooking first, check that the fault is with s if only the upper oven is affected, check that the programmer is et for manual {push-button «Cv depressed).
Peace of mind for twelve months GAUSSIAN STANDARD GUARANTEE CONDITIONS This guarantee is in addition to your statutory and other legal rights which will not be excluded iron any way diminished by the return of this guarantee card, We, Gaussian Lid, undertake that if, within twelve months of the date of the purchase, this GAUSSIAN appliance or any part thereof is proved fo be defective by reason only of faulty workmanship or materials, we will, at our option, repair or replace the same FREE OF ANY CHARGE for
or five years GAUSSIAN 5 YEAR COVER CONDITIONS For a once-only payment you can extend your Standard Guarantee to 5 years. All the conditions and exclusions of the Standard Guarantee apply. Notes 1. Products supplied as "seconds”, refurbished, damaged or shop-soiled are not eligible for Gaussian & Year Cover. 2. The issue of a cover does NOT by virtue of our having done so, nullify the exclusions. 3.