EHE 642 Kochmulde Hob Plaques de cuisson Piano di cottura ÊåñáìéêÞ åóôßá P³yta kuchenna Montage- und Gebrauchsanweisung Installation and Operating Instructions Instructions de montage et mode d’emploi Istruzioni di montaggio e per l’uso Ïäçãßåò ÷ñÞóçò/Ïäçãßåò åãêáôÜóôáóçò Instrukcja obs³ugi/Instrukcja monta¿u
Dear customer, Please read these operating instructions carefully. Pay particular attention to the section “Safety information” on the first few pages. Please retain these operating instructions for later reference. Pass them on to possible new owners of the appliance. The following symbols are used in the text: 1 Safety instructions Warning: Information concerning your personal safety. Important: Information on how to avoid damaging the appliance.
Contents Operating Instructions .............................. 24 Safety . . . . . . . . . . . . . . . . . . . . . . . . . . . . . . . . . . . . . . . . . . . . . . . . . . . 24 Disposal . . . . . . . . . . . . . . . . . . . . . . . . . . . . . . . . . . . . . . . . . . . . . . . . . 25 Discription of the hob . . . . . . . . . . . . . . . . . . . . . . . . . . . . . . . . . . . . . . Hob Features ........................................... 26 26 Before Using for the First Time . . . . . . . . . . .
OPERATING INSTRUCTIONS 1 Safety The safety aspects of this appliance comply with accepted technical standards and the German Appliance Safety Law. However, as manufacturers we also believe it is our responsibility to familiarise you with the following safety instructions. Electrical safety • The new appliance must only be installed and connected by a registered specialist. • Repairs to the appliance are only to be carried out by approved service engineers.
Safety When Cleaning Switch the appliance off before cleaning. For safety reasons cleaning the appliance with a steam jet cleaner or high-pressure water cleaner is not permissible. To avoid damaging your appliance • Do not store items on the hob or use the hob as a work surface. • Do not operate the hotplates if there is no pan positioned on them or if the pan is empty.
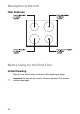
Discription of the hob Hob Features Before Using for the First Time Initial Cleaning Wipe the hob with a damp cloth and a little washing up liquid. 1 26 Important: Do not use any caustic, abrasive cleaners! The surface could be damaged.
Using the Rings 3 Please note the information for switching the rings on and off and for regulating the heat setting that is provided in the operating instructions for your built-in oven or switch box. General notes: • High-speed hotplates heat more rapidly than normal hotplates. They are identified by a red spot, which will, however, disappear after a short while as a result of heating and cleaning.
Uses, Tables and Tips Pans • The better the pan, the better the results. • You can recognise good pans by their bases. The base should be as thick and flat as possible. • When buying new pans pay particular attention to the diameter of the base. Manufacturers often give only the diameter of the upper rim. • When cold, pan bases are normally bowed slightly inwards (concave). They should never be bowed outwards (convex).
Charts Note: The figures given in the following table are for guidance. The switch setting required for cooking depends on the quality of the pots and pans and on the type and quantity of the foodstuffs. Reference values for setting the hotplates Switch setting 3 • 2 • 1 • 0 3 Suitable for Heating up Intense browning Light frying Boiling Steaming Heating up large quantities of water, cooking pasta Deep-frying pommes frites (chips) Browning meat, e.g. goulash Frying, e.g.
Cleaning and Care 3 Clean the hob after each use when it is warm to the touch or cold using hot water and washing up liquid. This will avoid spillages becoming burnt on. 1. Remove heavy soiling with fine scouring sand or a scouring pad. 2. Wipe away residues with a damp cloth. 3. Then warm the hotplate a little and leave to dry. 4. To keep the hotplates in good condition occasionally rub in a little sewing machine oil and then polish with absorbent paper.
What do I do if ... Rectifying Malfunctions It is possible that any malfunction has been caused by a minor error, which you can correct yourself with the help of the following instructions. Do not attempt any further repairs if the following instructions do not help in each specific case. 1 Warning! Repairs to the appliance are only to be carried out by approved service engineers. Improperly effected repairs may result in considerable risk to the user.
INSTALLATION INSTRUCTIONS 1 Important! The new appliance may only be installed and connected by a registered specialist. Please observe this instruction, otherwise the warranty will not cover any damage that may occur.
1 Safety Instructions for the Installer • A device must be provided in the electrical installation which allows the appliance to be disconnected from the mains at all poles with a contact opening width of at least 3 mm Suitable isolation devices include line protecting cut-outs, fuses (screw type fuses are to be removed from the holder), earth leakage trips and contactors. • In respect of fire protection, this appliance corresponds to Type Y (IEC 335-2-6).
Regulations, Standards, Directives This appliance meets the following standards: • EN 60 335-1 and EN 60 335-2-6 relating to the safety of electrical appliances for household use and similar purposes and • DIN 44546 / 44547 / 44548 relating to the operating features of electric cookers for household use. • EN 55014-2 / VDE 0875 part 14-2 • EN 55014 / VDE 0875 part 14/12.
Electrical Connection • Connect the cable form with the 21-pole compact connector to its counterpart in the built-in oven or switch box. Push the connecting cable to the side on the top of the oven. 1 • Following connection to the mains supply, all hotplates must be switched on, at the maximum setting, one after the other for approx. 30 seconds to check that they function correctly.
SERVICE In the “What to do if …” section a number of malfunctions are listed that you can rectify yourself Look there first if a fault occurs. Is it a technical fault? If so, please contact your customer service centre. (You will find addresses and telephone numbers in the section “Customer Service Centres”.) Always prepare in advance for the discussion.
Montage / Assembly / Montaggio Ïäçãßåò åãêáôÜóôáóçò / Monta¿ 102
Ausbau / Removal / Démontage / Smontaggio / áöáéñÝóôå 103