It is most important that this instruction book should be retained with the appliance for future reference, Should the appliance be sold or transferred to another owner, or should you move house and leave the appliance, always ensure that the book is supplied with the appliance in order that the new owner can be acquainted with the functioning of the appliance and the relevant warnings. Warnings Electric cookers THESE WARNINGS ARE PROVIDED IN THE INTEREST OF SAFETY.
Never line any part of the oven with aluminum foil. Easy clean liners should never be leaned with anything other than soapy water, (See cleaning instructions). This appliance is heavy and care must be taken when moving it Before any maintenance or cleaning work is carried out on the appliance, always switch off the isolation switch at the cooker point, Ensure Thai the anti-tip oven shelves are put in place in the correct way.
Contents Technical Data., . . . Page 5 When the oven is first installed Page 5 Use and Care Page & Using the oven. . . . Page 8 Digital Clock/ Programmer . Page 10 Electric Plate Hobs Page 13 Cleaning the oven. . Page 14 Removing/Replacing the oven door . Page 16 Removal/ Replacement of oven lamp .. . . Pagel® Safe cutoff hob . . . Page 19 What happens if something goes wrong . . Page 19 Gaussian guarantee conditions .
Installation It is mandatory that all operations required for the installation be carried out by QUALIFIED PERSONNEL in accordance with existing rules and regulations. The relevant instructions are to be found in the special sheet for the installer. This appliance meets the requirements laid down in EEC Directive No. 82/499 dated 7/6/1982 relating to the suppression of radio and TV interference.
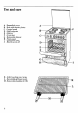
Use and care Enameled cover Hob with electric plates Control panel Shelf supports Shelves Oven door Removable drawer Front panel Removable base Electrical cut off Grill/roasting pan, large Reversible grill pan insert M Removable handles (2 Off) =
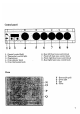
Control panel General control light 6 Rear left heat zone control knob 2 Thermostat control light 7 Front left heat zone control knob 3 Programmer 8 Front right heat zone control knob 4 Oven selector knob . 9 Rear right heat zone control knob 5 Oven thermostat knob Oven N Removable grill O Oven light P .
Using the oven (Fan Dusted) This is the Cuisinart system of cooking, "The heat source comes from a circular element surrounding the fan behind the back wall of the oven. The fan, which comes on automatically when the ovens turned on, distributes the warm air all around the oven so that the entire cavity is heated up evenly enabling foods to be cooked in the same time regardless of their position within the oven.
Electric grill To switch on the grill turn the oven control knob to & then tern the thermostat knob to the required temperature setting. The grill element is removable, To remove it pull outwards and always remember to insert the ceramic safety plug provided into the grill socket {Fig. 2). Foods to be grilled should be placed on the wire trivet in the grill pan. The trivet can be positioned either way up to give the required distance from the element.
Thermostat control knob (Fig. 3) By turning the thermostat control knob clockwise you select the cooking temperature, Temperature election starts at 50°C and is marked in 25°C increments up to maximum, where the temperature at the center of the oven will reach approximately 280°C. The thermostat controlling the temperature is totally variable 80 it is possible to select temperatures between those marked. The MAX setting is particularly suitable for grilling.
Fig. § Important For the oven to function dial 5 must show the same time as the time on the clock. To Set the Time of Day By turning knob 1 clockwise you can set the correct time of day. It will be necessary o do this on installation of the appliance, after a power failure or when the clock Is fast or slow. Knob 2 By turning this knob clockwise you ean enter on dial 4 the required duration of cooking, up to a maximum of 210 minutes.
Semi automatic operation of oven Manual cooking start Automatic cooking stop You may wish to put something in the oven before going out and programmer the oven 1o stop cooking before your return, Place the food to be cooked into the oven. "Turn knob 2 clockwise and set the required duration of cooking time on dial 4 {magi mum of 210 minutes). Turn the oven and thermostat control knobs to the required settings.
the hand symbol is centered on dial 4, thereby returning the oven to manual operation to continue cooking. Electric plate hobs The control panel incorporates knobs to operate the four heating elements. There are two different types of plates. Normal plate This is a 6 position nab where: O =off 1 = minimum power 6 = maximum power Positions 25 are the increasing power values up to maximum, Rapid plate This type is indicated by a red circle in the middle of the plate.
Cleaning your solid plate hob The enameled parts of the hob should be cleaned with a soft cloth soaked in warm soapy water, for more stubborn marks a light scouring cream may be used. Spills onto the actual plate should be moved using warm water and a soft brush, eg, toothbrush. To keep the plates looking as new, hob plate conditioner can be purchased from most hardware stores. {Follow the manufacturers instructions for use). Alternatively, wipe the plates with a drop of olive oil on a kitchen towel.
Shelves and Shelf supports To clean the chrome parts of the oven, soak in warm detergent water and remove stubborn marks with a well whetted soap impregnated pad. Rinse well and dry with 2 soft cloth. Do not use abrasive scourers or steel wool. Oven cavity "The enameled oven cavity is best cleaned whilst the oven is still warm. First remove the grill element and put the ceramic safety plug into the grill socket (Fig. 2).
ide panels after sliding them staining pins (Fig. 10), pull aut the gill heater (Fig, 2) and the top panel. av am Fig. 16 Warning: Before removing the back panel the oven must be disconnected and the safety plug put into the grill socket. To remove the back panel use a screwdriver (Fig. 11}, Wash the panels with very hot water and a detergent using a soft cloth. If the shelf supports or the panels become very soiled, use a standard caustic product specially made for cleaning ovens.
Fig. 124 To replace the door 1. Clasp the two hinges on either side of the door together simultaneously. 2. Hook the top hinge into the top slot, s0 that the hook is engaged with the roller. 3. Drop the lower hinge into the lower slot, so that the note is engaged. Drop the door down the horizontal position. Note It is important when carrying out this operation that both hinges be located simultaneously, 4. Turn the retaining discs back a quarter turn so that the two raised bars are opposite the hinges.
Removal/replacement of oven lamp (Fig. 18) {important Remember to disconnect the electricity supply before undertaking maintenance of any kind, Pushkin and unscrew anticlockwise the glass cap. Remove the faulty bulb and replace with one that resists to high temperatures (360°C). Electric bulb: 15W 240V (50 Ha), 300°C, E14.
Safety cut off hob Those ockers which have a lid, have a safety cut off device which cuts the fuel supply whenever the §id is lowered. This is ‘1o prevent the lid being lowered onto the heat areas of the hob which have inadvertently been left on. On electric cookers, should the lid be lowered when the plates are still on, the electricity supply to the hob and oven are automatically cut off. When the lid is raised again the power supply is automatically restored.
Peace of mind for twelve months GAUSSIAN STANDARD GUARANTEE CONDITIONS This guarantee is in addition to your statutory and other legal rights which will not be excluded or in any way diminished by the return of this guarantee card.
or five years GAUSSIAN 5 YEAR COVER CONDITIONS For a once-only payment you can extend your Standard Guarantee to 5 years. All the conditions and exclusions of the Standard Guarantee apply. Notes 1. Products supplied as "seconds”, refurbished, damaged or shop-soiled are not eligible for Gaussian § Year Cover. 2. The issue of a cover does NOT by virtue of our having done so, nullify the exclusions.
GAUSSIAN The appliance of science Gaussian. Ltd,, Gaussian House, New bury. The information in this manual is correct at time of going to p Gaussian reserve the right to alter cations without notice.