INSTRUCTION BOOKLET INSTRUÇÕES DE UTILIZAÇÃO DISHWASHER MÁQUINA DE LAVAR LOIÇA DWS 6706
ATTENTION! The appliance which you have just bought is supplied not only with this instruction manual, but also with a Warranty Card Certificate, on the back of which are written the relative conditions. Please fill in the necessary details on the Card Certificate and send it to the Zanussi Centre relative to the area in which the appliance is to be installed, within twenty days of the date of purchase. (See list of Zanussi network centres). We congratulate you on your choice.
CONTENTS Warnings . . . . . . . . . . . . . . . . . . . . . . . . . . . . . . . . . . . . . . . . . . . . . . . . . . . . . . . . . . . . . . . . . . . . . . .page 4 Installation . . . . . . . . . . . . . . . . . . . . . . . . . . . . . . . . . . . . . . . . . . . . . . . . . . . . . . . . . . . . . . . . . . . . . .page 5 Positioning, levelling, adjusting the worktop, installing and securing the machine under a kitchen unit . .page 5 Water supply connections, water outlet connection . . . . . . . . .
WARNINGS It is most important that this instruction book should be retained with the appliance for future reference. Should the appliance be sold or transferred to another owner, or should you move house and leave the appliance, always ensure that the book is left with the appliance in order that the new owner can get to know the functioning of the appliance and the relevant warnings. These warnings are provided in the interest of safety.
INSTALLATION Remove all packaging before positioning the machine. Installing and Securing the Machine Under a Kitchen Unit (Sink-Worktop Unit) Positioning By removing the machine's worktop, you can install it under a close fitting sink unit or a pre-existing top, if the dimensions of the recess correspond to those shown in the picture. If possible, position the machine next to a water tap and a drain. The sides and the back of the dishwasher can rest against the adjacent furniture or the wall.
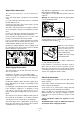
The problem is signalled by a red or yellow indicator which appears in window (B). If this happens, close the water tap and have the hose replaced. Water Outlet Connection Warning: the retaining ring (A) must be properly fitted so as to avoid water leaks. 2 A 1 A B C B CA13 Note: Only for water supply hoses with lock-fast safety device to prevent inadvertent loosening. To detach the hose press yellow lever (C) and turn the retaining ring anti-clockwise ➁.
USE Control panel A C 1 23 4 5 6 7 1. Pilot Light 6. Programme Marker This comes on when the ON/OFF button is depressed, indicating that the machine is on. 7. Programme Selector Dial 8 To select a programme, turn the Programme Selector Dial clockwise, making sure that the programme letter you wish to select corresponds with the programme marker (6) on the control panel. 2.
Levels 4 and 5 (adjustment on the machine) The Water Softener Water contains varying amounts of lime and mineral salts depending on the area in which you live: these are deposited on the dishes leaving white marks. If your water is level 4 or 5, open the door and drill membrane (A) on the upper left-hand corner of the machine. A The higher the content of these salts, the harder your water will be. The «hardness» level is measured on 2 equivalent scales: German degrees or French degrees.
To open the dispenser lid, pull the catch (D). This will open it. To help you to correctly dose the right amount of detergent, inside the container there are two reference marks: Rinse Aid The use of this liquid ensures thorough rinsing, spot and streak free drying, making the water run quickly off the dishes for sparkling results. It is automatically added during the hot rinse.
Loading your Machine Arrange the spoons, dessert spoons, knives and other small items of cutlery in the racks on both sides of the cutlery basket. Before placing dishes in the machine, remove any scraps of food from the plates (small bones, toothpicks, fish bones, scraps of meat and vegetables, fruit skins etc.) to avoid clogging the filters and consequently reducing performance. Open the door and slide out the baskets to load the dishes.
Adjusting the Height of the Upper Basket If washing very large plates (over 27 cm and up to 31 cm in diameter) you can load them in the lower basket after moving the upper basket to the higher position as follows: A Move the front runner stops (A) of the upper basket outward and slide the basket out. Refit the basket in the higher position and replace the stops (A) in their original position.
PTP32GB 12 Crockery, party crockery Pots - Pans Crockery Pots - Pans Crockery Partial load to be completed later. This programme does not require any detergent. Lightly soiled, not dried up (i.e. meat, cooked or uncooked v egetables, milk coffee, drinks). Due to the shortness of this programme, no drying phase is provided.
Operating Instructions 7 Start the programme Insert the plug into the wall socket. 1 Check that the filters are clean Open the water tap. (see cleaning instructions) 2 Check that there is salt and rinse aid BIO Depress the ON/OFF pushbutton. The pilot light will come on and the machine will start. 3 Load the dishes Remove larger scraps of food. Pull the lower basket out and arrange the saucepans, plates and cutlery in it. SO150 If you wish to interrupt the wash at any time press button again.
MAINTENANCE AND CLEANING Cleaning the Central Filters Internal and External Cleaning (After each wash) You must ensure that the seals around the door, the detergent and rinse aid dispensers are cleaned regu larly with a damp cloth. Inspect the central filters (B) and (C) and remove any scraps of food with a brush, under running water. We recommend you carryout a maintenance wash every 3 months, by running a 65° C wash programme without dishes using detergent.
SERVICING Certain problems are due to lack of simple maintenance or oversights and can be solved easily without having to call out an engineer. The machine is noisy The machine will not start ■ The door has not been properly closed. ■ The plug is not properly inserted in the power socket. ■ There is no current at the socket. Check the fuse. The water tap is shut. ■ The water supply has been cut off. ■ The inlet hose is kinked. ■ The water inlet hose filter is clogged.