EN User manual Dishwasher ZDS 2010 2
Contents Safety information _ _ _ _ _ _ _ _ _ _ _ _ _ _ _ _ Control panel _ _ _ _ _ _ _ _ _ _ _ _ _ _ _ _ _ _ _ Washing programmes _ _ _ _ _ _ _ _ _ _ _ _ _ _ _ Use of the appliance _ _ _ _ _ _ _ _ _ _ _ _ _ _ _ Setting the water softener _ _ _ _ _ _ _ _ _ _ _ _ _ Use of dishwasher salt _ _ _ _ _ _ _ _ _ _ _ _ _ _ Use of rinse aid _ _ _ _ _ _ _ _ _ _ _ _ _ _ _ _ _ _ Loading cutlery and dishes _ _ _ _ _ _ _ _ _ _ _ _ Use of detergent _ _ _ _ _ _ _ _ _ _ _ _ _ _ _ _ _ 2 3 4 5 5 6 7 8 9 Setting and starting
• Do not change the specifications or modify this product. Risk of injury and damage to the appliance. • Do not use the appliance: – if the mains cable or water hoses are damaged, – if the control panel, worktop or plinth area are damaged, that you can get access to the inner side of the appliance. Contact your local Service Force Centre. • Do not drill into the sides of the appliance to prevent damage to hydraulic and electrical components.
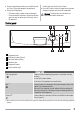
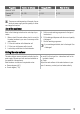
Programme knob and on/off indicator light – The on/off indicator light goes off (position OFF). • To set a washing programme, turn the programme knob clockwise or anticlockwise. The programme marker on the programme knob must agree with one of the washing programmes on the control panel. – The on/off indicator light comes on (position ON). • To set the appliance to the off position, turn the programme knob until the programme marker agrees with the on/off indicator light.
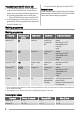
Programme Duration (in minutes) Energy (in kWh) Water (in litres) Quick 65° A 30' 30 0,8 8 Economy 50° 120 - 130 0,8 - 0,9 12 - 13 Prewash 11 0,1 5 The pressure and temperature of the water, the variations of power supply and the quantity of dishes can change these values. Use of the appliance Refer to the following instructions for each step of procedure: 1. Make a check if the water softener level is correct for the water hardness in your area. If necessary set the water softener. 2.
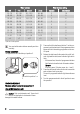
Water hardness Water hardness setting °dH °TH mmol/l Clarke manually electronically 51 - 70 91 - 125 9,1 - 12,5 64 - 88 2 10 43 - 50 76 - 90 7,6 - 9,0 53 - 63 2 9 37 - 42 65 - 75 6,5 - 7,5 46 - 52 2 8 29 - 36 51 - 64 5,1 - 6,4 36 - 45 2 7 23 - 28 40 - 50 4,0 - 5,0 28 - 35 2 6 19 - 22 33 - 39 3,3 - 3,9 23 - 27 2 5 15 - 18 26 - 32 2,6 - 3,2 18 - 22 1 4 11 - 14 19 - 25 1,9 - 2,5 13 - 17 1 3 4 - 10 7 - 18 0,7 - 1,8 5 - 12 1 2 <4 <7 < 0,7 <5 11)
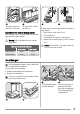
2 1 5 6 It is normal that water overflows from the salt container when you fill it with salt. 3 Fill the salt container with 1 litre of water (only the first operation). 4 Make sure that there is no grain of salt outer of the salt compartment. Salt which stays on the tank for a while drills the tank. It is recommended to start a washing programme immediately after you fill the salt container. This prevents of corrosion because of spilled salt.
Caution! Do not fill the rinse aid dispenser with other products (e.g. dishwasher cleaning agent, liquid detergent). There is a risk of damage to the appliance. Adjusting the dosage of rinse aid The rinse aid dial is set at the factory at position 4. To increase or decrease the dosage refer to 'What to do if...' Loading cutlery and dishes Helpful hints and tips Caution! Only use the appliance for household utensils that are applicable for dishwashers.
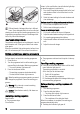
1 Arrange the items to let water touch all surfaces. 2 For longer items, fold the cup racks up. Adjustment of the height of the upper basket If you put large plates in the lower basket, first move the upper basket to a upper position. Warning! Adjust the height before you load the upper basket. Maximum height of the dishes in : upper basket lower basket Upper position 20 cm 31 cm Lower position 24 cm 27 cm 1 2 Do these steps to move the upper basket to the upper or lower position: 1.
tainers. In this condition the rinse aid indicator light stays on when the appliance is switched on. 1. Do a check if these tablets are applicable for the local water hardness. Refer to the instructions from the manufacturer. 2. Select the lowest setting for the water hardness and rinse aid dosage. 6 5 Different brands of detergent dissolve in different times. Some detergent tablets do not have the best cleaning results during short washing programmes.
Do not open the door during the countdown to prevent interruption of the countdown. When you close the door again, the countdown continues from the point of interruption. Cancelling a delay start: 1. Press and hold the start/cancel button until, the start/ cancel indicator light and delay start indicator light go off. 2. Press the start/cancel button to start the washing programme. End of the washing programme Switch off the appliance in these conditions: • The appliance stops automatically.
External cleaning Clean the external surfaces of the appliance and control panel with a damp soft cloth. Only use neutral detergents. Do not use abrasive products, scouring pads or solvents (acetone, trichloroethylene etc...). If not possible, empty the appliance and close the door. Disconnect the water inlet hose and remove water from the water inlet hose. Frost precautions Caution! Do not install the appliance where the temperature is below 0 °C.
Fault code and malfunction The programme does not start Possible cause and solution • The appliance door is not closed. Close the door. • Mains plug is not connected in. Put in the mains. • The fuse has blown out in the household fuse box. Replace the fuse. • Delay start is set. Cancel the delay start to start the programme immediately. After the check, switch on the appliance. The programme continues from the point of interruption. If the malfunction shows again, contact your Service Force Centre.
Depth cm 60,5 Electrical connection - Voltage Overall power - Fuse Information on the electrical connection is given on the rating plate on the inner edge of the dishwasher door. Water supply pressure Minimum 0,5 bar (0,05 MPa) Maximum 8 bar (0,8 MPa) Capacity Place settings 9 Environment concerns The symbol on the product or on its packaging indicates that this product may not be treated as household waste.
Install the appliance worktop to the appliance if you want to use the dishwasher as a freestanding appliance. The plinth on freestanding appliance is not adjustable. Adjusting the level of the appliance 4 3 Make sure that the appliance is level to close and seal the door correctly. If the level of the appliance is correct, the door does not catch on the sides of the cabinet. If the door does not close correctly, loosen or tighten the adjustable feet until the appliance is level.
Electrical connection Warning! The manufacturer is not responsible if you do not follow these safety precautions. Ground the appliance according to safety precautions. Make sure that the rated voltage and type of power on the rating plate agree with the voltage and the power of the local power supply. Always use a correctly installed shockproof socket. Do not use multi-way plugs, connectors and extension cables. There is a risk of fire. Do not replace the mains cable yourself.
www.zanussi.com 117952391 - 00 - 072009 To buy accessories, consumables and spare parts at our online shop please visit: www.zanussi.co.