DISHWASHER DA 6141 D 152969 74/0 Instruction book UK
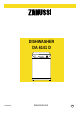
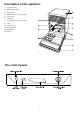
Description of the appliance 1. Upper basket stop 2. Water hardness switch 3. Salt container 4. Detergent dispenser (type A / type B) 5. Control panel 6. Rating plate 7. Rinse aid dispenser (type A / type B) 8. Filters 9. Lower spray arm 10. Upper spray arm 11. Upper basket 12.
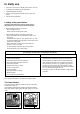
In daily use ● Check if it’s necessary to refill with special salt or rinse aid ● Load cutlery and dishes into the dishwasher. ● Fill with dishwasher detergent . ● Select a wash programme suitable for the cutlery and dishes. ● Start the wash programme. Loading cutlery and dishes Sponges, household cloths and any object that can absorb water may not be washed in the dishwasher. ● Before loading the dishes, you should: - Remove large left-overs.
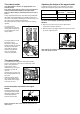
The cutlery basket Adjusting the height of the upper basket Long bladed knives stored in an upright position are a potential hazard. Long and/or sharp items of cutlery such as carving knives must be positioned horizontally in the upper basket. Take care when loading or unloading sharp items such as knives. If washing very large plates you can load them in the lower basket after moving the upper basket to the higher position.
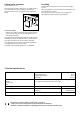
Washing programmes Programme (1) 65°c INTENSIVE Type of load and degree of soil Heavy soil. Crockery, cutlery, pots and pans Starting position of the programme selector dial (3) Consumption values Cycle description Energy Programme consumption duration (in kWh) (in minutes) A Cold prewash Main wash up to 65°C 1 cold rinse 1 hot rinse Drying 110 - 120 1,15 - 1,24 16 - 18 95 - 105 1,15 - 1,24 13 - 15 30 - 40 1,05 - 1,15 11 - 13 12 0,1 10 65°c NORMAL Normal soil.
Starting a washing programme 1. Check that the baskets have been loaded correctly and that the spray arms can rotate freely 2. Turn on the water tap 3. Close the dishwasher door 4. Setting and starting the programme Turn the programme selector dial clockwise until the letter of the programme you wish to select corresponds with the programme marker on the control panel (see "Washing programmes" chart). Depress the On/Off push button; the On/Off indicator light will come on and the machine will start. 5.
Fitting under a counter Levelling (kitchen worktop or sink) Good levelling is essential for correct closure and sealing of the door. By removing the machine’s worktop, you can install it under a close fitting sink unit or a pre-existing top, providing the dimensions of the recess correspond to those shown in the picture. If the door does not close correctly, loosen or tighten the adjustable feet until the machine is perfectly level.
Service and Spare Parts ● All service work under this guarantee must be undertaken by a Zanussi Service Force Centre. In the event of your appliance requiring service, or if you wish to purchase spare parts please contact your local Service Force Centre by telephoning: ● Any appliance or defective part replaced shall become the Company’s property. ● This guarantee is in addition to your statutory and other legal rights. 08705 929929 Home visits are made between 8.30am and 5.30pm Monday to Friday.
Hints for test centres Testing in accordance with EN 60704 must be carried out with appliance fully loaded and using the test programme (see "Washing programmes" chart). Test in accordance with EN 50242 must be carried out when the salt dispenser and rinse aid container have been filled with salt and rinse aid respectively and using the test programme (see "Washing programmes" chart).
From the Electrolux Group. The world’s No.1 choice. The Electrolux Group is the world’s largest producer of powered appliances for kitchen, cleaning and outdoor use. More than 55 million Electrolux Group products (such as refrigerators, cookers, vacuum cleaners, chain saws and lawn mowers) are sold each year to a value of approx. 14 billion USD in more than 150 countries around the world.
Instruction book Dishwasher Before use Maintenance Installation
Contents Safety instructions 2 Disposal 3 Economical and ecological dishwashing 3 Prior to using for the first time The water softener Setting the water softener Filling with salt Rinse aid Use of detergent 3 3 3 3 4 6 Maintenance and cleaning Cleaning the filters Prolonged periods of non-operation Frost precautions Moving the machine 7 7 7 7 7 What to do, when...
For the disposing of the appliance please take it to a recycling centre or to your dealer who will, for a small contribution to the costs, dispose it for you. Disposal Dispose of the dishwasher packaging material correctly. All packaging materials can be recycled. Plastic parts are marked with standard international abbreviations: >PE< for polyethylene, e.g. sheet wrapping material. >PS< for polystyrene, e.g. padding material (always CFCfree). >POM< for polyoxymethylene, e.g. plastic clips.
Only use salt specifically designed for use in dishwashers. All other types of salt not specifically designed for use in a dishwasher, especially table salt, will damage the water softener. Only fill with salt just before starting one of the washing programmes (except the Rinse and Hold programme). This will prevent any grains of salt or salty water, which may have been spilt, remaining on the bottom of the machine for any period of time, which may cause corrosion.
Filling with rinse aid Top up with rinse aid when: (Rinse aid dispenser type B) 1. The indicator (B) becomes clear, 1. Open the container by turning the lid (A) anticlockwise. 2. Fill with rinse aid exactly up to the level indicator marked "max". BR11 BR03 Ensure the lid is closed after every refill. 2. Only for dishwasher models with rinse aid indicator light: When the rinse aid indicator light on the control panel illuminates (when the machine is switched on).
Use of detergent Detergent tablets Only use detergents specifically designed for use in dishwashers. Detergent tablets of different brands dissolve at different speeds. For this reason some detergent tablets cannot develop their full cleaning power during short programmes. Therefore please use normal programmes with prewash when using detergent tablets. Using no more then the correct amount of detergent contributes to reducing pollution.
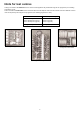
Maintenance and cleaning 8. Place the coarse/fine filter in the microfilter and press together. Clean the external surfaces of the machine and control panel with a damp soft cloth. If necessary use only neutral detergents. Never use abrasive products, scouring pads or solvent (acetone, trichloroethylene etc....). 9. Put the filter combination in place and lock by turning the handle clockwise to the stop.
What to do, when... Certain problems are due to the lack of simple maintenance or oversights, which can be solved with the help of the instructions given here, without calling out an engineer. ...there are problems when operating the dishwasher The dishwasher will not start or stops during operation. All push buttons are inoperative except for the On/Off push button. Press the On/Off push button to switch the dishwasher off and carry out the following suggested corrective actions.
...the wash results are not satisfactory The dishes are not clean ● ● ● ● ● ● ● ● The wrong washing programme has been selected. The dishes were arranged in such a way as to stop water reaching all parts of the surface. The baskets must not be overloaded. The spray arms do not rotate freely due to wrong arrangement of the load. The filters in the base of the washing compartment are dirty or incorrectly positioned. Too little or no detergent has been used.
Installation instructions Any electrical and/or plumbing work required to install this appliance should be carried out by a qualified electrician and/or plumber or competent person. Water outlet hose connection The end of the drain hose can be connected in the following ways: Remove all packaging before positioning the machine. 1. To the sink outlet spigot, securing it to the underside of the work surface. This will prevent waste water from the sink running into the machine.
Electrical connection This appliance must be earthed. The manufacturer declines any responsibility should this safety measure not be observed. The appliance should not be connected to the electrical supply by means of an extension cable. If the plug that is fitted to your appliance is not suitable for the socket, it must be cut off and the appropriate plug fitted.
152971 08/0 Subject to change without notice 0 01/03