DISHWASHER DA 4342 152977 35/2 INSTRUCTION BOOK - part 2 UK
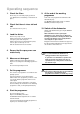
Description of the appliance 1. Water hardness adjustment 2. Levelling spacers 3. Upper basket stop 4. Upper spray arm 5. Salt container 6. Detergent dispenser 7. Control panel 8. Rinse aid dispenser 9. Filters 10. Lower spray arm 11. Upper basket 12. Worktop IN115 The control panel 1. ON-OFF indicator light 6. Programme sequence indicator As the programme progresses, the programme selector dial turns, to show the phase in the wash programme the appliance has reached. 2.
Washing programmes Type of load INTENSIVE 65°C * ECONOMY 50°C NORMAL 65°C RINSE & HOLD Degree of soil Heavy soil. Crockery and cutlery Normal soil.
Operating sequence 1. Check the filters 9. At the end of the washing programme Ensure they are clean and properly positioned (see "Maintenance and cleaning" - Instruction book part 1). At the end of the programme the dishwasher will automatically stop. The ON-OFF indicator light remains on until the ON-OFF push button is depressed. 2. Check that there is rinse aid and salt 10. Switch off the dishwasher (See "Instruction book - part 1") Switch off the dishwasher by pressing the ON-OFF push button.
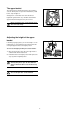
Using your appliance Loading your appliance Before placing dishes in the machine, remove any scraps of food, to avoid clogging the filters and consequently reducing the performance. Do not load very small items which can fall through the baskets. UI61 The lower basket The lower basket is designed to take saucepans, lids, plates, salad bowls, cutlery etc. Serving dishes and large lids should be arranged around the edge of the basket, ensuring that the upper spray arm can turn freely.
The upper basket The upper basket is designed for plates (dessert plates, saucers, dinner plates of up to 24 cm in diameter), salad bowls, cups and glasses. Arrange items so that water can reach all surfaces. Light items (plastic bowls etc.) should be loaded in the upper basket and arranged so they do not move. Before closing the door, ensure that the spray arms can rotate freely.
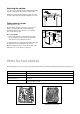
Adjusting the worktop You can move the worktop forward or backward by 25 mm in order to align the machine with other kitchen units. Simply unscrew the two front retaining screws, move the top to the required position and then retighten the screws. Fitting under a counter (kitchen worktop or sink) IN02 By removing the machine’s worktop, you can install it under a close fitting sink unit or a pre-existing top, providing the dimensions of the recess correspond to those shown in the picture.
From the Electrolux Group. The world’s No.1 choice. The Electrolux Group is the world’s largest producer of powered appliances for kitchen, cleaning and outdoor use. More than 55 million Electrolux Group products (such as refrigerators, cookers, vacuum cleaners, chain saws and lawn mowers) are sold each year to a value of approx. 14 billion USD in more than 150 countries around the world.