ELECTRIC OVENS FOURS ÉLECTRIQUES ELEKTRO-BACKÖFEN MEER-SYSTEMEN INBOUWFORNUIZEN HORNOS ELÉCTRICOS FORNOS ELÉCTRICO ÇËÅÊÔÑÉÊÏÓ ÖÏÕÑÍÏÓ BMS 641 - BST 6 INSTRUCTION BOOKLET - NOTICE DUTILISATION GEBRAUCHSANWEISUNG - GEBRUIKSAANWIJZING MANUAL DE INSTRUCCIONES - INSTRUÇÕES DE UTILIZAÇÃO ÏÄÇÃÉÅÓ ×ÑÇÓÇÓ
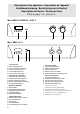
Description of the appliance - Description de l’appareil Gerätebeschreibung - Beschrijving van het toetsel Descripción del horno - Descriçao forno ÐåñéãñáöÞ ôïõ öïýñíïõ Mod. BMS 641 W/N/Y/A - BST 6 1 °C °C - + 2 3 4 Mod. BMS 641 X - + 1 2 5 3 4 1. 2. 3. 4. 5. Control panel: Electronic programmer Oven Thermostat control light Oven function control knob Thermostat control knob Oven function control light 1. 2. 3. 4. 5.
0 FO 0027 FO 0799 Fig. 5 Fig. 9 Fig. 6 Fig. 10 50 Fig. 1 100 MAX 0 20 150 Fig. 2 A U T O 4 3 2 - + 1 FO 0438 FO 2110 FO 0336 Fig. 3 FO 0350 Fig. 7 FO 0288 Fig. 4 Fig. 11 FO 0018 Fig. 8 Fig.
FO 0287 FO 2160 Fig. 13 Fig. 17 Mod. PROD. NO. SER. NO. MOD. PROD. NO. TYPE SER. NO. FO 0039 Fig. 14 Fig. 18 FO 0986 FO 0207 Fig. 15 FO 0290 4 Fig. 19 FO 2159 Fig. 16 Fig.
ENGLISH Important Safety Information You MUST read these warnings carefully before installing or using the oven. If you need assistance, contact our Customer Care Department on 08705 727727 Installation Maintenance and Cleaning This oven must be installed by qualified personnel to the relevant British Standards. This oven is heavy. Take care when moving it. Remove all packaging, both inside and outside the oven, before using the oven. Do not attempt to modify the oven in any way.
Contents Controls For the User Oven Function Control Knob (Fig.
24 hour Clock and Timer The electronic timer can indicate the time of day, operate as a minute minder and automatically operate the oven. Before the oven can be operated, the time of day must be set on the electronic timer. Please note that this is a 24 hour clock. For example, 2pm is shown as 14:00. In case of loss of power, all the settings (time of day, set program or program in operation), will be cancelled.
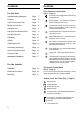
Before the First Use Remove all packaging, both inside and outside the oven, before using the oven. Before first use, the oven should be heated without food. During this time, an unpleasant odour may be emitted. This is quite normal. Push-Pull Control Knobs (Fig. 4 - Page 3) All the models, except model BMS 641 X, are provided with push-pull control knobs. These knobs can be completely sunken inside the control panel when the oven is not working. 1.
Using the Conventional Oven When using this setting, heat comes from both the top and bottom elements. This allows you to cook in a single level and is particularly suitable for dishes which require extra base browning such as pizzas, quiches and flans. Gratins, lasagnes and hotpots which require extra top browning also cook well in the conventional oven. This form of cooking gives you the opportunity to cook without the fan in operation.
Cooking Chart - Conventional Oven Food Temperature (°C) Runner Positions Cooking Time (mins) Biscuits 170-200 2/3 25-30 Bread, buns, yeast, doughs 200-230 2 35-45 Casseroles 140-170 2 90-180 Cakes - small, Queen Victoria sponge 170-190 2/3 18-25 Cakes - madeira, rich fruit 130-180 2 90-150 Choux pastry, eclairs 200-230 2 30-35 Fish 200-230 2/3 20-40 Fruit pies, plate tarts, crumbles 180-210 2 50-65 Meringues 90-100 2 90-150 Milk puddings 140-160 2 90-150 Pate, ter
Using the Fan Oven The air inside the oven is heated by the element around the fan situated behind the back panel. The fan circulates hot air to maintain an even temperature inside the oven. The advantages of cooking with this function are: Faster Preheating As the fan oven quickly reaches temperature, it is not usually necessary to preheat the oven although you may find that you need to allow an extra 5-7 minutes on cooking times.
Defrosting i The oven fan operates without heat and circulates the air, at room temperature, inside the oven. This increases the speed of defrosting. However, please note that the temperature of the kitchen will influence the speed of defrosting. This function is particularly suitable for delicate food which could be damaged by heat, e.g. cream filled gateaux, iced cakes, pastries, bread and other yeast products.
Grilling Grilling must be carried out with the oven door closed. The grill pan handles must be removed from the pan. The inner grill provides quick direct heat to the central area of the grill pan. By using the inner grill element for cooking small quantities, it can help to save energy. How to Use the Grill 1. Turn the oven control function knob on . 2. Turn the thermostat control knob on the required temperature. 3.
Cooking Chart - Grilling FOOD Grill and Inner Grill Element Temp (°C) Time (Mins) 2-3 6-10 200 190 8-12 10-15 170 180 10-15 7-10 160 170 35-45 20-25 - Pork - Whole Trout/Herring 180 170 10-15 8-12 170 170 25-35 10-20 - Fillets Plaice/Cod 170 180 4-6 10-15 170 170 10-20 20-30 - Lamb/Pig - Lamb/Pig 170 170 4-6 5-10 180 180 10-15 20-30 180 250 10-15 1-2 190 -- 10-15 - - 170 20-30 Temp (°C) Time (Mins per side) Bacon Rashers Beefburgers 210 200 Chicken Joints Chops - Lamb F
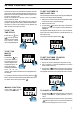
Grease Filter (Fig. 12 - Page 3) Oven Shelves To prevent a build-up of fats on the fan impellor, the grease filter must be fitted by clipping it over the vents in the back panel. To clean the oven shelves, soak in warm soapy water and remove stubborn marks with a well wetted soap impregnated pad. Rinse well and dry with a soft cloth. The shelf supports can be removed for easy cleaning (see diagram). Please, ensure the retaining nuts are secure when refitting the shelf support.
Something not working If the oven is not working correctly, please carry out the following checks, before contacting your local Service Centre. SYMPTOM n The oven does not come on SOLUTION u Check the oven is in manual operation and that both a cooking function and temperature have been selected. u Check the oven is wired in properly, and the socket switch or the switch from the mains supply to the oven are ON.
Customer Care For general enquiries concerning your Zanussi appliance or for further information on Zanussi products, please contact our Customer Care Department by letter or telephone at the address below or visit our website at www.zanussi.co.uk Customer Care Department Zanussi 55-77 High Street Slough Berkshire SL1 1DZ 08705 727727 (*) * calls to this number may be recorded for training purposes.
To contact your local Service Force Centre telephone 08705 929 929 CHANNEL ISLANDS GUERNSEY Guernsey Electricity PO Box 4 Vale, Guernsey Channel Islands GY1 3AD JERSEY Jersey Electricity Company Haut De Lorme Rue De Haut De Lorme Trinity Jersey Channel Islands JE3 5FG SCOTLAND ABERDEEN 54 Claremont Street Aberdeen AB10 6RA AUCHTERMUCHTY 33a Burnside Auchtermuchty Fife KY14 7AJ BLANTYRE Unit 5 Block 2 Auchenraith Ind.
To contact your local Service Force Centre telephone 08705 929 929 MIDLANDS BIRMINGHAM 66 Birch Road East Wyrley Trading Estate Witton Birmingham B6 7DB BOURNE Pinfold Road Bourne PE10 9HT BRIDGNORTH 68 St.
Installation The oven must be installed according to the instructions supplied. This oven must be installed by qualified personnel to the relevant British Standards. Technical Data DIMENSIONS Height 580 mm. OF RECESS Width 560-570 mm. Depth 550 mm. DIMENSIONS Height 320 mm. OF THE Width 420 mm. OVEN CAVITY Depth 390 mm. Oven capacity 53.
Building In Please ensure that when the oven is installed it is easily accessible for the engineer in the event of a breakdown. The surround or cabinet into which the oven will be built must comply with these specifications: l l l the dimensions must be as shown in the relevant diagrams; the materials must withstand a temperature increase of at least 60°C above ambient; proper arrangements must be made of a continuous supply of air to the oven to prevent the oven overheating.