ELECTRIC OVENS BMF 849 BMS 841 INSTRUCTION BOOKLET 35668-7105 10/01 IL
English Important Safety Information These warnings are provided in the interest of safety. You MUST read them carefully before installing or using the appliance. Installation It is mandatory that all operations required for the installation are carried out by a qualified or competent person, in accordance with existing rules and regulations. It is dangerous to alter the specification in any way.
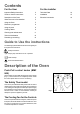
Contents For the User For the Installer Important Safety Information 2 Technical Data 14 Guide to Use the instructions 3 Installation 15 Description of the Oven 3 Electrical connection 16 When the oven is first installed 5 Using the Oven 5 Electronic programmer 6 Using the oven 8 Cooking Tables 9 Cleaning and maintenance 11 Technical Assistance 13 Something not working...
Oven function control knob (Fig. 2) Model BMF 849 The oven function control knob can have the following symbols and functions: Oven Light - The oven light will be on without any cooking function Conventional cooking - The heat comes from both the top and bottom element, ensuring even heating inside the oven. Top heating element - The heat comes from the top of the oven only. Bottom heating element - The heat comes from the bottom of the oven only.
When the oven is first installed F Before cooking for the first time, carefully wash the oven accessories. The oven will work only if the time of day has been set with the electronic programmer. Once the oven has been installed: a) set the thermostat knob to MAX (250); b) switch the oven function control knob to conventional ); cooking ( c) allow the oven to run empty for approximately 45 minutes; d) open a window for ventilation. During this time, an unpleasant odour may be emitted.
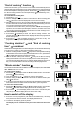
Electronic programmer 1. Push button for selecting a function 4 2. Decreasing control button 5 6 7 8 3. Increasing control button 4. Display 5. Cooking Duration pilot lamp 6. End of cooking pilot lamp 7. Minute minder pilot lamp Fig. 7 2 1 3 FO 2571 8. Time of day pilot lamp The oven will work only if the time of day has been set. Moreover, the oven can also be operated without any programme.
End of cooking function Thanks to this function, you can set the oven to switch off automatically when a programmed end of cooking time is over. Place food in the oven, select a cooking function and adjust the cooking temperature. Press button repeatedly to select the End of cooking function. The relevant pilot lamp will start flashing. Then, proceed as follows: To set the End of cooking time: 1. press button or . 2.
Using the oven Always cook with the oven door closed Conventional cooking Turn the oven function control knob to the relevant symbol ( ) and set the thermostat knob on the required temperature. If you need more heat from the top or the bottom of the oven, turn the oven function control knob to (top heating element only) or (bottom heating element only). Fan cooking Turn the oven function control knob to the relevant symbol ( ) and set the thermostat knob on the required temperature.
Cooking Tables Conventional and fan cooking WEIGHT (GR.
Cooking Tables Grilling TYPE OF DISH 4 3 2 1 PIECES WEIGHT Level Steaks Chops Sausages Chicken (cut in pieces) Kebabs Chicken (breast) Tomatoes Fish (fillets) Sandwiches Toast 4 4 8 6 4 4 8 4 4 4 800 600 500 800 700 400 500 400 Cooking time (minutes) Grilling Quantity 4 4 4 3 4 4 4 4 4 4 temp.
Cleaning and maintenance General Cleaning Before carrying out any cleaning or manteinance work, always disconnect the appliance from the electrical supply, and allow it to cool down. When using spray cleaning products, be careful not to spread them on the heating elements or on the thermostat sensor. Never use harsh abrasives, steel wool or cleaners with bleach, as they could damage the enamel and the oven door glass.
Replacing the Oven Light Ensure the electricity supply is switched off before carrying out this operation. The oven bulb has to comply to these features: a) resistant to temperatures of 300 °C; b) electric rate: 230 V - 50 Hz; c) electric power rate: 25 W; d) connection type: E 14. To replace the bulb, proceed as follows (Fig. 11): a) push in and turn the glass lid anticlockwise; b) remove tha faulty bulb; c) replace it with a new one; d) refit the glass lid; e) switch on the electricity supply. Fig.
Something not working... If the appliance is not working correctly, please carry out the following checks, before contacting your local Service Centre. SYMPTOM SOLUTION n The oven does not come on uCheck that both a cooking function and a temperature have been selected or uCheck the appliance is wired in properly, and the socket switch or the switch from the mains supply to the oven are ON.
Technical Data Recess dimensions Height in-column 58,0 cm undertop 59,1 cm Width 56,0 cm Depth 55,0 cm Oven cavity dimensions Height 32,5 cm Width 42,0 cm Depth 39,0 cm Volume 53 l Heating elements ratings Bottom heating element 1000 W Top heating element Full Oven (Top+Bottom) 800 W (1000 + 800) 1800 W Simple Grill heating element 1750 W Double Grill heating element 2550 W Oven rear heating element 2000 W Convection fan 30 W Cooling fan 25 W Oven lamp 25 W Voltage tension
Installation The following instructions are meant to a qualified technician, in order to allow him carry out the installation in compliance with the rules in force. The building-in and the electrical connection fo the appliance must be carried out by a qualified and authorized technician only. Building In It is important that the dimensions and materials of the surround or cabinet into which the oven will be built are correct and will withstand a temperature increase. Fig.
Electrical connection Before the appliance is connected: 1) check that the main fuse and the domestic installation can support the load; 2) check that the power supply is properly earthed in compliance with the current rules; 3) check the socket or the double pole switch used for the electrical connection can be easily reached with the appliance built in the forniture unit. This appliance is supplied without connection cable. A suitable one must be fitted, in compliance with the electric supply rate.
לפני חיבור התנור לשקע החשמל: .1ודאו שהנתי ומערכת החשמל הביתית בנויה לעומס של התנור. .2חברו את התנור לשקע ע הארקה בלבד. .3חברו את התנור לשקע נגיש )כלומר שנית לנתק את התקע בקלות(. המכשיר מסופק ללא כבל חיבור לחשמל .יש לחבר כבל המתאי למערכת החשמל באר . חברו את כבל ההזמה באופ שלא יעבור ליד משטח שדרגת החו שלו עולה ב 50מעלות מעל טמפ' החדר. החלפת כבל הזנת החשמל במידה ויש צור להחלי את כבל החשמל ,התקשרו למחלקת השרות שלנו.
הוראות למתקי חשוב!! הכיריי יותקנו בידי טכנאי מוסמ בלבד. היצר לא יהיה אחרי בגי נזקי שיגרמו עקב התקנה עצמית או כזו הנוגדת את הוראות היצר ,או אי מילוי הוראות הבטיחות המופיעות בחוברת. על מנת שהתנור יפעל בצורה טובה בגומחה ,חובה להציבו במטבח מאוורר היטב . מידות התנור ראו איור 14משמאל מידות גומחה בטור ראו איור 15 מידות גומחה תחת השיש ראו איור 16 חיבור התנור לארו • • • הכניסו את התנור לגומחה.
במקרה של קושי או בעיה במידה ויש קושי בהפעלת הכיריי או התנור ,או שפעולת אינה תקינה ,מומל לבצע את הבדיקות הבאות בכוחות עצמכ לפני שתפנו למח' השרות התופעה/הבעיה התנור לא מתחמ פתרו אפשרי הטמפרטורה נמוכה מדי הנורה לא דולקת • ודאו שבורר התכניות והתרמוסטט מכווני במצב הפעלה. • ודאו שתקע הכבל מחובר לשקע החשמל. • סובבו את התרמוסטט לטמפרטורה הרצויה. או התקינו את התכנית הרצויה ע בורר התכניות. • התקינו את התכנית הרצויה ע בורר התכניות. או הנורה שרופה .
החלפת הנורה )איור (11 נתקו תחילה את תקע כבל החשמל מהשקע. נתוני : בחו של .300ºC מתח230 (50Hz) : זר W25 : שחררו את הנורה והחליפו בנורה חדשה המתאימה לתנור: א .לחצו את מכסה הנורה פנימה וסובבו אותו נגד סיבוב השעו . ב .הסירו את הנורה השרופה. ג .החליפו אותה בנורה חדשה. ד .החזירו את המכסה. ה .חברו את תקע כבל התנור לשקע החשמל. הסרת גו הגריל )איור (12 בחלק מהדגמי נית להסיר את גו הגריל כדי לנקות את תקרת התנור.
ניקוי ותחזוקה כללי לפני ביצוע פעולות ניקוי או תחזוקה יש לנתק את כבל החשמל מהשקע. הניקוי יהיה טוב יותר כשהכיריי חמות וטר התקררו לחלוטי . אי לנקות ע החומרי הבאי : • דטרגנטי חריפי וחומרי הלבנה. • מברשות או כריות ניקוי קשות או זיפיות )סקוטש ברייט וכו'(. • ברזל כלי . • מסירי אבנית ניקוי חלל התנור יש לנקות את חלל התנור בעודו ח מעט ע תמיסת סבו כלי ומי פושרי .כשהתנור ח נית לנקותו ביתר קלות. אי לנקות ע תרסיסי כיוו שה פוגעי בשכבת הציפוי.
גריל סוג המזו סטייקי נקניקיות נתחי עו קבב חזה עו חצאי עגבניות דגי ,פילה פרוסות לח כמות מספר הנתחי 4 8 6 4 4 8 4 4 גריל גרמי קומה 4 4 3 4 4 4 4 4 800 500 800 700 400 500 400 טמפ' )(ºC מקס' מקס' מקס' מקס' מקס' מקס' מקס' מקס' משכי הבישול )בדקות( מינ' מקס' 10 10 30 12 13 12 8 23 8 6 20 10 10 6 1
מדרי לבישול סוג המזו מאוורר)טורבו( טמפ' )(ºC קומה בישול מסורתי טמפ' )(ºC קומה מש בישול הערות )דקות( עוגות משקל )גר ( 2 1 2 1 1 2 2 2 2 2 180 180 180 175 180 175 180 180 180 100 1) 2ו (3 1) 2ו (3 1) 2ו (3 2 1) 2ו (3 1) 2ו (3 1) 2ו (3 1) 2ו (3 1) 2ו (3 1) 2ו (3 160 160 160 150 160 150 160 160
שימוש והפעלה בזמ ההפעלה הדלת חייבת להיות סגורה. בישול מסורתי טיפי ועצות לבישול בשר ודגי וכוונו את התרמוסטט העבירו את בורר התכניות למצב לטמפרטורה הרצויה. במידה ונדרש יותר חו מהחלק התחתו או העליו ,הורידו או הרימו את הכלי ,או העבירו את הבורר למצב או . נית להניח את הבשר בכלי עמידי לחו בתנור או ישירות על הרשת .במקרה זה הקפידו להניח תבנית בקומה התחתונה לאגירת הנוזלי והמיצי המטפטפי .הכניסו בה 2כוסות מי כדי למנוע היווצרות עש .
תכונת "סיו תכנית" הודות לתכונה זו ,התנור יכבה אוטומטית בשעה שתקבעו מראש. יש להניח את הכלי בתנור ,לבחור את התכנית הרצויה )בבורר התכניות( ,ולכוו את ובחרו באפשרות "."END OF COOKING הטמפרטורה .לחצו לחיצות חוזרות על לחצ נורית החיווי תתחיל להבהב .עתה בצעו את השלבי הבאי : כדי לכוו את שעת סיו התכנית .1כוונו את מש התכנית ע לחצני " " או "."+ .2כ 5שניות מסיו כיוו השעה ,נורית חיווי "סיו התכנית" תידלק ובתצוגה תופיע השעה. .
מתכנת אלקטרוני לחי עבור בחירת תכנית לחצ ) ( לחצ )(+ צג )תצוגה( .1 .2 .3 .4 .5נורית חיווי "מש התכנית" .6נורית חיווי "סיו התכנית" .7נורית חיווי שעו תזכורת . .8נורית חיווי "השעה ביממה" התנור יפעל רק א כיוונת את השעה קוד לכ .אול התנור יכול לפעול ללא תכנית. כיוו השעה כשמחברי את כבל החשמל לשקע ,או לאחר הפסקת חשמל ,נורית החיווי של השעה תהבהב בתצוגה. כיוו השעה .1לחצו על לחצ " " או על "."+ .
לפני השימוש בפע הראשונה יש להשלי את כל חומרי האריזה מהתנור. התנור יפעל רק לאחר שתכוונו את השעו ע המתכנת האלקטרוני לאחר התקנת התנור והצבתו: א .יש לכוו את התרמוסטט לטמפ' מרבית ).(250ºC )בישול קונבנציונלי(. ב .לסובב את בורר התכניות לסימ ג .להפעיל את התכנית ללא מזו במש 45דקות ריק )ללא מזו (. ד .לפתוח חלו לאוורור החדר. בזמ זה יתכ שעש וריחות לא נעימי ייפלטו מהתנור .אלו ה שאריות הדבק וכו' ששמשו לאריזות ולמשלוח. אי זו תקלה.
בורר התכניות )איור (2 בורר התכניות כולל את הסמלי הבאי ונית להפעיל באמצעותו את התכניות הבאות:: :תאורה התאורה תידלק ע בחירה בתכנית כלשהי. :בישול רגיל :החימו מגיע משני גופי החימו )עליו ותחתו ( .הדבר מבטיח חימו אחיד בחלל התנור. גו חימו עליו בלבד. גו חימו תחתו בלבד. גו הגריל הפנימי בלבד – מתאי במיוחד לצליית נתחי קטני . גריל כפול כל גו הגריל מתחמ גריל תרמי שיטת צלייה חליפית המתאימה לבישול קונבנציונלי. במצב זה ,גו הגריל והמאוורר פועלי יחד ,.
תוכ הענייני הוראות בטיחות חשובות2........................................................................................................................... מאפייני עיקריי של התנור 3................................................................................................................... לפני השימוש בפע הראשונה 5.................................................................................................................. שימוש בתנור 5.............................................
הוראות בטיחות חשובות יש לקרוא בעיו את ההוראות המופיעות בעמוד זה לפני ההתקנה ולפני הפעלת התנור בפע ראשונה. התקנה • • • ניקוי ותחזוקה • המכשיר יוצב ויותק במקומו על ידי טכנאי מוסמ בלבד. לאחר הסרת כל חלקי האריזה יש לוודא שהתנור לא ניזוק ושכבל החשמל במצב מושל .א אי הדבר כ התקשרו ע נציג החברה לפני ההתקנה. אי לבצע שינויי כלשה בכל צורה שהיא.
הוראות שימוש והפעלה לתנור גומחה דגמי BMF 849 / BMS 841 ראלקו סוכנויות בע"מ רחוב המצודה ,31אזור טל03 6508282 :