REFRIGERATOR ZI 9155 A ZI 9225 A INSTRUCTION BOOKLET 2222748-77
Important Safety Instructions These warnings are provided in the interests of your safety. Ensure that you understand them all before installing or using this appliance. Your safety is of paramount importance. If you are unsure about any of the meanings of these warnings contact the Customer Care Department. Prior to Installation General Safety • Check the appliance for transport damage. Under no circumstance should a damaged appliance be installed. In the event of damage please contact your retailer.
At the end of the Appliance Life • When disposing of your appliance use an authorised disposal site. The symbol on the product or on its packaging indicates that this product may not be treated as household waste. Instead it shall be handed over to the applicable collection point for the recycling of electrical and electronic equipment.
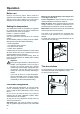
Operation Before use Remove all securing tapes. Wash inside the appliance with lukewarm water and bicarbonate of soda (5 ml to 0.5 litre of water). Do not use soap or detergent as the smell may linger. Dry thoroughly. Setting the temperature The temperature inside the refrigerator is regulated by a thermostat control knob with 6 temperature positions and one «OFF» (O) position. Position 1 = minimum coldness Position 6 = maximum coldness Turn the thermostat control knob to the required position.
Normal operating sounds You may hear faint gurgling or bubbling sounds when the refrigerant is pumped through the coils or tubing at the rear, to the cooling plate. When the compressor is on, the refrigerant is being pumped round, and you will hear a whirring sound or pulsating noise from the compressor. A thermostat controls the compressor, and you will hear a faint ‘click’ when the thermostat cuts in and out.
Defrosting The refrigerator automatically defrosts every time the compressor stops. The water is discharged, via the pipe, into a tray located at the back of the appliance above the compressor, where it evaporates. Important To avoid defrost water overflowing into the fridge, periodically clean the water discharge hole in the centre of the V shaped drip collector at the back of the refrigerator compartment behind the salad bin.
Something not Working? Before contacting your local Service Force Centre check the following points. IMPORTANT: If you call out an engineer to a fault listed below, or to repair a fault caused by incorrect use or installation, a charge will be made even if the appliance is under guarantee. Symptom Solution No power to appliance - Check there is power at the socket. - Check there is not a power cut by checking the household lights. - Check the fuse has not blown.
Service and Spare Parts In the event of your appliance requiring service, or if you wish to purchase spare parts, please contact your local Service Force Centre by telephoning:08705 929929 Your telephone call will be automatically routed to the Service Force Centre covering your post code area. For the address of your local Service Force Centre and further information about Service Force, please visit the website at www.serviceforce.co.
Guarantee Conditions Standard guarantee conditions We, Zanussi, undertake that if within 24 months of the date of purchase this Zanussi appliance or any part thereof is proved to be defective by reason only of faulty workmanship or materials, we will, at our option repair or replace the same FREE OF CHARGE for labour, materials or carriage on condition that: • The appliance has been correctly installed and used only on the electricity supply stated on the rating plate.
Technical specifications POWER SUPPLY VOLTAGE AND FREQUENCY TOTAL POWER ABSORBED AVERAGE DAILY UNITS ELECTRICITY (*) ZI 9155 A 220-240 V / 50 Hz 110 W 0,41 kWh ZI 9225 A 220-240 V / 50 Hz 140 W 0,44 kWh GROSS CAPACITY 158 l 230 l NET CAPACITY 154 l 228 l (*) This figure is based on standard test results in accordance with European Standard EN153. Actual consumption will depend on how the appliance is used and where it is located.
Door reversal The appliance’s door has been locked in position for transport by means of pins on both sides. According to the door opening direction, remove the relevant pins at the top and at the bottom. Attention After completion of the door reversing operation, check that the door gasket adheres to the cabinet. If the ambient temperature is cold (i.e. in Winter), the gasket may not fit perfectly to the cabinet.
Electrical Connection WARNING THIS APPLIANCE MUST BE EARTHED. The manufacturer declines any liability should this safety measure not be observed. If the plug that is fitted to your appliance is not suitable for your socket outlet, it must be cut off and the appropriate plug fitted. Remove the fuse from the cut off plug. The cut off plug should then be disposed of to prevent the hazard of shocks in case it should be plugged into a 13amp socket in another part of your home.
Building in Dimensions of the recess ZI 9155 A ZI 9225 A Height of housing (1) mm 880 1225 Depth of housing (2) mm 550 550 Width of housing (3) mm 560 560 1 50 540 2 3 2 D022 1. Fit the appliance in the niche by making sure that it stands against the interior surface of the unit on the side where the door hinges of the appliances are fitted.
Ha D C Hc E PR33 B 7. Fix cover (Hc) on guide (Ha) until it clips into place. 4. Snap vent grill (B) and hinge cover (E) into position. Apply blanking covers (C-D) as indicated. 8mm Hb Ha Ha Hc Hd PR167 PR266 5. Separate parts Ha, Hb, Hc, Hd as shown in the figure. Hb 8. Open the appliance door and the furniture door at 90°. Insert the small square (Hb) into guide (Ha). Put together the appliance door and the furniture door and mark the holes as indicated in the figure. ca.
Hb PR168 10. Place the small square on the guide again and fix it with the screws supplied. Should the alignment of the furniture door be necessary, use the clearance of slots. At the end of this procedure, it is necessary to check if the door of the furniture closes properly. Hb Hd PR167/1 11. Fix cover (Hd) on the small square (Hb) until it clips into place.
© Electrolux plc 2006