FREEZER ZI 9121 F © Electrolux Household Appliances Limited 2000 INSTRUCTION BOOKLET 2222 119-67
IMPORTANT SAFETY INFORMATION It is most important that this instruction book should be retained with the appliance for future reference. Should the appliance be sold or transferred to another owner, or should you move house and leave the appliance, always ensure that the book is left with the appliance in order that the new owner can get to know the functioning of the appliance and the relevant safety information. This information has been provided in the interest of safety.
CONTENTS Instructions for the User Important Safety Information 2 Instructions for the Installer Description of the Appliance 4 Technical Specifications 15 Operation 5 Installation Instructions 16 Before using 5 Electrical Connection 17 Starting your appliance 5 Temperature control 5 Building in 18 Freezing fresh food 5 Frozen food storage 5 Thawing 6 Making ice cubes 6 Hints and Tips 7 Defrosting 8 Maintenance and Cleaning 9 Internal cleaning 9 External cleaning 9 Whe
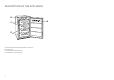
DESCRIPTION OF THE APPLIANCE B 5 4 6 1 3 2 3 C D A - Freezer calendar (recommended storage times for frozen foods) B - Freezer controls C - Compartments for freezing fresh foods D - Compartments for frozen food storage 4 6 9 12 A
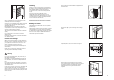
OPERATION Fix cover (C) on guide (A) until it clips into place. A 5 4 6 1 3 2 C A PR33 Open the appliance door and the furniture door at 90¡. Insert the small square (B) into guide (A). Put together the appliance door and the furniture door and mark the holes as indicated in the figure. Remove the squares and drill holes with ¿ 2 mm at 8 mm from the outer edge of the door. Place the small square on the guide again and fix it with the screws supplied.
Thawing 9 Kg 7 Kg D670 the top compartments of the freezer as this is the coldest part as shown in the diagram. Once the food is completely frozen (which could take up to 24 hours) press the fast freeze switch; the yellow light (B) goes off. Distribute the frozen food packages in the other compartments, so that the top compartment can be used for a further freezing operation. The food to be frozen must be fresh and of the best quality. Do not allow fresh food to touch food which is already frozen.
HINTS AND TIPS Instructions for totally built-in appliances Energy Saving Advice Normal Operating Sounds Door reversal ¥ Recess dimensions Height Depth Width min. 200 cm 50 mm 880 mm 550 mm 560 mm ¥ 2 ¥ The applianceÕs door has been locked in position for transport by means of pins on both sides. According to the door opening direction, remove relevant pins at the top and at the bottom. To ensure adequate ventilation, allow the clearances shown in figure. min.
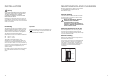
Defrosting When the frost has reached a thickness of up to 4mm it can be removed using the ice scraper provided with the appliance. During this operation it is not necessary to disconnect the appliance from the mains and remove the food. Never use metal tools for this operation. For complete defrosting (once or twice a year) proceed as follows: - turn the thermostat control knob to the ÇOFFÈ position (O) or disconnect the appliance from the mains.
INSTALLATION MAINTENANCE AND CLEANING Before any maintenance or cleaning work is carried out, DISCONNECT the appliance from the ELECTRICITY supply. Warning IF YOU ARE DISCARDING AN OLD APPLIANCE THAT HAS A LOCK OR CATCH ON THE DOOR, YOU MUST ENSURE THAT IT IS MADE UNUSABLE TO PREVENT YOUNG CHILDREN BEING TRAPPED INSIDE. Internal cleaning Clean the inside and accessories with warm water and bicarbonate of soda (5ml to 0.5 litre of water). Rinse and dry thoroughly.
SOMETHING NOT WORKING Important: If you call out an engineer to a fault listed below, or to repair a fault caused by incorrect use or installation a charge will be made, even if the appliance is under guarantee. Before contacting your local Service Force Centre, check the following points: Symptom Solution No power to the appliance Check there is power at the socket. Check there is not a power cut by checking the household lights.
GUARANTEE CONDITIONS SERVICE AND SPARE PARTS Standard guarantee conditions In the event of your appliance requiring service, or if you wish to purchase spare parts, please contact your local Zanussi Service Force Centre by telephoning:- We, Zanussi, undertake that if within 24 months of the date of the purchase this Zanussi appliance or any part thereof is proved to be defective by reason only of faulty workmanship or materials, we will, at our option repair or replace the same FREE OF CHARGE for labour
13
12 13
GUARANTEE CONDITIONS SERVICE AND SPARE PARTS Standard guarantee conditions In the event of your appliance requiring service, or if you wish to purchase spare parts, please contact your local Zanussi Service Force Centre by telephoning:- We, Zanussi, undertake that if within 24 months of the date of the purchase this Zanussi appliance or any part thereof is proved to be defective by reason only of faulty workmanship or materials, we will, at our option repair or replace the same FREE OF CHARGE for labour
SOMETHING NOT WORKING Important: If you call out an engineer to a fault listed below, or to repair a fault caused by incorrect use or installation a charge will be made, even if the appliance is under guarantee. Before contacting your local Service Force Centre, check the following points: Symptom Solution No power to the appliance Check there is power at the socket. Check there is not a power cut by checking the household lights.
INSTALLATION MAINTENANCE AND CLEANING Before any maintenance or cleaning work is carried out, DISCONNECT the appliance from the ELECTRICITY supply. Warning IF YOU ARE DISCARDING AN OLD APPLIANCE THAT HAS A LOCK OR CATCH ON THE DOOR, YOU MUST ENSURE THAT IT IS MADE UNUSABLE TO PREVENT YOUNG CHILDREN BEING TRAPPED INSIDE. Internal cleaning Clean the inside and accessories with warm water and bicarbonate of soda (5ml to 0.5 litre of water). Rinse and dry thoroughly.
Defrosting When the frost has reached a thickness of up to 4mm it can be removed using the ice scraper provided with the appliance. During this operation it is not necessary to disconnect the appliance from the mains and remove the food. Never use metal tools for this operation. For complete defrosting (once or twice a year) proceed as follows: - turn the thermostat control knob to the ÇOFFÈ position (O) or disconnect the appliance from the mains.
HINTS AND TIPS Instructions for totally built-in appliances Energy Saving Advice Normal Operating Sounds Door reversal ¥ Recess dimensions Height Depth Width min. 200 cm 50 mm 880 mm 550 mm 560 mm ¥ 2 ¥ The applianceÕs door has been locked in position for transport by means of pins on both sides. According to the door opening direction, remove relevant pins at the top and at the bottom. To ensure adequate ventilation, allow the clearances shown in figure. min.
Thawing 9 Kg 7 Kg D670 the top compartments of the freezer as this is the coldest part as shown in the diagram. Once the food is completely frozen (which could take up to 24 hours) press the fast freeze switch; the yellow light (B) goes off. Distribute the frozen food packages in the other compartments, so that the top compartment can be used for a further freezing operation. The food to be frozen must be fresh and of the best quality. Do not allow fresh food to touch food which is already frozen.
OPERATION Fix cover (C) on guide (A) until it clips into place. A 5 4 6 1 3 2 C A PR33 Open the appliance door and the furniture door at 90¡. Insert the small square (B) into guide (A). Put together the appliance door and the furniture door and mark the holes as indicated in the figure. Remove the squares and drill holes with ¿ 2 mm at 8 mm from the outer edge of the door. Place the small square on the guide again and fix it with the screws supplied.
IMPORTANT SAFETY INFORMATION It is most important that this instruction book should be retained with the appliance for future reference. Should the appliance be sold or transferred to another owner, or should you move house and leave the appliance, always ensure that the book is left with the appliance in order that the new owner can get to know the functioning of the appliance and the relevant safety information. This information has been provided in the interest of safety.
CONTENTS Instructions for the User Important Safety Information 2 Instructions for the Installer Description of the Appliance 4 Technical Specifications 15 Operation 5 Installation Instructions 16 Before using 5 Electrical Connection 17 Starting your appliance 5 Temperature control 5 Building in 18 Freezing fresh food 5 Frozen food storage 5 Thawing 6 Making ice cubes 6 Hints and Tips 7 Defrosting 8 Maintenance and Cleaning 9 Internal cleaning 9 External cleaning 9 Whe
DESCRIPTION OF THE APPLIANCE B 5 4 6 1 3 2 3 C D A - Freezer calendar (recommended storage times for frozen foods) B - Freezer controls C - Compartments for freezing fresh foods D - Compartments for frozen food storage 4 6 9 12 A
FREEZER ZI 9121 F © Electrolux Household Appliances Limited 2000 INSTRUCTION BOOKLET 2222 119-67