
User Manual


7
2. Step-by-Step Installation Guide
This section helps you with the installation of the Access Point. Please follow
the instructions on how to install your Access Point:
1. Mount the Access Point firmly to the wall on the desired position. A drill model is
supplied as a separate sheet with this manual.
2. Connect Ethernet cable to Access Point’s RJ-45 Port
3. Connect power adapter to Access Point, and “Power” LED of Access Point will
turn green.
Is your Installation Successful?
At the front of Access Point you will see three LEDs.
If the installation is successful, the “Power” LED is green, and the “RF” LED and
the “Ethernet” LED flash whenever there is traffic on the respective network.
1
How to Select Wired Network?
Access Point will automatically select the medium attached. When the cable
network is detected, the “Ethernet” LED will turn yellow.
Factory Settings
You can reset Access Point to factory default settings by pushing a paperclip into
the little hole next to the power switch when Access Point is turned off. Hold until
the lights of the 3 LEDs at the front of the Access Point are off. When you push a
paperclip in the reset hole while the Access Point is switched on, only the lock set
Access Point SNMP Manager is deactivated.
1
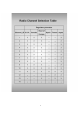
The –insert pic- flash at least 10 times per second for the wireless LAN because of so-called ‘beacons’