
User Manual


Getting Started
Setting the Keyboard’s Address
When shipped, all RF-250’s come with a preset address of 0:0. If the RF-250 Wireless Keyboard will be used near another one, the
address will need to be set so they won’t interfere with each other. To set the address, do the following:
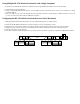
1. Using an installed RF-000 Wireless Receiver, press the address button on the bottom of the receiver. The LED on the top of the
receiver will blink rapidly for 30 seconds. After 30 seconds, the receiver will return to normal mode.
2. Press the ‘Addr’ key on the RF-250 Wireless Keyboard. If the green ‘sending’ LED blinks, the keyboard has acquired a new address
from the receiver. If the red ‘no signal’ LED blinks, the keyboard is probably too close to the receiver. Try again from slightly
farther away.
3. If no keyboard ‘Addr’ button is pressed within 30 seconds, the receiver’s address does not change.
Using a Third-Party Mouse
You can use any PS/2-compatible mouse (including wheel mice) with the RF-250 Wireless Keyboard. To install a third-party mouse,
do the following:
1. Disconnect the RF-000 Wireless Receiver from the computer. (This
prevents accidental key presses.)
2. Turn the RF-250 Wireless Keyboard over and disconnect the touch
pad’s PS/2 cable. (The cable can be stored in the cable run on the
underside of the wrist rest.
3. Detach the wrist rest from the keyboard, if desired.
4. Connect the third-party mouse’s PS/2 plug to the keyboard connector.
5. Route the mouse cord through the cable run on the underside of the
keyboard with the cable exiting on the desired side.
6. Turn the keyboard over and press the ‘Mouse On’ button on the keyboard. (The red ‘no signal’ LED should blink when the mouse is
moved.)
7. Reconnect the receiver to the computer.
When using a third-party mouse, it’s important to remember, that the keyboard will put the mouse port to sleep after 20 minutes. This
helps ensure long battery life. The mouse can also be put to sleep by pressing the ‘Mouse Off’ key. When the mouse is asleep, neither
the green ‘sending’ LED, nor the red ‘no signal’ LED will blink when the mouse is moved. To wake up the mouse, press the ‘Mouse
On’ key.
Macintosh Note: The right mouse button and wheel are only supported on MacOS 10.1 and later. Under MacOS 9.x, all mouse
buttons act alike.
1. Start the computer.
2. Insert the two AA batteries into the RF-250 Wireless Keyboard.
3. Plug the RF-000 Wireless Receiver’s USB plug into the computer.
Note: When the receiver is plugged into a computer for the first time, the
computer will automatically create the USB drivers needed to use it. During
this time, Windows 98 will display a series of dialogs. All of these can be
handled simply by pressing enter for each. Windows 2000 and XP will
display informational pop-ups. MacOS will perform the driver creation
silently.
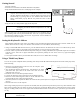
4. Plug the wrist rest / touch pad PS/2 plug into the keyboard.
Macintosh Note: If the keyboard will be used with a Macintosh computer, see
‘Configuring the RF-250 Wireless Keyboard for use with a
Macintosh.’
When you press a key or use the touch pad, the LED on the receiver will blink. Also, the
green ‘sending’ LED on the keyboard should blink. If the red ‘no signal’ LED blinks,
the keyboard is probably too close to the receiver. In general the receiver should be at
least a foot away from the keyboard.