Installation Guide Viking Range, LLC 111 Front Street Greenwood, Mississippi 38930 USA (662) 455-1200 For product information, call 1-888-(845-4641) or visit the Viking Web site at vikingrange.com in the U.S. or brigade.ca in Canada.
Table of Contents IMPORTANT - Please Read and Follow! Warnings.......................................................................................................................... 3 Kit Contents..................................................................................................................... 3 Regulator Conversion ...................................................................................................... 4 Infrared Broiler Conversion......................................
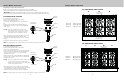
Infrared Broiler Conversion Regulator Conversion •Remove hex nut from top of regulator. •Unsnap plastic plunger from hex nut. •Reverse plunger and reinstall onto hex nut by pressing firmly. Natural Orientation NAT NOTE: Plunger is marked “NAT” or “LP”. Converted fuel type will be shown on the lower portion of plunger. LP LP Orientation Apply sideways finger pressure to remove pin from cap. •Reinstall hex nut onto regulator in configuration desired.
Surface Burner Conversion Surface Burner Conversion Preparing for Top Surface Conversion Remove all grates, grate supports, surface burner caps, and griddle NOTE: Some models may not be equipped with all parts mentioned above. 36” Surface Burner Orifice Locations C IMPORTANT: For models equipped with griddles, notice position of griddle temperature probe for proper reinstallation. Failure to properly reinstall could result in damage to griddle temperature probe.
Griddle Conversion (for models equipped with a griddle) Oven Bake Burner Conversion 36” W. Oven and 48” W. Right Hand Oven Bake Burner Screw (Front of Burner) Air Shutter Screw (Rear of Burner) Air Shutter Set Screw Adjustment Screw Air Shutter Orifice Hood Adjustment Screw Air Shutter -Locate bag labeled 050297-000. -Remove griddle. -Remove screws securing griddle burner to burner box. -Loosen air shutter screw and adjust opening on burner to 7/16” and tighten air shutter screw.
Rating Label Location When the LP/Propane conversion is complete, complete the enclosed conversion label and place it next to the rating label. 7KLV DSSOLDQFH ZDV FRQYHUWHG RQ 1DW RU GD\ PRQWK \HDU WR /3 JDV E\ QDPH DQG DGGUHVV RI RUJDQL]DWLRQ PDNLQJ WKH FRQYHUVLRQ ZKLFK DFFHSWV WKH UHVSRQVLELOLW\ WKDW WKLV FRQYHVLRQ KDV EHHQ SURSHUO\ PDGH 3) The rating label is located under the control panel.