i
Table of Contents INTRODUCTION ..................................................................................................................... 1 Features .............................................................................................................................. 1 Package Contents .............................................................................................................. 3 Physical Details ............................................................................
Diagnostics ....................................................................................................................... 81 Remote Administration................................................................................................... 82 Routing ............................................................................................................................. 84 Upgrade Firmware ...................................................................................................
Introduction Congratulations on the purchase of your new TEW-635BRM. The 300Mbps Wireless N ADSL 2/2+ Modem Router is a multi-function device providing the following services: • • • • ADSL Modem. Shared Broadband Internet Access for all LAN users. Wireless Access Point for 802.11b, 802.11g and 802.11n Wireless Stations. 4-Port Switching Hub for 10BaseT or 100BaseT connections.
Advanced Internet Functions • Application Level Gateways (ALGs). Applications which use non-standard connections or port numbers are normally blocked by the Firewall. The ability to define and allow such applications is provided, to enable such applications to be used normally. • Dynamic DNS Support. DDNS, when used with the Virtual Servers feature, allows users to connect to Servers on your LAN using a Domain Name, even if you have a dynamic IP address which changes every time you connect.
• Simple Configuration. If the default settings are unsuitable, they can be changed quickly and easily. LAN Features • 4-Port Switching Hub. The Wireless ADSL Router incorporates a 4-port 10/100BaseT switching hub, making it easy to create or extend your LAN. • DHCP Server Support. Dynamic Host Configuration Protocol provides a dynamic IP address to PCs and other devices upon request. The Wireless ADSL Router can act as a DHCP Server for devices on your local LAN and WLAN.
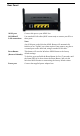
Physical Details Front-mounted LEDs WPS Button Push the WPS button on the device and your other wireless device to perform WPS function that easily creates an encryption-secured wireless connection automatically. When WPS button is pressed, the LED will start blinking for 2 minutes. If any client is associated with the router successfully within 2 minutes, the LED will stay On, otherwise the LED will be Off. Power LED (Orange) On - Power on. LAN (Blue) On - The LAN port is active. Off - No power.
Rear Panel ADSL port Connect this port to your ADSL line. 10/100BaseT LAN connections Use standard LAN cables (RJ45 connectors) to connect your PCs to these ports. Note: Any LAN port on the Wireless ADSL Router will automatically function as an "Uplink" port when required. Just connect any port to a normal port on the other hub, using a standard LAN cable. Reset Button (Reset to Defaults) This button will reset the Wireless ADSL Router to the factory default settings.
Wireless Performance Considerations There are a number of factors that can impact the range of wireless devices. 1. 2. 3. 4. 5. 6. Adjust your wireless devices so that the signal is traveling in a straight path, rather than at an angle. The more material the signal has to pass through the more signal you will lose. Keep the number of obstructions to a minimum. Each obstruction can reduce the range of a wireless device.
PC Configuration Overview For each PC, the following may need to be configured: • TCP/IP network settings • Internet Access configuration • Wireless configuration Windows Clients This section describes how to configure Windows clients for Internet access via the Wireless ADSL Router. The first step is to check the PC's TCP/IP settings. The Wireless ADSL Router uses the TCP/IP network protocol for all functions, so it is essential that the TCP/IP protocol be installed and configured on each PC.
Checking TCP/IP Settings - Windows 9x/ME: 1. Select Control Panel - Network. You should see a screen like the following: 2. 3. Select the TCP/IP protocol for your network card. Click on the Properties button. You should then see a screen like the following. Ensure your TCP/IP settings are correct, as follows: Using DHCP To use DHCP, select the radio button Obtain an IP Address automatically. This is the default Windows setting. Using this is recommended.
• On the DNS Configuration tab, ensure Enable DNS is selected. If the DNS Server Search Order list is empty, enter the DNS address provided by your ISP in the fields beside the Add button, then click Add.
Checking TCP/IP Settings - Windows NT4.0 1. Select Control Panel - Network, and, on the Protocols tab, select the TCP/IP protocol, as shown below. 2. Click the Properties button to see a screen like the one below. 3. 4. Select the network card for your LAN. Select the appropriate radio button - Obtain an IP address from a DHCP Server or Specify an IP Address, as explained below. Obtain an IP address from a DHCP Server This is the default Windows setting. Using this is recommended.
Specify an IP Address If your PC is already configured, check with your network administrator before making the following changes. 1. 2. The Default Gateway must be set to the IP address of the Wireless ADSL Router. To set this: • Click the Advanced button on the screen above. • On the following screen, click the Add button in the Gateways panel, and enter the Wireless ADSL Router's IP address, as shown in Figure 26 below.
Checking TCP/IP Settings - Windows 2000: 1. 2. Select Control Panel - Network and Dial-up Connection. Right - click the Local Area Connection icon and select Properties. You should see a screen like the following: 3. 4. Select the TCP/IP protocol for your network card. Click on the Properties button. You should then see a screen like the following. 5. Ensure your TCP/IP settings are correct, as described below. Using DHCP To use DHCP, select the radio button Obtain an IP Address automatically.
Restart your PC to ensure it obtains an IP Address from the Wireless ADSL Router. Using a fixed IP Address ("Use the following IP Address") If your PC is already configured, check with your network administrator before making the following changes. • Enter the Wireless ADSL Router's IP address in the Default gateway field and click OK. (Your LAN administrator can advise you of the IP Address they assigned to the Wireless ADSL Router.
Checking TCP/IP Settings - Windows XP 1. 2. Select Control Panel - Network Connection. Right click the Local Area Connection and choose Properties. You should see a screen like the following: 3. 4. Select the TCP/IP protocol for your network card. Click on the Properties button. You should then see a screen like the following.
5. Ensure your TCP/IP settings are correct. Using DHCP To use DHCP, select the radio button Obtain an IP Address automatically. This is the default Windows setting. Using this is recommended. By default, the Wireless ADSL Router will act as a DHCP Server. Restart your PC to ensure it obtains an IP Address from the Wireless ADSL Router. Using a fixed IP Address ("Use the following IP Address") If your PC is already configured, check with your network administrator before making the following changes.
Internet Access To configure your PCs to use the Wireless ADSL Router for Internet access: • Ensure that the DSL modem, Cable modem, or other permanent connection is functional. • Use the following procedure to configure your Browser to access the Internet via the LAN, rather than by a Dial-up connection. For Windows 9x/ME/2000 1. 2. 3. 4. 5. 6. 7. Select Start Menu - Settings - Control Panel - Internet Options. Select the Connection tab, and click the Setup button.
Macintosh Clients From your Macintosh, you can access the Internet via the Wireless ADSL Router. The procedure is as follows. 1. Open the TCP/IP Control Panel. 2. Select Ethernet from the Connect via pop-up menu. 3. Select Using DHCP Server from the Configure pop-up menu. The DHCP Client ID field can be left blank. 4. Close the TCP/IP panel, saving your settings.
Wireless Station Configuration This section applies to all Wireless stations wishing to use the Wireless ADSL Router's Access Point, regardless of the operating system which is used on the client. To use the Wireless Access Point in the Wireless ADSL Router, each Wireless Station must have compatible settings, as follows: Mode The mode must be set to Infrastructure (rather than Ad-hoc) Access points only operate in Infrastructure mode.
If the "Broadcast SSID" setting on the Wireless ADSL Router has been disabled, its SSID will NOT be listed. See the following section "If the SSID is not listed" for details of dealing with this situation. 4. The next step depends on whether or not Wireless security has been enabled on the Wireless ADSL Router. If Wireless Security is Disabled If Wireless security on the Wireless ADSL Router is disabled, Windows will warn you that the Wireless network is not secure.
If using WEP Data Encryption If WEP data encryption has been enabled on the Wireless ADSL Router, Windows will detect this, and show a screen like the following. To connect: • Enter the WEP key, as set on the Wireless ADSL Router, in the Network Key field. • Re-enter the WEP key into the Confirm Network key field. • Disable the checkbox Enable IEEE 802.1x authentication for this network. • Click the Connect button.
Configure this screen as follows: • Set Network Authentication to match the Wireless ADSL Router. (If the setting on the Wireless ADSL Router is "Auto", then either Open or Shared can be used.) • For Data Encryption, select WEP. • For the Network key and Confirm network key, enter the default key value used on the Wireless ADSL Router. (Windows will determine if 64bit or 128bit encryption is used.) • The Key index must match the default key index on the Wireless ADSL Router. The default value is 1.
Click OK to establish a connection to the Wireless ADSL Router.
If using WPA-PSK Data Encryption If WPA-PSK data encryption has been enabled on the Wireless ADSL Router, it does not matter which network is selected on the screen below. Just click the Advanced button. You will then see a screen like the example below.
Configure this screen as follows: • Set Network Authentication to WPA-PSK. • For Data Encryption, select TKIP. • For the Network key and Confirm network key, enter the network key (PSK) used on the Wireless ADSL Router. • Ensure the option This is a computer-to-computer (ad hoc) network is unchecked. • Click OK to save and close this dialog. • This wireless network will now be listed in Preferred Networks on the screen below. Click OK to establish a connection to the Wireless ADSL Router.
If the SSID is not listed If the "Broadcast SSID" setting on the Wireless ADSL Router has been disabled, its SSID will NOT be listed on the screen below. In this situation, you need to obtain the SSID from your network administrator, then follow this procedure: 1. Click the Advanced button to see a screen like the example below. 2. Click the Add button. You will see a screen like the example below.
3. Configure this screen as follows: • Enter the correct SSID, as used on the Wireless ADSL Router. Remember the SSID is case-sensitive, so be sure to match the case, not just the spelling. • Set Network Authentication and Data Encryption to match the Wireless ADSL Router. • If using data encryption (WEP or WPA-PSK), enter the key used on the Wireless ADSL Router. See the preceding sections for details of WEP and WPA-PSK.
Installation Requirements • Network cables. Use standard 10/100BaseT network (UTP) cables with RJ45 connectors. • TCP/IP protocol must be installed on all PCs. • For Internet Access, an Internet Access account with an ISP, and a DSL connection. • To use the Wireless Access Point, all Wireless devices must be compliant with the IEEE 802.11g, IEEE 802.11b or IEEE 802.11n Draft specifications. Procedure 1.
4. Power Up Connect the supplied power adapter to the Wireless ADSL Router. Use only the power adapter provided. Using a different one may cause hardware damage. 5. Check the LEDs • The Power LED should be ON. • For each LAN (PC) connection, one of the LAN LEDs should be ON (provided the PC is also ON.) • The WLAN LED should be ON • The ADSL LED should be ON if ADSL line is connected. • The Internet LED may be OFF. After configuration, it should come ON.
Setup Overview This chapter describes the setup procedure for: • Internet Access • LAN configuration • Wireless setup • Assigning a Password to protect the configuration data. PCs on your local LAN may also require configuration. For details, see Chapter 4 - PC Configuration. Other configuration may also be required, depending on which features and functions of the Wireless ADSL Router you wish to use. Use the table below to locate detailed instructions for the required functions.
Configuration Program The Wireless ADSL Router contains an HTTP server. This enables you to connect to it, and configure it, using your Web Browser. Your Browser must support JavaScript. The configuration program has been tested on the following browsers: • Netscape 7.1 or later. • Mozilla 1.6 or later • Internet Explorer V5.5 or later Preparation Before attempting to configure the Wireless ADSL Router, please ensure that: • Your PC can establish a physical connection to the Wireless ADSL Router.
If you can't connect If the Wireless ADSL Router does not respond, check the following: • The Wireless ADSL Router is properly installed, LAN connection is OK, and it is powered ON. You can test the connection by using the "Ping" command: • Open the MS-DOS window or command prompt window. • Enter the command: ping 192.168.10.1 If no response is received, either the connection is not working, or your PC's IP address is not compatible with the Wireless ADSL Router's IP Address. (See next item.
3. If Manual Selection is selected, you will see the VC 1 screen shown below. Enter the VPI and VCI values provided by your ISP, then click "Next". 4. On the Internet Access Screen, shown above, select the correct connection type, as used by your ISP. Click "Next" and complete the configuration for your connection method. • You need the data supplied by your ISP. Your ISP's data will also have the DSL Multiplexing Method ( LLC or VC ) • The common connection types are explained in the following table.
Connection Type Details ISP Data required Dynamic IP Address Your IP Address is allocated automatically, when you connect to you ISP. Often, none. Static (Fixed) IP Address Your ISP allocates a permanent IP Address to you. Usually, the connection is "Always on". IP Address allocated to you, and related information, such as Network Mask, Gateway IP address, and DNS address. PPPoE, PPPoA You connect to the ISP only when required. The IP address is usually allocated automatically.
Home Screen After finishing the Setup Wizard, you will see the Home screen. When you connect in future, you will see this screen when you connect. An example screen is shown below. Main Menu The main menu, on the left, contains links to the most-commonly used screen. To see the links to the other available screens, click "Advanced" or "Administration". The main menu also contains two (2) buttons: • Log Out - When finished, you should click this button to logout.
On each screen, clicking the "Help" button will display help for that screen.
LAN Screen Use the LAN link on the main menu to reach the LAN screen. An example screen is shown below. Data - LAN Screen TCP/IP IP Address IP address for the Wireless ADSL Router, as seen from the local LAN. Use the default value unless the address is already in use or your LAN is using a different IP address range. In the latter case, enter an unused IP Address from within the range used by your LAN. Subnet Mask The default value 255.255.255.0 is standard for small (class "C") networks.
DHCP What DHCP Does A DHCP (Dynamic Host Configuration Protocol) Server allocates a valid IP address to a DHCP Client (PC or device) upon request. • The client request is made when the client device starts up (boots). • The DHCP Server provides the Gateway and DNS addresses to the client, as well as allocating an IP Address. • The Wireless ADSL Router can act as a DHCP server. • Windows 95/98/ME and other non-Server versions of Windows will act as a DHCP client.
Wireless Screen The Wireless ADSL Router's settings must match the other Wireless stations. Note that the Wireless ADSL Router will automatically accept both 802.11b and 802.11g connections, and no configuration is required for this feature. To change the Wireless ADSL Router's default settings for the Wireless Access Point feature, use the Wireless link on the main menu to reach the Wireless screen. An example screen is shown below.
Multi SSID SSID With Multiple SSIDs, you can have 2 SSIDs on one AP. For example, a Guest SSID without encryption for visitors to have Internet access only, and a Admin SSID with encryption for private use to secure your company resources. Select the desired SSID from the list to configure. SSID 1/2 Broadcast SSID This is also called the "Network Name". • If using an ESS (Extended Service Set, with multiple access points) this ID is called an ESSID (Extended Service Set Identifier).
MAC Address Filter Allow access by … Use this feature to determine which Wireless stations can use the Access Point. The options are: • All Wireless Stations - All wireless stations can use the access point, provided they have the correct SSID and security settings. • Set Stations Button Trusted Wireless stations only - Only wireless stations you designate as "Trusted" can use the Access Point, even if they have the correct SSID and security settings.
Wireless Security This screen is accessed by clicking the "Configure SSID" button on the Wireless screen. There are 6 options for Wireless security: • Disabled - no data encryption is used. • WEP - data is encrypted using the WEP standard. • WPA-PSK - data is encrypted using the WPA-PSK standard. This is a later standard than WEP, and provides much better security than WEP. If all your Wireless stations support WPA-PSK, you should use WPA-PSK rather than WEP.
Encryption Default Key same setting. • 64 Bit - data is encrypted, using the default key, before being transmitted. You must enter at least the default key. For 64 Bit Encryption, the key size is 10 chars in HEX (0~9 and A~F). • 128 Bit - data is encrypted, using the default key, before being transmitted. You must enter at least the default key. For 128 Bit Encryption, the key size is 26 chars in HEX (0~9 and A~F). Select the key you wish to be the default.
Security Settings - WPA2-PSK This is a further development of WPA-PSK, and offers even greater security, using the AES (Advanced Encryption Standard) method of encryption. Figure 1: WPA2-PSK Wireless Security Screen Data - WPA2-PSK Screen WPA2-PSK PSK Enter the key value. Data is encrypted using a 256Bit key derived from this key. Other Wireless Stations must use the same key. Encryption The WPA2-PSK standard allows different encryption methods to be used. Select the desired option.
Security Settings - Mixed WPA-PSK/WPA2-PSK This method, sometimes called "Mixed Mode", allows clients to use EITHER WPA-PSK OR WPA2-PSK. Data - WPA2-PSK Screen WPA2-PSK PSK Enter the key value. Data is encrypted using a 256Bit key derived from this key. Other Wireless Stations must use the same key. Encryption This standard allows different encryption methods to be used. Select the desired option. Wireless Stations must use the same encryption method.
Security Settings - 802.1x This uses the 802.1x standard for client authentication, and WEP for data encryption. If this option is selected: • This Access Point must have a "client login" on the Radius Server. • Each user must have a "user login" on the Radius Server. Normally, a Certificate is used to authenticate each user. See Chapter4 for details of user configuration. • Each user's wireless client must support 802.1x. • All data transmission is encrypted using the WEP standard.
Trusted Wireless Stations This feature can be used to prevent unknown Wireless stations from using the Access Point. This list has no effect unless the setting Allow access by trusted stations only is enabled. To change the list of trusted wireless stations, use the Modify List button on the Access Control screen. You will see a screen like the sample below. Data - Trusted Wireless Stations Trusted Wireless Stations This lists any Wireless Stations which you have designated as “Trusted”.
Edit Use this to change an existing entry in the "Trusted Stations" list: 1. Select the Station in the Trusted Station list. 2. Click the Edit button. The address will be copied to the "Address" field, and the Add button will change to Update. 3. Edit the address (MAC or physical address) as required. 4. Click Update to save your changes. Add (Update) To add a Trusted Station which is not in the "Other Wireless Stations" list, enter the required data and click this button.