User Guide AX1800 Dual-Band Wi-Fi 6 Router Archer AX20 ©2020 TP-Link 1910012919 REV2.0.
Contents About This Guide .........................................................................................................1 Chapter 1. Get to Know About Your Router . . . . . . . . . . . . . . . . . . . . . . . . . . .3 2. 1. 2. 2. Product Overview. . . . . . . . . . . . . . . . . . . . . . . . . . . . . . . . . . . . . . . . . . . . . . . . . . . . . . . . . . . . 4 Appearance . . . . . . . . . . . . . . . . . . . . . . . . . . . . . . . . . . . . . . . . . . . . . . . . . . . . . . . . . . . . .
7. 1. 1.Access the USB Device Locally . . . . . . . . . . . . . . . . . . . . . . . . . . . . . . . . . . . . . . . 31 7. 1. 2.Access the USB Device Remotely . . . . . . . . . . . . . . . . . . . . . . . . . . . . . . . . . . . . 32 7. 2. 7. 3. 7. 1. 3.Customize the Access Settings. . . . . . . . . . . . . . . . . . . . . . . . . . . . . . . . . . . . . . . 34 Media Sharing . . . . . . . . . . . . . . . . . . . . . . . . . . . . . . . . . . . . . . . . . . . . . . . . . . . . . . . . . . . . . .
13. 8. Use WPS for Wireless Connection . . . . . . . . . . . . . . . . . . . . . . . . . . . . . . . . . . . . . . . . . . 83 13. 8. 1.Connect via the Client’s PIN . . . . . . . . . . . . . . . . . . . . . . . . . . . . . . . . . . . . . . . . . 83 13. 8. 2.Connect via the Router’s PIN . . . . . . . . . . . . . . . . . . . . . . . . . . . . . . . . . . . . . . . . 83 13. 8. 3.Push the WPS Button . . . . . . . . . . . . . . . . . . . . . . . . . . . . . . . . . . . . . . . . . . . . . . . 84 13. 9.
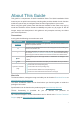
About This Guide This guide is a complement of Quick Installation Guide. The Quick Installation Guide instructs you on quick internet setup, and this guide provides details of each function and shows you the way to configure these functions appropriate to your needs. When using this guide, please note that features available of the router may vary by model and software version. Router‘s availability may also vary by region or ISP.
*Maximum wireless signal rates are the physical rates derived from IEEE Standard 802.11 specifications. Actual wireless data throughput and wireless coverage are not guaranteed and will vary as a result of network conditions, client limitations, and environmental factors, including building materials, obstacles, volume and density of traffic, and client location. *Use of 802.11ax (Wi-Fi 6), and features including OFDMA, 1024-QAM, and Target Wake Time requires clients to also support corresponding features.
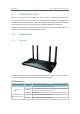
Chapter 2 Get to Know About Your Router This chapter introduces what the router can do and shows its appearance.
Chapter 2 2. 1. Get to Know About Your Router Product Overview TP-Link AX router, with next-generation 802.11ax Wi-Fi Technology, achieves WiFi performance at its ultimate level. The revolutionary combination of OFDMA and 1024QAM improve throughput by 4 times and dramatically increase the whole network capacity and efficiency. It’s also backwards compatible with 802.11a/b/g/n/ac.
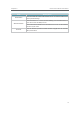
Chapter 2 Get to Know About Your Router LED (5GHz Wireless) Status On The 5GHz wireless band is enabled. Off The 5GHz wireless band is disabled. Green On (Internet) (Ethernet) (USB) 2. 2. 2. Indication Orange On Internet service is available. The router’s Internet port is connected, but the internet service is not available. Off The router’s Internet port is unplugged. On At least one powered-on device is connected to the router’s LAN port.
Chapter 2 Get to Know About Your Router Item Description Reset Button Press and hold the button until all LEDs turn on to reset the router to its factory default settings. WPS/Wi-Fi Button Antennas Press the button for 1 second, and immediately press the WPS button on your client to start the WPS process. Press and hold the button for 2 seconds to turn on or off the wireless function of your router. Used for wireless operation and data transmit. Upright them for the best Wi-Fi performance.
Chapter 2 Connect the Hardware This chapter contains the following sections: • Position Your Router • Connect Your Router
Chapter 2 2. 1. Connect the Hardware Position Your Router • The product should not be located in a place where it will be exposed to moisture or excessive heat. • Place the router in a location where it can be connected to multiple devices as well as to a power source. • Make sure the cables and power cord are safely placed out of the way so they do not create a tripping hazard. • The router can be placed on a shelf or desktop.
Chapter 2 Connect the Hardware Note: Note: If the 2.4GHz LED and 5GHz LED are off, press and hold the WPS/Wi-Fi button on the back for more than 2 seconds, then release the button. Both the LEDs should turn solid on. 5. Connect your computer to the router. • Method 1: Wired Turn off the Wi-Fi on your computer and connect the devices to the router via an Ethernet cable. • Method 2: Wirelessly 1 ) Find the SSID (Network Name) and Wireless Password printed on the label at the bottom of the router.
Chapter 3 Log In to Your Router
Chapter 3 Log In to Your Router With a web-based utility, it is easy to configure and manage the router. The web-based utility can be used on any Windows, Mac OS or UNIX OS with a Web browser, such as Microsoft Internet Explorer, Mozilla Firefox or Apple Safari. Follow the steps below to log in to your router. 1. Set up the TCP/IP Protocol in Obtain an IP address automatically mode on your computer. 2. Visit http://tplinkwifi.net, and create a login password for secure management purposes.
Chapter 4 Set Up Internet Connection This chapter introduces how to connect your router to the internet. The router is equipped with a web-based Quick Setup wizard. It has necessary ISP information built in, automates many of the steps and verifies that those steps have been successfully completed. Furthermore, you can also set up an IPv6 connection if your ISP provides IPv6 service.
Chapter 4 4. 1. Set Up Internet Connection Use Quick Setup Wizard The Quick Setup Wizard will guide you to set up your router. Tips: If you need the IPv6 internet connection, please refer to the section of Set Up an IPv6 Internet Connection. Follow the steps below to set up your router. 1. Visit http://tplinkwifi.net, and log in with the password you set for the router. 2.
Chapter 4 Set Up Internet Connection OR 2. Log in with your TP-Link ID. If you don’t have the TP-Link ID, create one first. 3. Connect your device to the router’s wireless network. 4. Launch the Tether app, tap the + button and select Router > Wireless Router. Follow the steps to complete the setup and connect to the internet. 5. Connect your devices to the newly configured wireless networks of the router and enjoy the internet! 4. 3.
Chapter 4 Set Up Internet Connection 2 ) If you choose Static IP, enter the information provided by your ISP in the corresponding fields. 3 ) If you choose PPPoE, enter the username and password provided by your ISP. PPPoE users usually have DSL cable modems.
Chapter 4 Set Up Internet Connection 4 ) If you choose L2TP, enter the username and password and choose the Secondary Connection provided by your ISP. Different parameters are needed according to the Secondary Connection you have chosen. 5 ) If you choose PPTP, enter the username and password, and choose the Secondary Connection provided by your ISP. Different parameters are needed according to the Secondary Connection you have chosen. 5. Click Save.
Chapter 4 4. 4. Set Up Internet Connection Set Up the Router as an Access Point The router can work as an access point, transforming your existing wired network to a wireless one. 1. Visit http://tplinkwifi.net, and log in with your TP-Link ID or the password you set for the router. 2. Go to Advanced > System > Operation Mode, select Access Point and click Save. The router will reboot and switch to Access Point mode. 3.
Chapter 4 Set Up Internet Connection 2. Go to Advanced > IPv6. 3. Enable IPv6 and select the internet connection type provided by your ISP. Tips: If you do not know what your internet connection type is, contact your ISP or judge according to the already known information provided by your ISP. 4. Fill in information as required by different connection types. 1 ) Static IP: Fill in blanks and click Save. 2 ) Dynamic IP(SLAAC/DHCPv6): Click Advanced to input further information if your ISP requires.
Chapter 4 Set Up Internet Connection Note: If your ISP provides two separate accounts for the IPv4 and IPv6 connections, manually enter the username and password for the IPv6 connection. 4 ) 6to4 Tunnel: An IPv4 internet connection type is a prerequisite for this connection type (Manually Set Up Your Internet Connection). Click Advanced to input further information if your ISP requires. Click Save and then click Connect. 5 ) Pass-Through (Bridge): Click Save and skip to Step 6.
Chapter 4 Set Up Internet Connection 5. Configure LAN ports. Windows users are recommended to choose from the first two types. Fill in Address Prefix provided by your ISP, and click Save. 6. Click Status to check whether you have successfully set up an IPv6 connection. Tips: Visit the FAQ section if there is no internet connection.
Chapter 5 TP-Link Cloud Service TP-Link Cloud service provides a better way to manage your cloud devices. Log in to your router with a TP-Link ID, and you can easily monitor and manage your home network when you are out and about via the Tether app. To ensure that your router stays new and gets better over time, the TP-Link Cloud will notify you when an important firmware upgrade is available. Surely you can also manage multiple TP-Link Cloud devices with a single TP-Link ID.
Chapter 5 5. 1. TP-Link Cloud Service Register a TP-Link ID If you have skipped the registration during the Quick Setup process, you can: 1. Visit http://tplinkwifi.net, and log in with the password you set for the router. 2. Go to Advanced > TP-Link ID or click TP-Link ID on the very top of the page. 3. Click Sign Up and follow the instructions to register a TP-Link ID. 4. After activating your TP-Link ID, come back to the TP-Link ID page to log in.
Chapter 5 • TP-Link Cloud Service To change your password: 1. Click behind the Password. 2. Enter the current password, then a new password twice. And click Save. 5. 3. Manage the User TP-Link IDs The TP-Link ID used to log in to the router for the first time will be automatically bound as the Admin account.
Chapter 5 TP-Link Cloud Service from the same router as Users. All accounts can monitor and manage the router locally or remotely, but user accounts cannot: • Reset the router to its factory default settings either on the web management page or in the Tether app. • Add/remove other TP-Link IDs to/from the router. 5. 3. 1. Add TP-Link ID to Manage the Router 1. Visit http://tplinkwifi.net, and log in with your TP-Link ID. 2. Go to Advanced > TP-Link ID, and focus on the Bound Accounts section. 3.
Chapter 5 5. 4. TP-Link Cloud Service Manage the Router via the TP-Link Tether App The Tether app runs on iOS and Android devices, such as smartphones and tablets. 1. Launch the Apple App Store or Google Play store and search “TP-Link Tether” or simply scan the QR code to download and install the app. OR 2. Launch the Tether app and log in with your TP-Link ID. Note: If you don’t have a TP-Link ID, create one first. 3. Connect your device to the router’s wireless network. 4.
Chapter 6 Guest Network This function allows you to provide Wi-Fi access for guests without disclosing your main network. When you have guests in your house, apartment, or workplace, you can create a guest network for them. In addition, you can customize guest network options to ensure network security and privacy.
Chapter 6 6. 1. Guest Network Create a Network for Guests 1. Visit http://tplinkwifi.net, and log in with your TP-Link ID or the password you set for the router. 2. Go to Advanced > Wireless > Guest Network or click Wireless on the top page. Locate the Guest Network section. 3. Create a guest network as needed. 1 ) Tick the Enable checkbox for the 2.4GHz or 5GHz wireless network. 2 ) Customize the SSID.
Chapter 6 Guest Network 4. Click Save. Now your guests can access your guest network using the SSID and password you set! 5. You can also click Sharing Network to share the SSID and password to your guests. Tips: To view guest network information, go to Network Map and locate the Guest Network section. You can turn on or off the guest network function conveniently. 6. 2. Customize Guest Network Options 1. Visit http://tplinkwifi.
Chapter 6 Guest Network Tick this checkbox if you want to allow the wireless clients on your guest network to communicate with each other via methods such as network neighbors and Ping. • Allow guests to access your local network Tick this checkbox if you want to allow the wireless clients on your guest network to communicate with the devices connected to your router’s LAN ports or main network via methods such as network neighbors and Ping. 4. Click Save.
Chapter 7 USB Settings This chapter describes how to use the USB ports to share files and media from the USB storage devices over your home network locally, or remotely through the internet. The router supports USB external flash drives and hard drives.
Chapter 7 7. 1. USB Settings Access the USB Storage Device Insert your USB storage device into the router’s USB port and then access files stored there locally or remotely. Tips: • If you use USB hubs, make sure no more than 4 devices are connected to the router. • If the USB storage device requires using bundled external power, make sure the external power has been connected. • If you use a USB hard drive, make sure its file system is FAT32, exFat, NTFS or HFS+.
Chapter 7 USB Settings • Method 2: Open the Windows Explorer (or go to Computer) and type the server address \\tplinkwifi.net or ftp://tplinkwifi.net in the address bar, then press Enter. Windows computer 1 ) Select Go > Connect to Server. 2 ) Type the server address smb://tplinkwifi.net. 3 ) Click Connect. Mac 4 ) When prompted, select the Guest radio box. (If you have set up a username and a password to deny anonymous access to the USB disks, you should select the Registered User radio box.
Chapter 7 USB Settings • Share photos and other large files with your friends without logging in to (and paying for) a photo-sharing site or email system. • Get a safe backup for the materials for a presentation. • Remove the files on your camera’s memory card from time to time during the journey. Note: If your ISP assigns a private WAN IP address (such as 192.168.x.x or 10.x.x.x), you cannot use this feature because private addresses are not routed on the internet.
Chapter 7 USB Settings 1 ) Open the Windows Explorer (or go to Computer, only for Windows users) or open a web browser. 2 ) Type the server address in the address bar: Type in ftp://: (such as ftp://59.40.2.243:21). If you have specified the domain name of the router, you can also type in ftp://: (such as ftp://MyDomainName:21) Computer 3 ) Press Enter on the keyboard.
Chapter 7 USB Settings 2. Now you can access the USB storage device by visiting \\MyShare (for Windows) or smb://MyShare (for Mac). • To Only Share Specific Content Focus on the File Sharing section. Specify sharing folders that you want to share and click Save. • To Set Up Authentication for Data Security You can set up authentication for your USB storage device so that network clients will be required to enter username and password when accessing the USB storage device. 1.
Chapter 7 USB Settings 2. Click to modify the access account. The username and password are both admin for default administrator account, and both visit for default visitor account. Accessing as an administrator can read and modify the shared folders while visitors can only read the shared folders. Note: 1. For Windows users, do not set the sharing username the same as the Windows username.
Chapter 7 USB Settings • Go to Computer > Network, then click the Media Server Name (Model number-share by default) in the Media Devices section. Note: Here we take Windows 7 as an example. Windows Computer Tablet 7. 3. • Use a third-party DLNA-supported player. Time Machine Time Machine backs up all files on your Mac computer to a USB storage device connected to your router. 1. Visit http://tplinkwifi.net, and log in with your TP-Link ID or the password you set for the router. 2.
Chapter 7 USB Settings 3. Tick the checkbox to enable Time Machine. 4. Click Select to select a location for Time Machine backups. 5. Set the Size Limit for Backups. Note: 0 means no limit for the space. 6. Click Save.
Chapter 8 Parental Controls This function allows you to block inappropriate, explicit and malicious websites, and control access to specified websites at specified time.
Chapter 8 8. 1. Parental Controls Setting Up Access Restrictions I want to: Block access to inappropriate online content for my child’s devices, restrict internet access to 2 hours every day and block internet access during bed time (10 PM to 7 AM) on weekdays. How can I do that? 1. Visit http://tplinkwifi.net, and log in with your TP-Link ID or the password you set for the router. 2. Go to Advanced > Parental Controls. 3. Click to create a profile for a family member. 4.
Chapter 8 Parental Controls 1 ) Enter a keyword (for example, “Facebook”) or a URL (for example, “www. facebook.com”). All websites containing the keywords will be blocked. 2 ) Click Next. 6. Set time restrictions on internet access. 1 ) Enable Time Limits on Monday to Friday and Saturday & Sunday then set the allowed online time to 2 hours each day.
Chapter 8 Parental Controls 2 ) Enable Bed Time and use the up/down arrows or enter times in the fields. Devices under this profile will be unable to access the internet during this time period. Note: School Nights are from Sunday to Thursday. 3 ) Click Save. Done! The amount of time your child spends online is controlled and inappropriate content is blocked on their devices. 8. 2.
Chapter 8 Parental Controls Done! You can now check up on your child’s online activities.
Chapter 9 QoS This chapter introduces how to create a QoS (Quality of Service) rule to specify prioritization of traffic and minimize the impact caused when the connection is under heavy load.
Chapter 9 QoS I want to: Specify priority levels for some devices or applications. For example, I have several devices that are connected to my wireless network. I would like to set an intermediate speed on the internet for my computer for the next 2 hours. How can I do that? 1. Enable QoS and set bandwidth allocation. 1 ) Visit http://tplinkwifi.net, and log in with your TP-Link ID or the password you set for the router. 2 ) Go to Advanced > QoS > Global Settings. 3 ) Tick to enable QoS.
Chapter 10 OneMesh with Seamless Roaming This chapter introduces the TP-Link OneMeshTM feature.
Chapter 10 OneMesh with Seamless Roaming TP-Link OneMesh router and TP-Link OneMesh extenders work together to form one unified Wi-Fi network. Walk through your home and stay connected with the fastest possible speeds thanks to OneMesh’s seamless coverage. SAME INTERNE T Network Name & Password for seamless roaming Unified Wi-Fi Network Router and extenders share the same wireless settings, including network name, password, access control settings and more.
Chapter 10 OneMesh with Seamless Roaming 3. Connect a OneMesh extender to this router by following the setup instructions in the extender’s manual. The extender will be listed on the router’s OneMesh page. Note: To check full list of TP-Link OneMesh devices, visit https://www.tp-link.com/onemesh/compatibility. 4. If you have set up the extender to join the OneMesh network, it will be listed on the router’s OneMesh page.
Chapter 10 OneMesh with Seamless Roaming 10. 2. Manage Devices in the OneMesh Network In a OneMesh network, you can manage all mesh devices and connected clients on your router’s web page. • To view mesh devices and connected clients in the network: 1. Visit http://tplinkwifi.net, and log in with your TP-Link ID or the password you set for the router. 2. Go to Network Map. 3. Click • to view all mesh devices, and click to view all connected clients. To manage a OneMesh device in the network: 1.
Chapter 10 OneMesh with Seamless Roaming 4. Manage the OneMesh device as needed. You can: • Change device information. • Click Manage Device to redirect to the web management page of this device. • Click Leave OneMesh to delete this device from the OneMesh network.
Chapter 10 Network Security This chapter guides you on how to protect your home network from cyber attacks and unauthorized users by implementing these three network security functions. You can protect your home network from cyber attacks, block or allow specific client devices to access your network using Access Control, or you can prevent ARP spoofing and ARP attacks using IP & MAC Binding.
Chapter 10 Network Security 10. 1. Protect the Network from Cyber Attacks The SPI (Stateful Packet Inspection) Firewall protects the router from cyber attacks and validate the traffic that is passing through the router based on the protocol. This function is enabled by default. 1. Visit http://tplinkwifi.net, and log in with your TP-Link ID or the password you set for the router. 2. Go to Advanced > Security > Firewall. It’s recommended to keep the default settings. 10. 2.
Chapter 10 2 ) Click Network Security and select devices you want to be blocked and Click ADD. 3 ) The Operation Succeeded message will appear on the screen, which means the selected devices have been successfully added to the blacklist. • To allow specific device(s): 1 ) Select Whitelist and click SAVE. 2 ) Your own device is in the whitelist by default and cannot be deleted. Click to add other devices to the whitelist. • Add connected devices 1 ) Click Select From Device List.
Chapter 10 Network Security 3 ) The Operation Succeeded message will appear on the screen, which means the selected devices have been successfully added to the whitelist. • Add unconnected devices 1 ) Click Add Manually. 2 ) Enter the Device Name and MAC Address of the device you want to be allowed and click ADD. 3 ) The Operation Succeeded message will appear on the screen, which means the device has been successfully added to the whitelist.
Chapter 10 Network Security I want to: Prevent ARP spoofing and ARP attacks. How can I do that? 1. Visit http://tplinkwifi.net, and log in with your TP-Link ID or the password you set for the router. 2. Go to Advanced > Security > IP & MAC Binding. 3. Enable IP & MAC Binding. 4. Bind your device(s) according to your need. • To bind the connected device(s): 1 ) Click in the Binding List section. 2 ) Click VIEW CONNECTED DEVICES and select the device you want to bind.
Chapter 10 • Network Security To bind the unconnected device: 1 ) Click in the Binding List section. 2 ) Enter the MAC Address and IP Address that you want to bind. 3 ) Click SAVE.
Chapter 11 NAT Forwarding The router’s NAT (Network Address Translation) feature makes devices on the LAN use the same public IP address to communicate with devices on the internet, which protects the local network by hiding IP addresses of the devices. However, it also brings about the problem that an external host cannot initiatively communicate with a specified device on the local network.
Chapter 11 NAT Forwarding 11. 1. Share Local Resources on the Internet by Port Forwarding When you build up a server on the local network and want to share it on the internet, Port Forwarding can realize the service and provide it to internet users. At the same time Port Forwarding can keep the local network safe as other services are still invisible from the internet. Port Forwarding can be used for setting up public services on your local network, such as HTTP, FTP, DNS, POP3/SMTP and Telnet.
Chapter 11 NAT Forwarding 5. Click VIEW COMMON SERVICES and select HTTP. The External Port, Internal Port and Protocol will be automatically filled in. 6. Click VIEW CONNECTED DEVICES and select your home PC. The Device IP Address will be automatically filled in. Or enter the PC’s IP address 192.168.0.100 manually in the Device IP Address field. 7. Click SAVE. Tips: It is recommended to keep the default settings of Internal Port and Protocol if you are not clear about which port and protocol to use.
Chapter 11 NAT Forwarding Tips: The WAN IP should be a public IP address. For the WAN IP is assigned dynamically by the ISP, it is recommended to apply and register a domain name for the WAN referring to Set Up a Dynamic DNS Service Account. Then users on the internet can use http:// domain name to visit the website. • If you have changed the default External Port, you should use http:// WAN IP: External Port or http:// domain name: External Port to visit the website. • 11. 2.
Chapter 11 NAT Forwarding 4. Click SAVE. Tips: • You can add multiple port triggering rules according to your network need. • The triggering ports can not be overlapped. • If the application you need is not listed in the Existing Applications list, please enter the parameters manually. You should verify the external ports the application uses first and enter them into External Port field according to the format the page displays. 11. 3.
Chapter 11 NAT Forwarding How can I do that? 1. Assign a static IP address to your PC, for example 192.168.0.100. 2. Visit http://tplinkwifi.net, and log in with your TP-Link ID or the password you set for the router. 3. Go to Advanced > NAT Forwarding > DMZ and tick to enable DMZ. 4. Click VIEW CONNECTED DEVICES and select your PC. The Device IP Address will be automatically filled in. Or enter the PC’s IP address 192.168.0.100 manually in the DMZ Host IP Address field. 5. Click SAVE.
Chapter 11 NAT Forwarding corresponding ports allowing the following data penetrating the NAT to transmit. Therefore, you can play Xbox online games without a hitch. INTERNET If necessary, you can follow the steps to change the status of UPnP. 1. Visit http://tplinkwifi.net, and log in with your TP-Link ID or the password you set for the router. 2. Go to Advanced > NAT Forwarding > UPnP and toggle on or off according to your needs.
Chapter 12 VPN Server The VPN (Virtual Private Networking) Server allows you to access your home network in a secured way through internet when you are out of home. The router offers two ways to setup VPN connection: OpenVPN and PPTP (Point to Point Tunneling Protocol) VPN. OpenVPN is somewhat complex but with greater security and more stable. It is suitable for restricted environment, such as campus network and company intranet.
Chapter 12 VPN Server 12. 1. Use OpenVPN to Access Your Home Network In the OpenVPN connection, the home network can act as a server, and the remote device can access the server through the router which acts as an OpenVPN Server gateway. To use the VPN feature, you should enable OpenVPN Server on your router, and install and run VPN client software on the remote device. Please follow the steps below to set up an OpenVPN connection. INTERNET Home Network Router Remote Devices Step1.
Chapter 12 VPN Server 6. Select your Client Access type. Select Home Network Only if you only want the remote device to access your home network; select Internet and Home Network if you also want the remote device to access internet through the VPN Server. 7. Click SAVE. 8. Click GENERATE to get a new certificate. Note: If you have already generated one, please skip this step, or click GENERATE to update the certificate. 9.
Chapter 12 VPN Server 2. Go to Advanced > VPN Server > PPTP, and tick the Enable box of PPTP. Note: Before you enable VPN Server, we recommend you configure Dynamic DNS Service (recommended) or assign a static IP address for router’s WAN port and synchronize your System Time with internet. 3. In the Client IP Address field, enter the range of IP addresses (up to 10) that can be leased to the devices by the PPTP VPN server. 4. Set the PPTP connection permission according to your needs.
Chapter 12 VPN Server 3 ) Click ADD. Step 2. Configure PPTP VPN Connection on Your Remote Device The remote device can use the Windows built-in PPTP software or a third-party PPTP software to connect to PPTP Server. Here we use the Windows built-in PPTP software as an example. 1. Go to Start > Control Panel > Network and Internet > Network and Sharing Center. 2. Select Set up a new connection or network. 3. Select Connect to a workplace and click Next.
Chapter 12 VPN Server 4. Select Use my Internet connection (VPN). 5. Enter the internet IP address of the router (for example: 218.18.1.73) in the Internet address field. Click Next.
Chapter 12 VPN Server 6. Enter the User name and Password you have set for the PPTP VPN server on your router, and click Connect. 7. The PPTP VPN connection is created and ready to use.
Chapter 12 VPN Server 71
Chapter 13 Customize Your Network Settings This chapter guides you on how to configure advanced network features.
Chapter 13 Customize Your Network Settings 13. 1. Change the LAN Settings The router is preset with a default LAN IP 192.168.0.1, which you can use to log in to its web management page. The LAN IP address together with the Subnet Mask also defines the subnet that the connected devices are on. If the IP address conflicts with another device on your local network or your network requires a specific IP subnet, you can change it. 1. Visit http://tplinkwifi.
Chapter 13 Customize Your Network Settings 2 ) Click SAVE. 3 ) After configuring IGMP proxy, IPTV can work behind your router now. You can connect your set-top box to any of the router’s Ethernet port. If IGMP is not the technology your ISP applies to provide IPTV service: 1 ) Tick Enable IPTV/VLAN. 2 ) Select the appropriate Mode according to your ISP. • Select Bridge if your ISP is not listed and no other parameters are required.
Chapter 13 Customize Your Network Settings 13. 3. Specify DHCP Server Settings By default, the DHCP (Dynamic Host Configuration Protocol) Server is enabled and the router acts as a DHCP server; it dynamically assigns TCP/IP parameters to client devices from the IP Address Pool. You can change the settings of the DHCP Server if necessary, and you can reserve LAN IP addresses for specified client devices. 1. Visit http://tplinkwifi.net, and log in with your TP-Link ID or the password you set for the router.
Chapter 13 Customize Your Network Settings 2. Click VIEW CONNECTED DEVICES and select the you device you want to reserve an IP for. Then the MAC Address will be automatically filled in. Or enter the MAC address of the client device manually. 3. Enter the IP address to reserve for the client device. 4. Click SAVE. 13. 4. Set Up a Dynamic DNS Service Account Most ISPs assign a dynamic IP address to the router and you can use this IP address to access your router remotely.
Chapter 13 Customize Your Network Settings If you have selected NO-IP or DynDNS, enter the username, password and domain name of your account. 5. Click LOGIN AND SAVE. Tips: If you want to use a new DDNS account, please click Logout first, and then log in with a new account. 13. 5. Create Static Routes Static routing is a form of routing that is configured manually by a network administrator or a user by adding entries into a routing table.
Chapter 13 Customize Your Network Settings I want to: Visit multiple networks and servers at the same time. For example, in a small office, my PC can surf the internet through Router A, but I also want to visit my company’s network. Now I have a switch and Router B. I connect the devices as shown in the following figure so that the physical connection between my PC and my company’s server is established.
Chapter 13 Customize Your Network Settings Network Destination: The destination IP address that you want to assign to a static route. This IP address cannot be on the same subnet with the WAN IP or LAN IP of Router A. In the example, the IP address of the company network is the destination IP address, so here enter 172.30.30.1. Subnet Mask: Determines the destination network with the destination IP address. If the destination is a single IP address, enter 255.255.255.
Chapter 13 • Customize Your Network Settings To enable or disable the wireless function: 1. Go to Wireless or Advanced > Wireless > Wireless Settings. 2. The wireless function is enabled by default. If you want to disable the wireless function of the router, just untick the Enable checkbox of each wireless network. In this case, all the wireless settings will be invalid. • To change the wireless network name (SSID) and wireless password: 1. Go to Wireless or Advanced > Wireless > Wireless Settings. 2.
Chapter 13 Customize Your Network Settings 3. Keep the default values or set a new SSID and password, and click SAVE. This SSID and password will be applied for the 2.4GHz and 5GHz wireless networks. • To change the security option: 1. Go to Advanced > Wireless > Wireless Settings. 2. Select an option from the Security drop-down list. • No security - No password is needed to access your guest network.
Chapter 13 Customize Your Network Settings • Mode - Select a transmission mode according to your wireless client devices. It is recommended to just leave it as default. • To use the OFDMA feature: The OFDMA feature enables multiple users to transmit data simultaneously, and thus greatly improves speed and efficiency. Note: Only when your clients also support OFDMA can you fully enjoy the benefits. 1. Go to Wireless or Advanced > Wireless > Wireless Settings. 2. Enable OFDMA. 13. 7.
Chapter 13 • • Customize Your Network Settings Note: The Effective Time Schedule is based on the time of the router. You can go to Advanced > System > Time & Language to modify the time. The wireless network will be automatically turned on after the time period you set. 13. 8. Use WPS for Wireless Connection Wi-Fi Protected Setup (WPS) provides an easier approach to set up a security-protected Wi-Fi connection. 1. Visit http://tplinkwifi.
Chapter 13 Customize Your Network Settings Note: PIN (Personal Identification Number) is an eight-character identification number preset to each router. WPS supported devices can connect to your router with the PIN. The default PIN is printed on the label of the router. 13. 8. 3. Push the WPS Button Click Start on the screen or directly press the router’s WPS button. Within two minutes, enable WPS on your personal device.
Chapter 13 Customize Your Network Settings • WMM - WMM function can guarantee the packets with high-priority messages being transmitted preferentially. • Short GI - It is recommended to enable this function, for it will increase the data capacity by reducing the guard interval time. • AP Isolation - This function isolates all connected wireless stations so that wireless stations cannot access each other through WLAN.
Chapter 14 Manage the Router This chapter will show you the configuration for managing and maintaining your router.
Chapter 14 Manage the Router 14. 1. Upgrade the Firmware TP-Link aims at providing better network experience for users. We will inform you through the web management page if there’s any update firmware available for your router. Also, the latest firmware will be released at the TP-Link official website www.tp-link.com, and you can download it from the Support page for free. • • Note: Backup your router configuration before firmware upgrade. Do NOT turn off the router during the firmware upgrade. 14. 1.
Chapter 14 Manage the Router Tips: If there’s a new and important firmware update for your router, you will see the prompt notification on your computer as long as a web browser is opened. Click UPGRADE, and log in to the web management page with the username and password you set for the router. You will see the Firmware Upgrade page. 14. 1. 2. Local Upgrade 1. Download the latest firmware file for the router from www.tp-link.com. 2. Visit http://tplinkwifi.
Chapter 14 • Manage the Router To restore configuration settings: 1. Click BROWSE to locate the backup configuration file stored on your computer, and click RESTORE. 2. Wait a few minutes for the restoring and rebooting. Note: During the restoring process, do not turn off or reset the router. • To reset the router except your login password and TP-Link ID: 1. In the Factory Default Restore section, click RESTORE. 2. Wait a few minutes for the resetting and rebooting.
Chapter 14 Manage the Router Note: • During the resetting process, do not turn off or reset the router. • We strongly recommend you backup the current configuration settings before resetting the router. 14. 3. Change the Login Password The account management feature allows you to change your login password of the web management page. Note: If you are using a TP-Link ID to log in to the web management page, the account management feature will be disabled.
Chapter 14 Manage the Router Tips: • SMTP server is available for users in most webmail systems. For example, the SMTP server address of Gmail is smtp.gmail.com. • Generally, Authentication should be enabled if the login of the mailbox requires username and password. 5. Click SAVE. To recover the login password, please visit http://tplinkwifi.net, click Forgot Password? on the login page and follow the instructions to set a new password. 14. 5.
Chapter 14 • Manage the Router Allow all LAN connected devices to manage the router: Select All Devices for Local Managers. • Allow specific devices to manage the router: 1. Select All Devices for Local Managers and click SAVE. 2. Click Add Device.
Chapter 14 Manage the Router 3. Click VIEW CONNECTED DEVICES and select the device to manage the router from the Connected Devices list, or enter the MAC address of the device manually. 4. Specify a Description for this entry. 5. Click SAVE. 14. 6. Remote Management This feature allows you to control remote devices’ authority to manage the router. 1. Visit http://tplinkwifi.net, and log in with your TP-Link ID or the password you set for the router. 2.
Chapter 14 Manage the Router 4. Click SAVE. Devices on the internet can log in to http://Router’s WAN IP address:port number (such as http://113.116.60.229:1024) to manage the router. • • Tips: You can find the WAN IP address of the router on Network Map > Internet. The router’s WAN IP is usually a dynamic IP. Please refer to Set Up a Dynamic DNS Service Account if you want to log in to the router through a domain name. • Allow a specific device to manage the router remotely: 1.
Chapter 14 Manage the Router 1. Visit http://tplinkwifi.net, and log in your TP-Link ID or the password you set for the router. 2. Go to Advanced > System > System Log. 3. Choose the type and level of the system logs as needed. 4. In the Save Log section, click SAVE TO LOCAL to save the system logs to a local disk.
Chapter 14 Manage the Router 1 ) Email From: Enter the email address used for sending the system log. 2 ) Select Require Password. Tips: Generally, Require Password should be selected if the login of the mailbox requires username and password. 3 ) Username: Enter the email address used for sending the system log. 4 ) Email Password: Enter the password to login the sender’s email address. 5 ) SMTP Server: Enter the SMTP server address. Tips: SMTP server is available for users in most webmail systems.
Chapter 14 Manage the Router 1. Visit http://tplinkwifi.net, and log in with your TP-Link ID or the password you set for the router. 2. Go to Advanced > System > Diagnostics. 3. Enter the information: 1 ) Choose Ping or Traceroute as the diagnostic tool to test the connectivity; • Ping is used to test the connectivity between the router and the tested host, and measure the round-trip time.
Chapter 14 Manage the Router The figure below indicates the proper connection between the router and the Yahoo server (www.Yahoo.com) tested through Traceroute. 14. 9. Set Up System Time System time is the time displayed while the router is running. The system time you configure here will be used for other time-based functions like Parental Controls. You can choose the way to obtain the system time as needed. 1. Visit http://tplinkwifi.
Chapter 14 Manage the Router 5. (Optional) In the NTP Server II field, enter the IP address or domain name of the second NTP Server. 6. Click SAVE. • To get time from your computer: 1. In the Set Time field, select Get from Managing Device. 2. The time of your computer will then be displayed and click SAVE. • To manually set the date and time: 1. In the Set Time field, select Manually. 2. Set the current Date (In MM/DD/YYYY format). 3. Set the current Time (In HH/MM/SS format). 4. Click SAVE.
Chapter 14 Manage the Router 2. Select the correct Start date and time when daylight saving time starts at your local time zone. 3. Select the correct End date and time when daylight saving time ends at your local time zone. 4. Click SAVE. 14. 10. Set the Router to Reboot Regularly The Scheduled Reboot feature cleans the cache to enhance the running performance of the router. 1. Visit http://tplinkwifi.net, and log in with your TP-Link ID or the password you set for the router. 2.
Chapter 14 Manage the Router 14. 11. Control the LED The LED of the router indicates its activities and status. You can enable the Night Mode feature to specify a time period during which the LED is off. 1. Visit http://tplinkwifi.net, and log in with your TP-Link ID or the password you set for the router. 2. Go to Advanced > System > LED Control. 3. Enable Night Mode. 4. Specify the LED off time, and the LED will be off during this period every day. 5. Click SAVE.
FAQ Q1. What should I do if I forget my wireless password? The default wireless password is printed on the label of the router. If the password has been altered: 1. Connect your computer to the router using an Ethernet cable. 2. Visit http://tplinkwifi.net, and log in with your TP-Link ID or the password you set for the router. 3. Go to Wireless to retrieve or reset your wireless password. Q2.
4 ) Click LAN settings and deselect the following three options and click OK. 5 ) Go to Advanced > Restore advanced settings, click OK to save the settings.
• Use another web browser or computer to log in again. • Reset the router to factory default settings and try again. If login still fails, please contact the technical support. Note: You’ll need to reconfigure the router to surf the internet once the router is reset. Q4. What should I do if I can’t access the internet even though the configuration is finished? 1. Visit http://tplinkwifi.net, and log in with your TP-Link ID or the password you set for the router. 2.
• Restart the modem and the router. 1 ) Power off your modem and router, and leave them off for 1 minute. 2 ) Power on your modem first, and wait about 2 minutes until it gets a solid cable or Internet light. 3 ) Power on the router. 4 ) Wait another 1 or 2 minutes and check the internet access. • Reset the router to factory default settings and reconfigure the router. • Upgrade the firmware of the router.
1 ) Visit http://tplinkwifi.net, and log in with your TP-Link ID or the password you set for the router. 2 ) Go to Internet or Advanced > Network > Internet and focus on the MAC Clone section. 3 ) Choose an option as needed (enter the MAC address if Use Custom MAC Address is selected), and click SAVE.
1 ) Power off your modem and router, and leave them off for 1 minute. 2 ) Power on your modem first, and wait about 2 minutes until it get a solid cable or Internet light. 3 ) Power on the router. 4 ) Wait another 1 or 2 minutes and check the internet access. • Double check the internet connection type. 1 ) Confirm your internet connection type, which can be learned from the ISP. 2 ) Visit http://tplinkwifi.net, and log in with your TP-Link ID or the password you set for the router.
• Make sure the wireless adapter driver is installed successfully and the wireless adapter is enabled. • On Windows 7 1 ) If you see the message No connections are available, it is usually because the wireless function is disabled or blocked somehow. 2 ) Click Troubleshoot and windows might be able to fix the problem by itself.
If you can find your wireless network but fail to connect, please follow the steps below: • Authenticating problem/password mismatch: 1 ) Sometimes you will be asked to type in a PIN number when you connect to the wireless network for the first time. This PIN number is different from the Wireless Password/Network Security Key, usually you can only find it on the label of your router.
• Windows unable to connect to XXXX / Can not join this network / Taking longer than usual to connect to this network: • Check the wireless signal strength of your network. If it is weak (1~3 bars), please move the router closer and try again. • Change the wireless Channel of the router to 1, 6 or 11 to reduce interference from other networks. • Re-install or update the driver for your wireless adapter of the computer.
FCC compliance information statement Product Name: AX1800 Dual-Band Wi-Fi 6 Router Model Number: Archer AX20 Component Name I.T.E. Power Model T120150-2B1 Responsible party: TP-Link USA Corporation, d/b/a TP-Link North America, Inc. Address: 145 South State College Blvd. Suite 400, Brea, CA 92821 Website: http://www.tp-link.com/us/ Tel: +1 626 333 0234 Fax: +1 909 527 6803 E-mail: sales.usa@tp-link.
Note: The manufacturer is not responsible for any radio or TV interference caused by unauthorized modifications to this equipment. Such modifications could void the user’s authority to operate the equipment. FCC RF Radiation Exposure Statement This equipment complies with FCC RF radiation exposure limits set forth for an uncontrolled environment. This device and its antenna must not be co-located or operating in conjunction with any other antenna or transmitter.
• Reorient or relocate the receiving antenna. • Increase the separation between the equipment and receiver. • Connect the equipment into an outlet on a circuit different from that to which the receiver is connected. • Consult the dealer or an experienced radio/ TV technician for help. This device complies with part 15 of the FCC Rules. Operation is subject to the following two conditions: 1. This device may not cause harmful interference. 2.
CE Mark Warning This is a class B product. In a domestic environment, this product may cause radio interference, in which case the user may be required to take adequate measures. OPERATING FREQUENCY (the maximum transmitted power) 2400 MHz -2483.5 MHz(20dBm) 5150 MHz -5250 MHz(23dBm) EU declaration of conformity TP-Link hereby declares that the device is in compliance with the essential requirements and other relevant provisions of directives 2014/53/EU, 2009/125/ EC, 2011/65/EU and (EU)2015/863.
L’émetteur/récepteur exempt de licence contenu dans le présent appareil est conforme aux CNR d’Innovation, Sciences et Développement économique Canada applicables aux appareils radio exempts de licence. L’exploitation est autorisée aux deux conditions suivantes : 1. l’appareil ne doit pas produire de brouillage; 2.
⡛⸆桧㼘걽㐼勞⛓⢪欽♶䖤䕧갠굳菔㸝Ⰼ⿺䎁仟ざ岁鸑⥌竤涮植剣䎁仟植韌 儗䥰用⽰⨢欽⚛佖㊤荛搁䎁仟儗倰䖤糒糵⢪欽կ 鶣ざ岁鸑⥌䭷⣜ꨵ⥌盗椚岁鋊㹁⡲噟⛓搁箁ꨵ鸑⥌կ ⡛⸆桧㼘걽㐼勞갭䗽「ざ岁鸑⥌䧴䊨噟ծ猰㷸⿺ꄳ派欽ꨵ岚鱖㼘䚍ꨵ堤鏤⪓⛓䎁 仟կ 䥰鼙⯝䕧갠꣡鵛ꨭ麧禹窠⛓乼⡲կ 넞㟞渤䭷ぢ䚍㣔箁〫䖤䥰欽倴㔿㹁䒭럊㼩럊禹窠կ 㸝Ⰼ镩鑉⿺岤䠑✲갪 ˖ 锝⢪欽⾲酤ꨵ彂⣘䥰㐼䧴〫腊䭽撑劥欴ㅷ岤僈涸ꨵ彂㘗⢪欽劥欴ㅷկ ˖ 幡悥劥欴ㅷ⛓锝⯓䬬䱈ꨵ彂箁կ锝⺡⢪欽巊넒ծ㑑ꪒ幡悥ⷭ䧴憈䋒鹍遤 幡悥կ ˖ 岤䠑惐锝⺡㼞宐䧴Ⱖ➭巊넒悝扴ⵌ劥欴ㅷ♳կ ˖ 䳃坵莄〡⣘鸑괏⢪欽⟄焷⥂劥欴ㅷ涸乼⡲〳ꬑ⚛姺麔攧锝⺡㜧㝱 䧴銻覇〡կ ˖ 锝⺡㼞劥欴ㅷ縨佞倴ꬑ鵛攧彂涸㖑倰կꤑꬋ剣姻䌢涸鸑괏や♶〳佞㖈 㺙ꟗ⡙縨⚥կ ˖ ♶銳猙荈䬒堤媽䧴荈遤笞⥝㥵欴ㅷ剣佦ꥻ锝莄⾲䑖䧴➿椚㉁耡粯կ ꣳ欽暟颶ゎ剣䞔屣垥爙耪僈剅 ꣳ欽暟颶⿺Ⱖ⻊㷸痗贪 㢴徃耡薅 㢴徃✳薅ꄍ ꊋ ꓸ 寏 Ⱉ⭆ꋈ 欴ㅷ⯋⟝ぜ珖 1## 1#%& 1C $E )H $S 1$# ӧ ӧ ӧ ӧ ӧ
Safety Information • Keep the device away from water, fire, humidity or hot environments. • Do not attempt to disassemble, repair, or modify the device. If you need service, please contact us. • Do not use damaged charger or USB cable to charge the device. • Do not use any other chargers than those recommended • Do not use the device where wireless devices are not allowed. • Adapter shall be installed near the equipment and shall be easily accessible.