
User's Manual


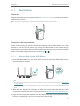


Table Of Contents

6
Chapter 2
Set Up Internet Connection
2. 1. Quick Setup
Power on
Plug the extender into an electrical outlet near your host router, and then wait until the
Power LED is solid on.
Note: For safety, we suggest that you plug the extender in upright directions as shown below.
Connect to the host network
There are three ways to connect to the host network: via the WPS button, via a web
browser or via the TP-Link Tether app. Using the WPS button is the easiest way to
extend your host network. We recommend you to use this way if your router has a WPS
button. The button might look like one of these: .
2. 1. 1. Method One: Via the WPS Button
1. Press the WPS button on your host router, and then press the WPS button on the
extender within 2 minutes.
Tips:
• Some ISP gateways disable the WPS function by default. If the WPS connection fails, please refer to Method Two:
Via a Web Browser.
• For more information about using WPS button on your host router, please refer to the router manufacturer’s user
guide.
2. Wait until the Signal LED changes to solid blue, which indicates that the WPS
connection is successful. If it’s not, please refer to Method Two: Via a Web Browser .
3. If you are connecting the extender to a dual-band router but only the 2.4GHz or 5GHz
LED is on, repeat Step 1 and 2 to connect to the other band.