User‘s Guide Bedienungsanleitung Mode d‘emploi Instrucciones de manejo Manuale di istruzioni Medusa 5.
DE S ICHERHEITSHINWEISE Wichtig! Bevor Sie dieses Produkt verwenden, lesen Sie bitte die Sicherheits- und Warnhinweise im Handbuch. Bewahren Sie dieses Handbuch auf, um zu einem späteren Zeitpunkt darauf zurückgreifen zu können. Haftungsausschluss Die Jöllenbeck GmbH übernimmt keine Haftung für Schäden am Produkt oder Verletzungen von Personen aufgrund von unachtsamer, unsachgemäßer, falscher oder nicht dem vom Hersteller angegebenen Zweck entsprechender Verwendung des Produkts.
Einleitung Herzlichen Glückwunsch zum Erwerb des Medusa 5.1 Home Edition Headsets. Genießen Sie ein Sounderlebnis, das Sie mitten ins Geschehen versetzt – hören Sie, wie links hinter Ihnen ein Tür schließt oder rechts ein Auto an Ihnen vorbei fährt. Bitte lesen Sie dieses Handbuch sorgfältig durch, bevor Sie das Gerät anschließen. Bewahren Sie dieses Handbuch auf, um zu einem späteren Zeitpunkt darauf zurückgreifen zu können. Produkteigenschaften Medusa 5.
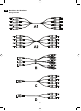
DE Anschluss des Headsets Beiliegende Kabel 6
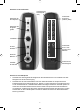
Anschlüsse an der Verstärkerbox DE Anschlüsse für Soundquelle 1 (PC) Anschlüsse für Soundquelle 2 (DVD) Wechseln der Soundquelle Wechseln des Ausgabegeräts Lautstärke Anschlüsse für 5.1 Lautsprecher und Mikrofon An/AusSchalter Externes Mikrofon Anschluss für das Netzgerät HeadsetAnschluss Anschluss an einen DVD-Spieler Schließen Sie das mitgelieferte Netzgerät an die Verstärkerbox an und verbinden Sie das Netzgerät mit der Stromversorgung.
DE Chinch-Kennzeichnung Anschluss am DVD-Spieler Grüner Klinkenstecker FR (roter Chinch-Stecker) Front Right FL (weißer Chinch-Stecker) Front Left Schwarzer Klinkenstecker RR (roter Chinch-Stecker) Rear Right RL (weißer Chinch-Stecker) Rear Left Roter Klinkenstecker WF (roter Chinch-Stecker) Subwoofer CE (weißer Chinch-Stecker) Center Schließen Sie das Headset an den 9-poligen Stecker G9 an der Vorderseite der Verstärkerbox an. Anschluss an die 5.
Um das Headset zu testen, können Sie das mit Ihrer Soundkarte gelieferte Testprogramm verwenden. Gegebenenfalls müssen Sie den Sound über die Regler an der Kabelfernbedienung einstellen. Anschluss an einen CD-Player Stecken Sie das Headset an den 9-poligen Anschluss von Kabel D. Verbinden Sie den Klinkenstecker für die Lautsprecher mit der Klinkenbuchse am CD-Player Bedienung Wechseln der Soundquelle Beim ersten Einschalten der Verstärkerbox leuchten die LEDs für INPUT und OUTPUT blau.
DE Technische Daten Verstärker-Box: Spannungsversorgung: 7,5 DC Mikrofon-Daten: Kondensatormikrofon: Ø 9,7mm Richtwirkung: ungerichtetes Mikrofon Impedanz: 2200 Ω Empfindlichkeit: -60dB ± 2dB Frequenzgang: 30Hz~16kHz Betriebsspannung: 4,5V Lautsprecher-Daten: Surround-Lautsprecher (Center/hinten): Ø30mmx2, 32Ω, 20Hz-20kHz. Front-Lautsprecher: Ø40mmx2, 64Ω, 20Hz-20kHz. Subwoofer: Ø 32mmx2, 8Ω, 20Hz-120Hz.
Notizen: DE 11
I MPORTANT S AFETY I NFORMATION GB Important! Before using this product, read the instruction manual for important safety information. Please retain this manual for future reference and warranty information. Excemption from Liability No liability will attach to Jöllenbeck GmbH if any damage, injury or accident is attributable to inattentive, inappropriate, negligent or incorrect operation of the machinery whether or not caused deliberately.
Introduction Congratulations on your purchase of the Medusa 5.1 Home Edition Headset. Enjoy a world of sound that puts you right at the centre of the action - listen as a door shuts behind you to your left or experience the sound of a car as is speeds past you from the right. Please read this manual carefully before you connect up your equipment. Please also keep this manual in a handy place for your future reference. Features Medusa 5.1 headset with amplifier allowing connection to a 5.
Connecting the headset GB Accompanying cables 14
Connections on the amp box Ports for audio source 1 (PC) GB Ports for audio source 2 (DVD) Change audio source Change output device Volume control Ports for 5.1 loudspeakers and microphone Power switch External microphone Mains adapter jack Headset port Connecting to a DVD player Connect the supplied mains adapter to the amp box and then plug the adapter into the mains.
RCA Marking GB Connector on DVD player Green jack plug FR (red RCA connector) Front Right FL (white RCA connector) Front Left Black jack plug RR (red RCA connector) Rear Right RL (white RCA connector) Rear Left Red jack plug WF (red RCA connector) Subwoofer CE (white RCA connector) Centre Connect the headset connector to the 9 pin socket “G9“ on the front side of the amp box. Connecting to a 5.
Operation Changing audio source When the amp box is switched on, the “INPUT” and “OUTPUT” LEDs will light up blue. To switch from “INPUT 1” to the audio source on “INPUT II” simply press the input button on the front side of the amp box. The relevant LED will now light up red and “INPUT II” will now be selected as the audio source. Changing audio output To switch the audio output from the headset to an external 5.
Technical Data GB Amp box Power supply: 7.5 DC Microphone data: Condensor microphone: Ø 9.7mm Directivity: Omni-directional microphone Impedence: 2200 Ω Sensitivity: -60dB ± 2dB Frequency response: 30Hz~16kHz Operating voltage: 4.5V Speaker data: Surround speaker (centre/rear): Ø30mmx2, 32Ω, 20Hz-20kHz. Front speaker: Ø40mmx2, 64Ω, 20Hz-20kHz. Subwoofer: Ø 32mmx2, 8Ω, 20Hz-120Hz.
Notes: GB 19
I NSTRUCTIONS DE SÉCURITÉ FR Important! Avant d‘utiliser ce produit, consultez le manuel d‘instructions. Vous y trouverez des informations importantes sur la sécurité. Conservez ce manuel pour référence ultérieure. Entretien Ne tenez pas d‘effectuer vous-même l’entretien du dispositif ni de le réparer. Pour les opérations d’entretien, adressez-vous à du personnel qualifié. N‘essayez jamais d‘apporter une quelconque modification au dispositif. Cela pourrait annuler votre garantie.
Introduction Félicitations pour l’achat du combiné casque-micro Medusa 5.1 Home Edition. Son univers sonore vous plonge au cœur de l’action – vous entendez la porte se refermer à gauche derrière vous ou les voitures passer à droite de vous. Veuillez lire soigneusement ce mode d’emploi avant de raccorder l’appareil. Conservez ce mode d’emploi pour pouvoir le consulter à nouveau ultérieurement. Caractéristiques Combiné casque-micro 5.
Raccordement du combiné casque-micro Câbles fournis FR 22
Raccordements sur le boîtier amplificateur Prises pour source sonore 1 (PC) Prises pour source sonore 2 (DVD) Changement de source sonore Changement d’appareil de sortie Volume Prises pour enceintes 5.1 et microphone Interrupteur Marche/Arrêt Microphone externe Prise pour bloc d’alimentation Prise combiné casque-micro Raccordement à un lecteur de DVD Reliez le bloc d’alimentation fourni au boîtier amplificateur et raccordez le bloc d’alimentation à la source de courant.
Marquage cinch FR Raccordement au lecteur de DVD Connecteur jack vert FR (fiche cinch rouge) Front Right (avant droite) FL (fiche cinch blanche) Front Left (avant gauche) Connecteur jack noir RR (fiche cinch rouge) Rear Right (arrière droite) RL (fiche cinch blanche) Rear Left (arrière gauche) Connecteur jack rouge WF (fiche cinch rouge) Subwoofer (basses) CE (fiche cinch blanche) Center (Centre) Raccordez le combiné casque-micro au connecteur à 9 broches G9 à l’avant du boîtier amplificateur.
Pour tester le combiné casque-micro, vous pouvez utiliser le programme test fourni avec votre carte son. Au besoin, vous devrez régler le son à l’aide des boutons de contrôle qui se trouvent sur la télécommande filaire. Raccordement à un lecteur de CD Reliez le combiné casque-micro au connecteur à 9 broches du câble D. Reliez le connecteur jack pour enceintes à la prise jack sur le lecteur de CD.
Caractéristiques techniques Boîtier amplificateur : Alimentation électrique : 7,5 DC FR Caractéristiques du microphone : Microphone à condensateur : Ø 9,7 mm Directivité : microphone omnidirectionnel Impédance : 2 200 Ω Sensibilité : -60 dB ± 2 dB Courbe de réponse : 30 Hz~16 kHz Tension de service : 4,5 V Caractéristiques des haut-parleurs : Haut-parleurs surround (central/arrière) : Ø 30 mm x 2, 32 Ω, 20 Hz-20 kHz. Haut-parleur avant : Ø 40 mm x 2, 64 Ω, 20 Hz-20 kHz.
Notes: FR 27
N OTAS ES IMPORTANTES SOBRE LA SEGURIDAD Importante! Antes de utilizar este producto, lea el manual de instrucciones para obtener informaciones importantes acerca de la seguridad. Guarde el manual de instrucciones para consultas en el futuro. Soluciòn de problemas No intente reparar el dispositivo usted mismo. Remita todas las reparaciones al personal de servicio cualificado. No intente modificar el dispositivo de ninguna manera. Si lo hace, la garantía perdería validez.
Introducción Felicidades por la adquisición de este headset Medusa 5.1 Home Edition. Disfruta del sonido en estado puro que te sitúa en plena acción. Escucha como se cierra una puerta a tu izquierda o siente la aceleración de un coche a toda velocidad pasando a tu derecha. Lee atentamente las instrucciones antes de conectar y encender este aparato. Guarda este manual para que puedas servirte de él y consultarlo posteriormente cuando tengas alguna duda. Características del producto Medusa 5.
Conexiones del headset Cables que se adjuntan ES 30
Conexión a la caja amplificadora Conexiones para fuente de audio 1 (PC) Conexiones para fuente de audio 2 (DVD) Cambio de la fuente de sonido Cambio del aparato de salida Volumen Conexiones para altavoces 5.1 y micrófono Interruptor Encendido/ apagado Micrófono externo Conexión para fuente de alimentación Conexión auriculares Conexión a un lector de DVD: Conecta el adaptador adjunto a la caja amplificadora y a continuación enchúfalo a una toma de corriente.
Código RCA Conexión a lector DVD Conector verde tipo jack ES FR (conector RCA rojo) Frente derecho FL (conector RCA blanco) Frente izq. Conector negro tipo jack RR (conector RCA rojo) Posterior derecho RL (conector RCA blanco) Posterior izq. Conector rojo tipo jack WF (conector RCA rojo) subwoofer CE (conector RCA blanco) Centro Conecta los auriculares al conector de nueve polos G9 en la parte frontal de la caja amplificadora. Conexión a la tarjeta de sonido 5.
Conexión a un lector de CD: Enchufa el headset al conector de 9 polos del cable D. Enchufa el conector tipo jack de los altavoces con el conector hembra del lector de CD. Manejo ES Cambio de la fuente de sonido Al conectar por primera vez la caja amplificadora se encienden en azul los LEDs de INPUT y OUTPUT. Para conmutar de INPUT I a la fuente de audio en INPUT II pulsa el botón Input que está en la parte delantera de la caja amplificadora.
Datos técnicos Caja amplificadora Tensión de alimentación: 7,5 CC ES Datos técnico micrófono: Micrófono de condesador: Ø 9,7mm Directividad: Micrófono no direccional Impedancia: 2200 Ω Sensibilidad: -60dB ± 2dB Rango de frecuencia: 30Hz~16kHz Tensión operativa: 4,5V Datos altavoces: Altavoces surround (central/posterior): Ø30mmx2, 32Ω, 20Hz-20kHz. Altavoz frente: Ø40mmx2, 64Ω, 20Hz-20kHz. Subwoofer: Ø 32mmx2, 8Ω, 20Hz-120Hz.
Notas: ES 35
I MPORTANTI INFORMAZIONI IN MATERIA DI SICUREZZA Importante! IT Prima di utilizzare il prodotto, è necessario leggere attentamente nel manuale d’istruzione le avvertenze sulla sicurezza, nonché generali. Conservare accuratamente il presente manuale d‘istruzioni al fine di poterlo successivamente consultare nuovamente: Ricerca guasti/riparazione Non riparate l’apparecchio e non effettuate la manutenzione da soli. Per lavori di riparazione o manutenzione rivolgeteVi a personale competente specializzato.
Introduzione Congratulazioni per aver acquistato l’headset Medusa 5.1 Home Edition. Godetevi un esperienza sonora che vi porta nel vivo dell’azione – sentite una porta che si chiude a sinistra dietro a voi o una macchina che passa sulla vostra destra. Vi preghiamo di leggere attentamente questo manuale prima di collegare il prodotto. Conservate questo manuale per poterlo consultare in un secondo tempo. Caratteristiche del prodotto Medusa 5.
Collegamento dell’headset Cavi compresi nella fornitura IT 38
Ingressi dell’amplificatore Ingressi audio 1 (PC) Ingressi audio 2 (DVD) Cambiare la fonte audio IT Cambiare il dispositivo di uscita Volume Ingresso/ uscita per altoparlanti 5.1 e microfono Interruttore on/off Microfono esterno Attacco per l’alimentatore di rete Attacco headset Collegamento ad un lettore DVD Collegare l’alimentatore con l’amplificatore ed allacciare quindi l’alimentatore alla rete di corrente.
Spina jack verde Spina jack nera IT Spina jack rossa Connessioni RCA FR (spina RCA rossa) FL (spina RCA bianca) RR (spina RCA rossa) RL (spina RCA bianca) Ingresso lettore DVD Front Right Front Left Rear Right Rear Left WF (spina RCA rossa) CE (spina RCA bianca) Subwoofer Center Collegare l’headset alla spina a 9 poli G9 sul frontale dell’amplificatore. Collegamento alla scheda audio 5.
Collegamento al lettore CD Collegare l’headset all’attacco a 9 poli del cavo D. Collegare la spina jack per gli altoparlanti con la presa jack del lettore CD Impiego Cambiare la fonte audio Quando l’amplificatore viene acceso per la prima volta, i LED per l’INPUT e l’OUTPUT si illuminano di blu. Per cambiare dall’INPUT I alla fonte audio sull’INPUT II, premere il pulsante dell’Input sul frontale dell’amplificatore. Il LED allora si illuminerà di rosso e l’ingresso INPUT I è ora selezionato come fonte audio.
Dati tecnici Amplificatore: Alimentazione di tensione: 7,5 DC IT Dati tecnici del microfono: Microfono a condensatore: Ø 9,7mm Direttività: microfono omnidirezionale Impedenza: 2200 Ω Sensibilità: -60dB ± 2dB Risposta in frequenza: 30Hz~16kHz Tensione d’esercizio: 4,5V Dati tecnici degli altoparlanti: Altoparlanti surround (centrale/rear): Ø30mmx2, 32Ω, 20Hz-20kHz. Altoparlante front: Ø40mmx2, 64Ω, 20Hz-20kHz. Subwoofer: Ø 32mmx2, 8Ω, 20Hz-120Hz.
Note: IT 43
Jöllenbeck GmbH, Kreuzberg 2, D-27404 Weertzen, Germany SL-8796 © Phone: +49 (0) 4287 125 133 Web: www.speed-link.com 2005 Jöllenbeck GmbH. All rights reserved. All product names mentioned in this manual may be trademarks or registered trademarks and are the property of their respective owners. Information contained herein is subject to change without notice. This publication or parts of it may not be reproduced without the express consent of the publisher.