
User Manual

Important safety instructions
1. Read these instructions – All the safety and operating instructions should be read before this product is operated.
2. Keep these instructions – The safety and operating instructions should be retained for future reference.
3. Heed all warnings – All warnings on the appliance and in the operating instructions should be adhered to.
4. Follow all instructions – All operating and use instructions should be followed.
5. Do not use this apparatus near water – The appliance should not be used near water or moisture – for example, in a wet basement or near a swimming pool, and the like.
6. Clean only with dry cloth.
7. Do not block any ventilation openings. Install in accordance with the instructions.
8. Do not install near any heat sources such as radiators, heat registers, stoves, or other apparatus (including ampliers) that produce heat.
9. Do not defeat the safety purpose of the polarized or grounding plug. A polarized plug has two blades with one wider than the other. Grounding plug has two blades and a
third grounding prong. The wide blade or the third prong is provided for your safety. If the provided plug does not t into your outlet, consult an electrician for
replacement of the obsolete outlet.
10. Protect the power cord from being walked on or pinched particularly at the plugs, convenience receptacles, and at the point where they exit from the apparatus.
11. Only use attachments/accessories specied by the manufacturer.
12. Use only with the cart, stand, tripod, bracket, or table specied by the manufacturer, or sold with the apparatus. When a cart or rack is used,
use caution when moving the cart/apparatus combination to avoid injury from tip-over.
13. Unplug the apparatus during lightning storms or when unused for long periods of time.
14. Refer all servicing to qualied personnel. Servicing is required when the apparatus has been damaged in any way, such as power supply cord or plug is damaged, liquid
has been spilled or objects have fallen into the apparatus; or if it has been exposed to rain or moisture, does not operate normally, or has been dropped.
15. Do not install this equipment in a conned or built-in space such as a bookcase. Install in well-ventilated conditions. The ventilation should not be impeded by covering the
ventilation openings with items such as newspaper, table-cloths, curtains etc.
16. WARNING:To reduce the risk of re or electric shock, do not expose this apparatus to rain or moisture. The apparatus shall not be exposed to dripping or splashing and that
objects lled with liquids, such as vases, shall not be placed on apparatus.
17. WARNING: The mains plug is used as disconnect device, the disconnect device shall remain readily operable.
18. This equipment is a Class II or double insulated electrical appliance. It has been designed in such a way that it does not require a safety connection to electrical earth.
19. This lightning ash with arrowhead symbol within an equilateral triangle is intended to alert the user to the presence of non-insulated “dangerous voltage” within the
product’s enclosure that may be of sucient magnitude to constitute a risk of electric shock. Warning: To reduce the risk of electric shock, do not remove cover (or back) as
there are no user-serviceable parts inside. Refer servicing to qualied personnel. The exclamation point within an equilateral triangle is intended to alert the user to the
presence of important operating and maintenance instructions in the literature accompanying the appliance.
20. The equipment shall be used at maximum 35 degree C ambient temperature.
21. CAUTION: Danger of explosion if battery is incorrectly replaced. Replace only with the same or equivalent type.
22. WARNING:To prevent injury, this apparatus must be securely attached to the oor/wall in accordance with the installation instruction.
23. WARNING: The battery (battery or batteries or battery pack) shall not be exposed to excessive heat such as sunshine, re or the like.
PRODUCT GUIDE
Model: BWB15HO212
BWB15HO212(RX)
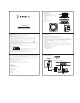
Speaker Overview
SOURCE MODE PAIR
5 6 7 8
13
14
15
16
9
10 11 12
1. Power on/o
2. Source, sequence: Bluetooth“ ”, Optical“OPT”, Aux
3. Sound Mode, sequence: Game” “, Music” ”, Movie” ”
4. Bluetooth pairing key
5. NFC
6. Mute
7. Volume down
8. Volume up
9. Optical
10. Aux in
11. Charging LED
12. DC in
13. Soundbar and Subwoofer connection LED
14. Bass volume
15. Power on/o
16. AC in
Operation Instructions
Connecting External Devices
15V 2A
Specication
Package contents
1. Subwoofer 1pc
2. Soundbar 1pc
3. Aux in cable 1pc
4. Operation manual 1pc
5. AC adapter 1pc
-“Warning: Changes or modications to this unit not expressly approved by the party responsible for compliance could void the user’s authority to operate the equipment.”
-“NOTE: This equipment has been tested and found to comply with the limits for a Class B digital device, pursuant to Part 15 of the FCC Rules. These limits are designed to
provide reasonable protection against harmful interference in a residential installation. This equipment generates, uses and can radiate radio frequency energy and, if not
installed and used in accordance with the instructions, may cause harmful interference to radio communications.
However, there is no guarantee that interference will not occur in a particular installation. If this equipment does cause harmful interference to radio or television reception,
which can be determined by turning the equipment o and on, the user is encouraged to try to correct the interference by one or more of the following measures:
■ Reorient or relocate the receiving antenna.
■ Increase the separation between the equipment and receiver.
■ Connect the equipment into an outlet on a circuit dierent from that to which the receiver is connected.
■ Consult the dealer or an experienced radio/TV technician for help.”
Amplier power: 50W
Battery type: Li-ion rechargeable
Bluetooth transmitter frequency range: 2.402 – 2.480GHz
1. Power on the soundbar and subwoofer. They will automatically be connected wirelessly by Bluetooth.
2. Press Source key on top of the Soundbar to select Bluetooth/OPT/AUX
3. Bluetooth input
Press the SOURCE button to select the Bluetooth mode while the LED” “is on.
Pairing option 1: Pair to your Bluetooth devices by selecting the pair name Zulu. After the initial pairing, the speaker unit will connect
automatically when powered on again. To disconnect from one device and pair to another Bluetooth device, press and hold the PAIR button.
Pairing option 2: If your device supports Near Field Communication (NFC), make sure the NFC feature is activated. Touch the NFC area on your
device with the NFC area on top of the Soundbar.
Note: ” ” ashing quickly indicates Bluetooth device is being located; solid “ ” indicates that Bluetooth is paired.
4. Optical input
Press the SOURCE button to select Optical mode while LED 'OPT' is on. Connect to your device with optical cable (not included) and play.
5. Aux input
Press the SOURCE button to select AUX mode while LED 'AUX' is on. Connect to your device with the included audio cable and play.
6. Select the sound mode
Press the MODE button to select the sound mode you like. When you select Game mode, the“ ” will be on, when you select Music mode the
“ ” will be on, when you select Movie mode the “ ” will be on.
7. Charge the Soundbar
Use the AC adaptor to charge the Soundbar when the battery is low.
Note: Low battery life: Red LED is fast blinking;
Charging: the Red LED is on;
Fully charged: Red LED is o.
TM
FCC Radiation Exposure Statement
This equipment complied with FCC radiation exposure limits set forth for an uncontrolled environment.
This equipment should be installed and operated with minimum distance 20cm between the radiator & your body.