WR3011 300Mbps Wireless Router User Guide 1
Copyright statement Is the registered trademark of Shenzhen MTC Co., LTD. All the products and product names mentioned herein are the trademarks or registered trademarks of their respective holders. Copyright of the whole product as integration, including its accessories and software, belongs to Shenzhen MTC Co., LTD.
Important Safety Instructions 1. Do not open this product or attempt to service it; it may expose you to dangerous high voltage or other risks. 2. Do not operate this product near water. 3. Do not place or operate this product near a radiator or a heat register. 4. Do not expose this product to dampness, dust or corrosive liquids. 5. Do not connect this product or disconnect it from a wall socket during a lightning or a thunderstorm. 6.
Preface Thank you for choosing MTC! Please read this user guide before you start! This user guide instructs you to install and configure your device. This user guide applies to PW500X, The WR3011 is used as an example throughout this user guide. This user guide uses the following formats to highlight special messages: ICON Description This format is used to highlight information of importance or special interest.
Contents Important Safety Instructions .......................................................................................................................... 3 Preface ............................................................................................................................... ............................ 4 Contents ....................................................................................................
3.7.5 Remote WEB ......................................................................................................................... 53 3.7.6 WAN Ping .............................................................................................................................. 55 3.8 Routing ............................................................................................................................... .............
Chapter 1 Introduction 1.1 Product Overview Congratulations on your purchase of this outstanding 300Mbps Wi-Fi router. This device is a 300Mbps Wi-Fi Access Point which creates a wireless network allowing for greater range and mobility. As a Wi-Fi Access Point, it can transmit wireless data at the rate of up to 300Mbps.
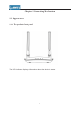
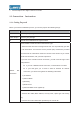
Chapter 2 Connecting Mechanism 2.1 Appearance 2.1.1 The products front panel The LED indicator displays information about the device’s status.
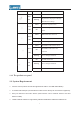
LED Name Status Indication Off WPS is disabled or connected WPS Negotiation is in progress through LED Blinking WiͲFi Protected Setup. The device is powered on Solid SYS The device is powered off or is LED Off down. WAN connection succeeds. Solid WAN LED No WAN connection. Off Data is being transmitted.
¾ Internet Explorer 8 or higher versions or Firefox 2.3 Connection Instruction 2.3.1 Getting Prepared Before you start the installation process, you need to prepare the following things: Item Description Router Find it in your package. Power adapter Find it in your package. PC Should have installed IE8 or higher browser. DHCP, PPOE or Static IP Internet Connection Type: 1.
3. Ethernet Cable: This can be found in the product package. You will need it to connect your PC to this device 2.3.2 Installment Environment Please follow these rules when install and use: Note z Environmental factor will have influence on the distance of wireless transmission. 2.3.3 Hardware Connection Note z Before connecting, please make sure that you can surf the internet in your computer to use the reticle provided by ISP.
2) If you use Residential broadband, put the network line into the WAN port and follow the step 3-4 as graphical shown to connect your device. Set Steps˖ ķ Connect the modem. ĸ Please connect reticle what you ever connected to the computer with the router's WAN port. Ĺ Use another reticle to connect your computer Ethernet port with the router’s any LAN port. ĺ Connect the router’s power adapter. And the hardware connection is finished.
Ĺ Click Network and Sharing Center. ĺ Click Change adapter settings.
Ļ Click Local Area Connection and select Properties. ļ Select Internet Protocol Version 4 (TCP/IPv4) and click Properties.
ľ Click OK on the Local Area Connection Properties window to save your settings Note z If you need to configure the IP address manually, please set the PC’s IP address and router IP address in the same subnet, because the router’s default IP is 192.168.1.1, the subnet mask is 255.255.255.0, so your IP should set 192.168.1.XXX; XXX cannot be 1.
Chapter 3 Configuring the Device Manually 3.1 Log in the Router 1. To access the Router’s Web-based Utility, launch a web browser such as Internet Explorer or Firefox. 2. Enter “http://192.168.1.1”. Press “Enter”. ( You can login to the device’s page through the following two domains: “mtc.setup.cn” or “WR3011.setup.
Tips z Default Password is “admin” z The default language is EN. You can change the language between English and French. Ô Web page layout Web page have˖primary & secondary navigation barǃconfiguration zoneǃhelp information zone four partsˈas shown: Note z Device does not support web page, function display will appear abnormal, please refer to the actual situation of equipment software.
No Name 1 Primary 2 Secondary Description User can easily Select functions in the navigation bar menu, Select the results displayed in the configuration section 3 configuration zone Configure and view area.
Change the resolution of the screen the help information may become “ ? ” as above shown, if you want to refer the help information please click the symbol. Note Change the resolution of the screen or login by small screen terminal, the “navigation bar menu” may become “ ” as above shown, if you want to refer the “navigation bar menu” please click the symbol.
Close Scan Close the scan function Apply Application current page configuration Cancel Cancel current page configuration Save Save current page configuration Refresh Refresh current page configuration Add Add item Delete Delete item resetOOB resumed to not configured mode Backup Backup current information Upgrade Upgrade current information Reboot Reboot the device Clear Clear current page information Con
Here are two modes Router and WISP: Tips z The default mode is Router. You can change the operation mode on the quick setup page. 1) Router mode configure Plug Internet cable to WR3011 WAN port. Set steps: ķ Select “Router”. ĸ Click “NEXT”. Ĺ You can select “Dynamic IP”, “Static IP”, “PPPOE” mode. ĺ Click “NEXT” to configure the wireless information. Ļ Click “NEXT”. ļ Click “Save” to confirm.
Knowledge Expansion z WISP: In this mode, the AP will behave as client.In addition, router function is added between the wireless WAN side and the Ethernet LAN side.Therefore, the WISP subscriber can share the WISP connection without the need of extra router. z Router: The Ethernet port will behave as a WAN port for wired connection to ADSL or Cable modem. The NAT routing will be performed between the WAN and WLAN.
¾ Running Time: Displays the time duration indicating how long the router has been up since startup. Up time is recounted and renewed upon power off. ¾ System Time: Current system time on this device. The device automatically synchronizes the system time with Internet time servers. Tips z Running time is total time the router is turned on 3.3.
¾ Secondary DNS Server: Obtained from ISP. ¾ Connection Duration: Access method for dynamic IP or PPPOE server and router and ISP connection is properly timed. Tips WAN IP/Subnet Mask/Gateway/Primary DNS Server/Secondary DNS Server: This types of information appears only if the router successfully connects to Internet via a PPPoE or DHCP (dynamic IP) connection.
Tips z The default IP address is 192.168.1.1. z The default Subnet mask value is 255.255.255.0 z If the router as a DHCP server, here shown as enabled. Otherwise disabled 3.3.4 Wireless Status Parameters Specification: ¾ SSID Name˖The name of Wireless. ¾ BSSID: The MAC Address of Wireless. ¾ Channel˖The Channel of Wireless. ¾ Security Mode: Encryption schemes.
Knowledge Expansion z AutoSelect: Under the “AutoSelect” the wireless signal will choice the user number is the least channel to improve the efficiency of the signal, it works for most cases. z If you choice other mode, the channel will not change all the time not matter the channel is good or bad. 3.
1ǃConfiguration the Internet access Support Static IP modeǃDynamic IP(DHCP)ǃPPOE. Instruction WAN Connection Type If your ISP provides you with an Ethernet cable from the incoming Internet side IP information (IP address, subnet Static IP mode mask, gateway IP address, DNS server address), your ISP uses a static IP connection.
Parameters Specification: ¾ Connection Type: Select Static IP. ¾ IP Address/Subnet Mask/WAN subnet mask/Gateway/Primary DNS Server/Secondary DNS Server: Enter the ISP information you gathered in Getting Prepared. ¾ Click Save to save your settings. Tips z MTU better to choose the default values. 1.2> Dynamic IP mode. Set Steps˖ ķ Click “Network Settings”. ĸ Select “WAN Settings”. Ĺ Select Connection Type “Dynamic IP”.
Tips z MTU better to choose the default values. 1.3> PPOE Set Steps˖ ķ Click “Network Settings”. ĸ Select “WAN Settings”. Ĺ Select Connection Type “PPOE”. ĺ Enter the ISP login UserNameˈthe ISP login Password. Ļ Click “Save” to confirm.
Knowledge Expansion z MTU: Maximum Transmission Unit. It is the size of the largest data packet that can be sent over the network. The default value is 1500. The common MTU sizes and applications are listed in the table below. MTU Application 1500 Typical for connections that do not use PPOE or VPN. 1492 Used in PPOE environments. 1472 Maximum size to use for pinging. (Larger packets are fragmented.
3.4.2 WAN Parameters Set Steps˖ ķ Click “Network Settings”. ĸ Select “WAN Parameters”. Ĺ Select Negotiation Mode type. ĺ Click “Save” to confirm. Parameters Specification: ¾ Negotiation mode: you can set the value to match with the status Tips 1. The router operates in “Auto-negotiation” (or Auto) mode by default. Usually, it works for most cases. 2. In some situations, you might need to change the port mode.
3.4.3 MAC Address Clone Some ISPs (Internet Service Providers) require end-user's MAC address to access their network. This feature copies your current PC's MAC address to the router. Set Steps˖ ķ Click “Network Settings”. ĸ Click “MAC Address Clone”. Ĺ You can set this page from three methods˖ 1ǃ To Restore to Factory Default MAC 1> Click “Restore to factory Default MAC” 2> Click Save to save your settings.
Knowledge Expansion 1. Restore to Factory Default MAC: Reset the router’s WAN MAC to factory default. 2. Clone MAC: Clicking this button copies the MAC address of the computer that you are now using to the router. Also, you can manually enter the MAC address that you want to use. You have to use the computer whose MAC address is allowed by your ISP 3.
Parameters Specification: ¾ Wireless: wireless “Enable” or “Disable”. ¾ SSID: It is the unique name of the wireless network and can be modified. ¾ Broadcast (SSID): Select “Enable” to enable the router’ SSID to be scanned by wireless devices. The default is enabled. If you disable it, the wireless devices must know the SSID for communication. ¾ BSSID: This is the MAC address of the device's wireless interface.
device's MAC address. You can find it on the label attached on the bottom of the device. 2. If you are not an advanced user, it is advisable to only change the SSID (name of the network) and channel and leave other items unchanged. Knowledge Expansion Network Mode (802.11 Mode): Select a correct mode according to your wireless clients.
¾ Security mode: WPA – PersonalǃWPA2 – PersonalǃMixed WPA/WPA2 – Personal. Security mode Disable WPA – Personal WPA2 – Personal Instruction Not open this function Support AES and TKIP cipher types Support AES, TKIP and TKIP+AES cipher types Both WPA-Personal and WPA2-Personal secured Mixed WPA/WPA2 – Personal wireless clients can join your wireless network.
Parameters Specification: ¾ WPA Algorithms: Wi-Fi Protected Access Algorithms. ¾ Pass Phrase: The default is 12345678. Knowledge Expansion 1. WEP: (Wired Equivalent Privacy) is the wireless transmission of data between two devices for encryption, to prevent illegal users wiretapping or invade the wireless network. 2. AES: (Advanced encryption standard) is an iterative, symmetric key group password.
Tips z Recommended that you choice “WPA-Personal” + ”AES” mode , make sure the wireless efficiency and ensure the security of wireless network. Meanwhile, avoid some kind of wireless network card does not support security mode, cause cannot connect the wireless network. 3.5.3 WPS Settings Set Steps˖ ķ Click “WLAN Settings”. ĸ Select “WPS Settings”.
The WPS provides below methods: ¾ PBC: Using routers and physical or logical button on a wireless device to connect WPS.
Parameters Specification: ¾ The Wireless Access Control is based on the MAC address of the wireless adapter to determine whether it communicates with the Router or not; 1. Select “Off” to allow all wireless clients to join your wireless network. 2. Select “Allow” allow ONLY the specified wireless clients to join your wireless network. 3. Select “Block” disallow ONLY the specified wireless clients to join your wireless network.
Set Steps˖ ķ Select Allow. ĸ Enter the MAC address of the wireless device you want to restrict. Here in this example, enter 00:12:35:EC:DF:25. Ĺ Click Add to add the MAC address to the MAC address list. ĺ Click Save to save your settings.
Tips z The bandwidth here refers to the channel bandwidth instead of wireless connection rate. z You can know whether there are unauthorized accesses to your wireless network by viewing the wireless client list. 3.6 LAN Settings Click “LAN Settings” enter the LAN Settings page, here you can configure LAN port info and DHCP Server and DHCP List & Binding. 3.6.1LAN Settings This page is to configure the basic parameters for LAN ports.
ĺ Click “Save” and wait for the router reboot automatically. Parameters Specification: ¾ MAC Address˖It displays the Router’s LAN MAC address. ¾ IP Address˖It displays the Router’s LAN IP address. ¾ Subnet Mask: it displays the Router’s LAN subnet mask. Tips 1. Default IP address and subnet mask are respectively 192.168.2.1 and 255.255.255.0. 2. Be sure to make a note of any changes you apply to this page.
ĸ Select “DHCP Server”. Parameters Specification: ¾ DHCP Server: Select whether enable or disable the DHCP server feature. ¾ Start IP Address and End IP Address: You can specify the starting and ending address of the IP address pool here. These addresses should be part of the same IP address subnet as the router’s LAN IP address.
1. Lease time will be renewed automatically upon expiry. No additional configurations are needed. 2. If you are not an advanced user, the default DHCP server settings are recommended. In order to use the function of the router's DHCP server, LAN in the computer's TCP/IP protocol must be set to “automatically obtain IP”. 3.6.3 DHCP List & Binding Set Steps˖ ķ Click “LAN Settings”. ĸ Select “DHCP List & Binding”.
the same IP address each time when it accesses the DHCP server. Reserved IP addresses could be assigned to servers that require permanent IP settings. Static Assignment Application Example: To have a PC at the MAC address of 44:37:E6:4F:37:3B always receive the same IP address of 192.168.1.200 Parameters Specification: ¾ Enter the last number of the IP address you want to reserve, for example, 200.
3.7 Expert Settings Click “Expert Settings” enter the Virtual Server configure page ,here you can set “URL Filter”, “Port Range”, “DMZ Settings”, “DDNS”, “Remote WEB”, “WAN Ping”. 3.7.1 URL Filter This section is to set URL filtering access. If you want to enable this function, please activate the checkbox. Select one policy from the drop-down menu and enter a policy name in the field.
Set Steps˖ ķ Enter a Policy Name ĸ Enter the Start IP and End IP here for example:192.168.1.100 Ĺ Enter part of or the entire domain name of the web site you wish to restrict. Separate different domain names or domain name key words with a comma, for example, "YouTube, Hollywood.com" ĺ Select time and day Ļ Click “Save” to save your settings. Tips 1. Different URL strings must be separated with a comma.
the router's firewall blocks inbound traffic from the Internet to your computers except replies to your outbound traffic. You can use the Port Forwarding feature to create exceptions to this rule so that your friends can access these files from external networks. When accessing your PC from Internet, type "protocol://xxx.xxx.xxx.xxx:port number" into your browser’s address or location field.
Parameters Specification: ¾ Start/End Port: Enter the start/end port number which ranges the External ports used to set the server or Internet applications. Here in this example, enter 21. ¾ IP Address: Enter the IP address of the PC where you want to set the applications. Here in this example, enter 192.168.1.100. ¾ Protocol: Specify the protocol required for the service utilizing the port(s).
Ļ Click “Save” to confirm. Tips z The DMZ Settings screen allows one local computer to be exposed to the Internet for use of a special-purpose service such as Internet gaming or videoconferencing. z DMZ hosting forwards all the ports at the same time to one PC. Note 1. DMZ host poses a security risk.
Set Steps˖ ķ Click “Expert Settings” ĸ Select “DNNS” Ĺ Select “Enable” ĺ Add “Serve provider”. Ļ Enter the “User name” and “Password” ļ Enter “Domain Name” Ľ Click “Save” to confirm. Tips 1. To use the DDNS feature, you need to have an account with one of the Service Providers in the drop-down menu first. 2. This router supports five DDNS service providers: DynDNS.com and 88ip.cn and 3322.
¾ Domain name: Enter the effective registered domain name. 3.7.5 Remote WEB This section is to allow the network administrator to manage the router remotely. If you want to access the router remotely, please select “Enable”. Set Steps˖ ķ Click “Expert Settings”. ĸ Select “Remote WEB”. Ĺ Enter the Port ĺ Click “Save” to confirm. Parameters Specification: ¾ Port: The management port to be open to outside access. Tips 1.
2. Make sure your WAN IP address (Internet IP address) is a public IP address. Private IP addresses are not routed on the Internet. 3. It is unsafe to make your router remotely accessible to all PCs on external network. For better security, we suggest that only enter the IP address of the PC for remote management Remote Web Management Application Example: To access your router (WAN IP address: 172.16.87.160) at your home from the PC (210.
3.7.6 WAN Ping The ping test is to check the status of your internet connection. When disabling the test, the system would prevent the ping test from WAN. Set Steps: ķ Select the “Expert Setting” ĸ Select the “WAN Ping” Ĺ Select the “Enable” 3.8 Routing In this page you can view the routing table information.
¾ Destination IP: The IP address of the final destination. “0.0.0.0” indicates any network segment. ¾ Subnet Mask: The subnet mask for the specified destination. ¾ Gateway: This is the next router on the same LAN segment as the router to reach. ¾ Interface: The interface between your router and the final destination. 3.9 Traffic Control Traffic control is used to limit communication speed in the LAN.
Tips 1. 1M=128KByte/s. 2. The volume of uplink traffic/downlink traffic should not be larger than that allowed on your router's WAN (Internet) port. You can ask your ISP to provide the volume of Internet traffic. 3. The bandwidth for ADSL/DSL line usually refers to the download bandwidth Bandwidth Control Application Example: You share a 4M-broadband service with your neighbor (at 192.168.1.102).
Set Steps˖ ķ Enable Traffic Control: Check the Enable box to enable the Traffic Control feature. ĸ IP Range: Enter the last number of the IP address. Here in this example, enter 101 in both boxes. Ĺ Up: Set a limit to regulate upload bandwidth of PCs on the LAN. Here in this example, enter 32 in first boxes, and 256 in second box. ĺ Down: Set a limit to regulate download bandwidth of PCs on the LAN.
Tips Configured time and date info will be lost if the device gets disconnected from power supply. However, it will be updated automatically when the device reconnects to Internet. To activate time-based features (e.g. firewall), the time and date info shall be set correctly first, either manually or automatically Set Steps˖ ķ Click “System Tools”. ĸ Select “Time Settings”.
3.10.2 Backup/Restore Parameters Specification: ¾ Backup: Click this button to back up the router's configurations. ¾ Restore: Click this button to restore the router's configurations. Set Steps˖ ķ Click “System Tools”. ĸ Select “Back/Restore”. Ĺ “Backup” to keep parameters. ĺ Click “Browse” to add an file Ļ Click “Save” Note The default configuration file name is “RouterCfm.cfg”. Do include the file name suffix of “.
3.10.3 Restore to Factory Set Steps˖ ķ Click “System Tools”. ĸ Select “Restore to Factory”. Parameters Specification: ¾ This “Restore” button is to reset all configurations to the default values. It means the Range Extender will lose all the settings you have set. So please note down the related settings if necessary. ¾ Default Password: admin ¾ Subnet Mask:255.255.255.0 ¾ Default IP:192.168.1.
2> You cannot access Internet and your ISP or our technical support asks you to reset the router. 3.10.4 Firmware Upgrade The router provides the firmware upgrade by clicking the “Upgrade” after browsing for the firmware upgrade packet. After the upgrade is completed, the router will reboot automatically.
3.10.5 Reboot When a certain feature does not take effect or the device fails to function correctly, try rebooting the device. ¾ Rebooting the Wifi Router is to make the settings configured go into effect or to set the Range Extender again if setting failure happens. 3.10.
Set Steps˖ ķ Click “System Tools” ĸ Select “Change Password” Ĺ Enter “Old Password” “New Password” and “Confirm New Password” ĺ Click “Save” to save you settings. Tips z z The default login password is admin. The valid password must be between 3~12 characters and only include letters, numbers and underscore 3.10.7 System Log The section is to view the system log. Click the “Refresh” to update the log.
Set Steps˖ ķ Click “System Tools” ĸ Select “System Log” Ĺ Click “Refresh” can update the information ĺ Click “Clear” to clear the screen 65
Appendix 1 Configure PC TCP/IP Settings Windows 7 ķ Click Start -> Control Panel.
ĸ Click Network and Internet. Ĺ Click Network and Sharing Center.
ĺ Click Change adapter settings. Ļ Click Local Area Connection and select Properties.
ļ Select Internet Protocol Version 4 (TCP/IPv4) and click Properties.
Ľ Select Obtain an IP address automatically and click OK.
ľ Click OK on the Local Area Connection Properties window to save your settings.
Windows XP ķ Right-click My Network Places and select Properties. ĸ Right click Local Area Connection and select Properties.
Ĺ Select Internet Protocol Version 4 (TCP/IPv4) and click Properties. ĺ Select Obtain an IP address automatically and click OK.
Ļ Click OK on the Local Area Connection Properties window to save your settings. 2 Troubleshooting The Troubleshooting provides answers to common problems regarding the Router Adapter˖ 1. The System LED does not light up. Ans. Check the following: a) Make sure that the Router Adapter is properly plugged into a power outlet. b) Make sure the power outlet is active (working) by plugging another electric device into it.
a) Make sure that the Ethernet cable (RJ-45) is properly connected to the Router Adapter’s Ethernet port. b) Make sure that the other end of the Ethernet cable (RJ-45) is properly connected to the computer LAN card or to you Cable/xDSL Ethernet port. c) Make sure your computer LAN card is properly installed and configured. d) Make sure your Cable/xDSL broadband access is working and configured correctly.
WR3011_XXXXXX(where XXXXXX is the last six characters in the device's SSID MAC address) You can find it on the label attached to the device.
ĸ Select Manage Wireless Networks.
Ĺ Select the wireless network and click Remove network.
Windows XP ķ Right-click My Network Places and select Properties. ĸ Right click Wireless Network Connection and then select Properties.
Ĺ Click Wireless Networks, select the wireless network name under Preferred networks and then click the Remove button. 5 Safety and Emission Statement Warning: Changes or modifications to this unit not expressly approved by the party responsible for compliance could void the user’s authority to operate the equipment.
communications. However, there is no guarantee that interference will not occur in a particular installation. If this equipment does cause harmful interference to radio or television reception, which can be determined by turning the equipment off and on, the user is encouraged to try to correct the interference by one or more of the following measures: ¾ Reorient or relocate the receiving antenna.