C M Y CM MY CY CMY K EK 2000 Instruction manual
Contents Important safety instructions .......................................................................... 2 The EK 2000 diversity receiver ......................................................................... 3 The frequency bank system .......................................................................... 4 Areas of application ........................................................................................ 5 Delivery includes ........................................................
Important safety instructions Important safety instructions • Read this instruction manual. • Keep this instruction manual. Always include this instruction manual when passing the product on to third parties. • Heed all warnings and follow all instructions in this instruction manual. • Use only a cloth for cleaning the product. • Do not place the product near any heat sources such as radiators, stoves, or other devices (including amplifiers) that produce heat.
The EK 2000 diversity receiver Replacement parts When replacement parts are required, be sure the service technician uses replacement parts specified by Sennheiser or those having the same characteristics as the original part. Unauthorized substitutions may result in fire, electric shock, or other hazards.
The EK 2000 diversity receiver The frequency bank system The receiver is available in 5 UHF frequency ranges with up to 3,000 receiving frequencies per frequency range: Range Aw: 516 – 558 500 Range Gw: 558 – 626 600 Range Bw: 626 – 698 Range Cw: 718 – 790 700 Range Dw: 790 – 865 800 Each frequency range (Aw–Dw, Gw) offers 26 frequency banks with up to 64 channels each: Channel 1 – frequency preset Channel 2 – frequency preset Frequency bank 1 ...
Delivery includes Areas of application The receiver can be combined with the following transmitters of the 2000 series: Transmitter Type SK 2000 Bodypack transmitter SKM 2000 Radio microphone SKP 2000 Plug-on transmitter For more information, visit the EK 2000 product page on our website at www.sennheiser.com. The transmitters are available in the same UHF frequency ranges and are equipped with the same frequency bank system with factory-preset frequencies.
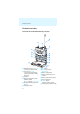
Product overview Product overview Overview of the EK 2000 diversity receiver 쐋 쐃 쐇 쐏 씉 쐂 쐄 씈 쐂 쐉 쐆 쐊 쐎 쐈 쐃 Headphone output (PHONES), 3.5 mm jack socket, lockable 쐇 Line output (AF OUT), 3.
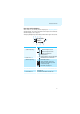
Product overview Overview of the displays After switch-on, the diversity receiver displays the “Frequency/Name” standard display. For further illustrations and examples of the different standard displays, refer to page 13. The display backlighting is automatically reduced after approx. 20 seconds. 햲 햳 햴 햵 823.
Product overview Display Meaning 햷 Battery status Charge status: approx. 100% approx. 70% approx. 30% charge status is critical, the red LOW BATT LED 쐏 is flashing: 쐏 햸 Muting function “MUTE” or line output level AF OUT 햹 Pilot tone “P” 8 “Mute” is only displayed on the “Frequency/ Name” standard display (see page 13) when the transmitter’s RF signal is deactivated. The diversity receiver does then not output an audio signal.
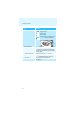
Putting the diversity receiver into operation Putting the diversity receiver into operation Inserting the batteries/accupack For powering the diversity receiver, you can either use two 1.5 V AA size batteries or the rechargeable Sennheiser BA 2015 accupack or the DC 2 power adapter (see “Accessories” on page 35). 왘 Open the battery compartment by pushing the two catches 쐈 in the direction of the arrows and open the cover 쐅. 쐅 쐈 쐂 쐅 쐂 왘 Insert the two batteries or the accupack as shown above.
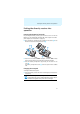
Putting the diversity receiver into operation Mounting the diversity receiver to a camera Use the supplied CA 2 camera adapter to mount the receiver to a camera’s flash mount. 왘 Determine where on the perforated plate 씉 the flash mount adapter 씊 will need to be fastened so that the receiver can best be attached to the camera. 씋 씊 씌 왘 At this position, place a square nut 씋 under the perforated plate 씉. 왘 Fasten the flash mount adapter 씊 to the perforated plate 씉 using the square nut 씋.
Putting the diversity receiver into operation 왘 Place the perforated plate 씉 onto the rear of the receiver. 왘 Reinsert the belt clip 씌. 왘 Use one of the supplied line cables to connect the line input of the camera to the socket 쐇. 쐇 왘 Via the operating menu of the diversity receiver, adjust the level of the line output (AF OUT) to the input of the camera (see page 24). The ground connection of the line cable serves as the antenna for the second diversity section.
Using the diversity receiver Using the diversity receiver To establish a transmission link, proceed as follows: 1. Switch the diversity receiver on (see next section). 2. Switch a transmitter on (see the instruction manual of the transmitter). The transmission link is established and the receiver’s RF level display “RF” 햲 reacts. It is vital to observe the notes on frequency selection on page 30.
Using the diversity receiver Deactivating the lock mode temporarily You can activate or deactivate the automatic lock mode via the “Auto Lock” menu item (see page 24). If the lock mode is activated, you have to temporarily deactivate it In order to be able to operate the receiver: SET 왘 Press the SET button. “Locked” appears on the display panel. 왘 Press the rocker button. “Unlock?” appears on the display panel. SET 왘 Press the SET button.
Using the operating menu Using the operating menu A special feature of the Sennheiser 2000 series is the consistent, intuitive menu structure of transmitters and receivers. As a result, adjustments to the settings can be made quickly – even in stressful situations, for example on stage or during a live show or presentation.
Using the operating menu Overview of the operating menu Submenu “Sync Settings” Main menu “Menu” Sync Phones Volume Squelch Easy Setup Frequency Preset Name AF Out Auto Lock Advanced Exit Display Extended menu “Advanced Menu” SK Settings SKM Settings SKP Settings Exit Tune Sync Settings Pilot Tone LCD Contrast Reset Software Revision Exit Submenu “SK Settings” “SKM Settings” “SKP Settings” Sensitivity Low Cut (SKM) Auto Lock Mute Mode (SK, SKP) RF Power Phantom Power48V (SKP) Cable Emulation (SK) Exi
Using the operating menu Display Function of the menu item Page Extended menu “Advanced Menu” Tune Sets the receiving frequencies for the frequency banks “U1” to “U6” 25 Sets the frequency bank, the channel and the receiving frequency (frequency banks “U1” to “U6”) 25 Sync Settings Calls up the “Sync Settings” submenu 16 Pilot Tone Activates/deactivates the pilot tone evaluation 27 LCD Contrast Adjusts the contrast of the display panel 27 Reset Resets the settings made in the operating me
Using the operating menu Display Function of the menu item Page “SK Settings” / “SKM Settings” / “SKP Settings” submenu Sensitivity Adjusts the input sensitivity Low Cut Actives/deactivates the low cut filter (“SKM Settings” only) Auto Lock Activates/deactivates the automatic lock mode Mute Mode Sets the mode for the MUTE switch (“SK Settings” and “SKP Settings” only) RF Power Adjusts the transmission power 28 PhantomPower48V Activates/deactivates the phantom powering (“SKP Settings” only) Ca
Using the operating menu Working with the operating menu If the lock mode is activated, you have to deactivate it In order to be able to work with the operating menu (see page 13). By way of example of the “Frequency Preset” menu, this section describes how to use the operating menu. Changing from a standard display to the operating menu SET 왘 Press the SET button. The current standard display is replaced by the main menu. The last selected menu item is displayed.
Adjusting settings via the operating menu Canceling an entry ON/OFF 왘 Press the ON/OFF button to cancel the entry. The current standard display appears on the display panel. To subsequently return to the last edited menu item: SET 왘 Press the SET button repeatedly until the last edited menu item appears. Exiting a menu item To return to the next higher menu level: 왘 Change to the “Exit” menu item. Menu Exit SET 왘 Confirm your selection.
Adjusting settings via the operating menu Via the “Sync Settings” submenu, you can adjust additional parameters to be transferred to the transmitters (see page 16 and 28). To transfer these parameters: 왘 Switch the transmitter and the diversity receiver on. 왘 On the receiver, call up the “Sync” menu item. “Sync” appears on the display panel of the receiver.
Adjusting settings via the operating menu Adjusting the volume at the headphone output – “Phones Volume” There are two ways to adjust the volume at the headphone output (PHONES): CAUTION! Hearing damage due to high volumes! Listening at high volume levels for long periods can lead to permanent hearing defects. 왘 Set the volume to a low level before putting the headphones on 왘 Do not continuously expose yourself to high volumes. 1.
Adjusting settings via the operating menu CAUTION! Danger of hearing damage! If you switch the squelch off or adjust the squelch threshold to a very low value, loud hissing noise can occur in the receiver. The hissing noise can be loud enough to cause hearing damage! 왘 Always make sure that the squelch is switched on. 왘 Before adjusting the squelch threshold, set the volume of the headphone output PHONES to the minimum (see page 21). 왘 Never change the squelch threshold during a live transmission.
Adjusting settings via the operating menu Menu item Function of the menu item Scan New List Automatically scans for unused receiving frequencies (frequency preset scan) If receiving frequencies are used, they will be locked; if receiving frequencies are unused, they will be released. After the frequency preset scan, you can select an unused frequency preset. Selecting the frequency bank and the channel – “Frequency Preset” SET SET Menu Frequency Preset B.Ch: 1. 1 Frequency Preset B.Ch: 1. 1 863.
Adjusting settings via the operating menu Via the “Name” menu item, you can enter a freely selectable name (e.g. the name of the performer) for the receiver. The name is displayed on the standard display (see page 7). The name can consist of up to 8 characters such as: • letters (without pronounciation marks), • numbers from 0 to 9, • special characters and spaces. To enter a name, proceed as follows: SET 왘 Press the rocker button to select a character.
Adjusting settings via the operating menu The extended menu “Advanced Menu” To get into the extended menu “Advanced Menu”: 왘 From the main menu, select “Advanced”. Setting the receiving frequencies and the frequency banks “U1” to “U6” – “Tune” When you have selected one of the system banks and then select the “Tune” menu, the diversity receiver automatically switches to channel 1 of the frequency bank “U1”. In this case, “U1.1” briefly appears on the display panel.
Adjusting settings via the operating menu SET 왘 Press the SET button to confirm the frequency. “Stored” appears on the display panel. The “Tune” menu item appears again. Selecting a channel and assigning this channel a frequency SET 왘 Press the rocker button until the “Tune” menu item appears. 왘 Press the SET button and keep it pressed until the frequency bank is highlighted. SET Advanced Menu Tune 823.925 MHz Call up “Tune” (special function) SET Tu n e 823.925 MHz B.Ch: U1. 1 Tu n e 823.925 MHz B.
Adjusting settings via the operating menu Activating/deactivating the pilot tone evaluation – “Pilot Tone” Advanced Menu Name Pilot Tone Active Call up “Pilot Tone” Pilot Active Pilot Inactive Select the desired setting Store the setting “Stored” The transmitter adds an inaudible signal, known as the pilot tone, to the transmitted signal. The diversity receiver detects and evaluates the pilot tone.
Adjusting settings via the operating menu Resetting the settings made in the operating menu – “Reset” SET Advanced Menu Reset Reset Yes Select the desired setting; apply the setting Call up “Reset” “Stored” SET When resetting the settings made in the operating menu, only the selected settings for the pilot tone and for the frequency banks “U1” to “U6” remain unchanged. For an overview of the factory-preset default settings, refer to the enclosed frequency information sheet.
Adjusting settings via the operating menu Via the “Sync” menu item, you can transfer the parameters from the receiver to the transmitters via the infra-red interface (see page 19).
Synchronizing a transmitter with the receiver Synchronizing a transmitter with the receiver When synchronizing a transmitter with a diversity receiver, please observe the following: 왘 Only use a transmitter and a diversity receiver from the same frequency range (see the type plates on the transmitter and the diversity receiver). 왘 Make sure that the desired frequencies are listed in the enclosed frequency information sheet.
Synchronizing a transmitter with the receiver OR: 왘 Manually set the transmitter to the same frequency bank and channel that you set on the receiver. 왘 Activate the RF signal on this transmitter. The transmission link is established. If you want to set up a multi-channel system: 왘 Repeat the following 4 steps for each additional transmission link: – Perform a frequency preset scan with the next diversity receiver. – Select a channel from the same frequency bank as with the first diversity receiver.
Cleaning the diversity receiver Cleaning the diversity receiver CAUTION! Liquids can damage the electronics of the receiver! Liquids entering the housing of the device can cause a short-circuit and damage the electronics. 왘 Keep all liquids away from the receiver. 왘 Do not use any solvents or cleansing agents. 왘 Use a cloth to clean the diversity receiver from time to time.
Recommendations and tips Recommendations and tips ... for the diversity receiver • Make sure that the antenna and the headphone or line cable do not cross. • For best results, make sure that the transmitter sensitivity is correctly adjusted. ... for optimum reception • Transmission range depends to a large extent on location and can vary from about 10 m to about 150 m. There should be a “free line of sight” between transmitting and receiving antennas.
If a problem occurs ... If a problem occurs ... Problem Possible cause Possible solution Diversity receiver cannot be operated, “Locked” appears on the display panel Lock mode is activated Deactivate the lock mode (see page 13). No operation indication Batteries are flat or accupack is flat Replace the batteries or recharge the accupack (see page 9). No RF signal Transmitter and receiver are not on the same channel Set the transmitter and receiver to the same channel.
Accessories Problem Possible cause Audio signal is Transmitter sensitivity distorted is adjusted too high Possible solution Adjust the transmitter sensitivity correctly (see the instruction manual of the transmitter). Receiver’s audio output Reduce the audio output level level is adjusted too (“AF Out”, see page 24).
Specifications Specifications RF characteristics Modulation Frequency ranges Receiving frequencies Switching bandwidth Nominal/peak deviation Receiver principle Sensitivity (with HDX, peak deviation) Adjacent channel rejection Intermodulation attenuation Blocking Squelch Pilot tone squelch wideband FM 516–558, 558–626, 626–698, 718–790, 790–865 MHz (Aw to Dw, Gw, see page 4) up to 3,000 receiving frequencies, tuneable in steps of 25 kHz 20 frequency banks, each with up to 64 factory-preset channels 6 fr
Specifications Overall device Temperature range Power supply Nominal voltage Power consumption: –10°C to +55°C 2 AA size batteries, 1.5 V or BA 2015 accupack 2,4 V • at nominal voltage typ. 180 mA (30 mW) • with switched-off receiver Operating time (line operation) Dimensions Weight (incl. batteries) ≤ 25 μA typ. 9 hrs approx. 82 x 64 x 24 mm approx.
Manufacturer Declarations Manufacturer Declarations Warranty Sennheiser electronic GmbH & Co. KG gives a warranty of 24 months on this product. For the current warranty conditions, please visit our web site at www.sennheiser.com or contact your Sennheiser partner.
Manufacturer Declarations Statements regarding FCC and Industry Canada This device complies with Part 15 of the FCC Rules and with RSS-210 of Industry Canada. Operation is subject to the following two conditions: (1) this device may not cause harmful interference, and (2) this device must accept any interference received, including interference that may cause undesired operation.
Index Index Accessories 35 Accupack charging inserting 9 9 Easy Setup (scanning for, releasing and selecting frequency presets) 22 F Frequency bank selecting 23 setting a frequency 25 ~ system 4 AF Out (adjusting the audio output Frequency Preset (selecting a level) 24 frequency bank/ Auto Lock (activating/deactivating channel) 23 the lock mode) 24 Advanced Menu (extended menu) overview 16 settings 25 B Batteries battery status inserting 9 8 Buttons function of the ~ 14 ON/OFF button 6 SET button 6
Index Operating menu overview 15 settings 19 using 18 P Phones Volume (adjusting the volume at the headphone output) 21 Reset (resetting the settings made in the operating menu) 28 RF signal indication S 6 Software Revision (displaying the software revision) 28 Squelch (adjusting the squelch) 21 Pilot Tone (activating/deactivating Sync (synchronizing a transmitter the pilot tone with the receiver) 19 evaluation) 27 T R Transmitter (synchronizing with Receiver receiver) 30 cleaning 32 Troubleshooting 34
C M Y CM MY CY CMY K Sennheiser electronic GmbH & Co. KG Am Labor 1, 30900 Wedemark, Germany www.sennheiser.com Printed in Germany Publ.