RS 165 Digital Wireless Headphone System Instuction Manual
Contents Contents Important safety information ...................................................................... 2 The RS 165 digital wireless headphone system ........................................ 4 Package includes ............................................................................................ 5 Product overview ........................................................................................... Overview of the HDR 165 headphones ...............................................
Important safety information Important safety information 왘 Read this instruction manual carefully and completely before using the product. 왘 Always include this instruction manual when passing the product on to third parties. 왘 Do not use an obviously defective product. Preventing damage to health and accidents 왘 Protect your hearing from high volume levels. Permanent hearing damage may occur when headphones are used at high volume levels for long periods of time.
Important safety information Safety instructions for standard/rechargeable batteries WARNING In extreme cases, the standard/rechargeable batteries may leak and may cause the following hazards if abused or misused: • • • • explosion fire heat smoke/gas Keep away from children. Do not heat above 70 °C/ 158 °F), e.g. do not expose to sunlight or throw into a fire. Do not expose to moisture. When not using rechargeable batteries for extended periods of time, charge them regularly (about every 3 months).
The RS 165 digital wireless headphone system The RS 165 digital wireless headphone system Sennheiser's RS 165 is the perfect introduction to the world of digital wireless home entertainment. Its ergonomic, closed, circumaural design reduces background noise while providing an exceptionally comfortable fit, so that you can focus on enjoying your favorite television programs and movies.
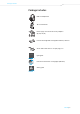
Package includes Package includes HDR 165 headphones TR 165 transmitter BASS Power supply unit with multi-country adapters (EU, UK, US, AU) Low self-discharge NiMH rechargeable batteries, AAA size Stereo audio cable with 3.
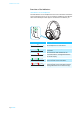
Product overview Product overview Overview of the HDR 165 headphones 1 2 3 4 8 5 7 6 6 | RS 165 1 Headband 5 Volume + button 2 Charging contacts 6 Volume – button 3 Ear pads 7 HDR power button 4 Ear cups/Battery compartments 8 HDR status LED
Product overview Overview of the TR 165 transmitter 4 3 2 1 5 AU DIO IN 6 1 TR status LED 2 BASS button (with LED) 3 Charge status LED 4 Charging contacts 5 AUDIO IN Analog audio input (3.5 mm jack) 6 DC 9V 0.
Product overview Overview of the indicators LED indicators on the headphones The LED indicators on the headphones and on the transmitter indicate the current operating state. If you are not using the headphones, the LED indicators automatically dim after approx. 30 seconds to not disturb you. HDR status LED Meaning The headphones are switched off. The transmitter and headphones are connected. The transmitter and headphones are connected and the rechargeable batteries are almost empty.
Product overview LED indicators on the transmitter 1 2 3 1 Charge status LED Meaning The transmitter is not charging. The rechargeable batteries are being charged. The rechargeable batteries are fully charged. A charging/battery fault has been detected. After taking the headphones from the holder, the charge status LED indicates the approximate operating time: Charge status LED Operating time Battery capacity up to 4 hours 0 to 25% approx. 4 to 9 hours 25 to 50% approx.
Product overview 2 A BASS button LED Meaning The dynamic bass boost is deactivated. The dynamic bass boost is activated. 3 TR status LED 1s Meaning The transmitter is connected to the AC wall outlet. The transmitter is in standby mode. The transmitter and headphones are connected.
Putting the RS 165 into operation Putting the RS 165 into operation Setting up the transmitter 왘 Choose a suitable place near your audio source. 왘 Separate the transmitter and other wireless devices in a room by at least 50 cm/20” to avoid interference. 왘 Do not place the transmitter close to metal objects such as shelf bars, reinforced concrete walls, etc. as this can decrease the cover range of the transmitter.
Putting the RS 165 into operation Connecting the transmitter to an audio source You can connect the transmitter to different audio sources, such as a Bluray player, a TV or a stereo hi-fi system. You can also refer to the beginner’s video guides on how to connect your digital wireless headphone system to a TV at www.sennheiser.com/how-to-videos. 왘 Switch your audio source off before connecting the transmitter.
Putting the RS 165 into operation A Connection option A: 3.5 mm or 6.3 mm/¼“ jack socket (analog) Some TV models mute the loudspeakers when you connect the transmitter to the headphone socket. Check in the menu of your TV to see if the muting function can be deactivated. Alternatively, connect the TV and the transmitter using a different option (B). 왘 Switch your audio source off before connecting the transmitter. 왘 If necessary, connect the adapter 6.3 mm/¼“ jack plug onto the stereo audio cable.
Putting the RS 165 into operation B Connection option B: RCA 왘 Switch your audio source off before connecting the transmitter. 왘 Plug the RCA adapter onto the stereo audio cable. 왘 Connect the stereo audio cable to the 3.5 mm jack socket of the transmitter. 왘 Connect the RCA adapter to the RCA outputs of your audio source (in most cases “AUDIO OUT“). Connect the red RCA plug to the red RCA socket and the white RCA plug to the white or black RCA socket.
Putting the RS 165 into operation Connecting the transmitter to an AC wall outlet 1 Select a suitable country adapter and slide it onto the power supply unit until it locks firmly in place. 2 Connect the power supply unit connector to the power input socket of the transmitter. 3 Plug the power supply unit into an AC wall outlet. lights up for a second. The transmitter is in The TR status LED standby mode.