| Safety Symbols | Power | Installation | Use and Cleaning | Safety Symbols Make sure to keep the directions given below in order to prevent hazards and property damages by using the product correctly. Identifies information about practices or circumstances that failure to following the accompanying directions may lead to serious personal injury or death.
z Otherwise, overheating of an outlet may cause a fire. Do not bend or pull the power cord forcibly. Do not place heavy stuff on it. z Otherwise, it may cause electric shock or a fire. Make sure to turn the power off and disconnect the power plug from the outlet before moving the product. Make sure to disconnect other connection lines from other devices as well. z If you move the product without disconnecting the power cord, it may be damaged during moving, which may cause electric shock or a fire.
When installing the product on a cabinet or shelf, do not let the front end of the product's bottom be projected out of its front edge. z Otherwise, the product may fall, causing product malfunction or personal injury. Do not place the power cord near a heat generating appliance. z Otherwise, the covering of the power code may be melted, causing electric shock or a fire. Do not install the product in a place exposed to oil, smoke, moisture, water, or rainwater, or in a car.
Do not insert metals such as a chopsticks, wire, or gimlet, or flammables such as a paper or match into the terminals at the back of the product. z Otherwise, it may cause electric shock or a fire. If water or foreign materials enter the product, make sure to turn the product off and disconnect the power plug form the outlet, and then contact a service center. Never disassemble, repair, or modify the product arbitrarily. z If you need to repair your product, contact a service center.
disconnect the power plug. z If you use it without verification, it may cause electric shock or a fire. Please contact a service center.
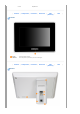
| Features | Components | Front Part | Back Part | Side (Buttons) | Side | Features You can enjoy digital images without turning on your PC or printing images. Expand memory capacity with a memory card. Enjoy stored images immediately. By connecting a CF or SD/MMC memory card of your digital camera to your digital photo frame, you can enjoy the images taken with them on your Digital Photo Frame quickly and easily. It also provides a way to expand memory capacity of your digital photo frame.
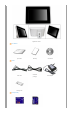
Digital Photo Frame User Manual Quick Start Warranty User Manual Cables Power cord Cleaning cloth Sold separately USB cable (A-B type) Power adapter
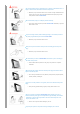
CF card | Features | Components | SD/MMC card Front Part | Back Part | Side (Buttons) | Side | | Side | Front Part Power Shows the status of power. Indicator When the product is powered on, it turns on with a light.
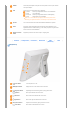
POWER Connect the power adapter to this jack. Connect the power cord to the power terminal of the power adapter. USB Connect a PC or an external device using a USB cable. Up stream Connect your Digital Photo Frame to a PC's USB terminal terminal using a USB cable. Down stream Connect your Digital Photo Frame to a USB-supporting terminal storage device using a USB cable.
[ ] Select Button Selects a file to play back, a setting on the menu, or an item. [SHOW] Slide Show Files are displayed in thumbnails on the bottom of the screen during Button playback. To play a file, use the Right and Left buttons to move selection on the file and press this /SHOW button. | Features | Components | Front Part | Back Part | Side (Buttons) | Side Side Memory Card You can insert a CF card or SD/MMC card to this slot to view and use the content stored in Slot them.
| Power | USB | Memory Card | | USB | Memory Card | Connecting Power Connect the power adapter to the POWER terminal at the back of the product. Connect the power cord to the power adapter. If all cables are connected, insert the power plug to a 220V outlet. Press the button at the right of the product to turn the product on.
Up Stream Terminal Used to connect your Digital Photo Frame to a PC. When connecting your Digital Photo Frame to a PC through the up stream terminal, make sure to use the USB cable provided with the product. Down Stream Used to connect an external USB-supporting device to your Digital Photo Frame . Terminal This product does not support USB card readers. Only USB storages are supported. When connecting an external device to the down stream terminal, use the USB cable provided with the external device.
CF CARD Slide the card into in the direction marked on its top. To remove a memory card, press the button at the top of the card slot. SD/MMC Slide the card into in the direction marked on its top. CARD If you remove the memory card during playback of MP3, movie, or photos, the product may not operate normally. In this case, turn off and on your product.
| Direct button | | | | Direct button MENU The menu is hidden automatically after one minute. Button MENU (MENU button) (Up button) Description Shows the menu on the bottom center of the screen. Pressing the menu button releases Volume/Brightness mode.
Button (Up button) Description Action/Stop Moves up the selected frame on the menu. Operating During Playback Position Menu (Bottom) Thumbnail Volume Up Play Mode (when the volume adjustment window is displayed) Brightness Up Moves up.
Button Description Action/Stop Moves to the left the selected frame on the menu. (Left button) (Right button) Button (Right button) Description Action/Stop Moves to the right the selected frame on the menu.
(Select / Slide Show button) Operating Position Play Mode Operating Position Sub menu of Basic operation Selects a file to play back or a setting on the menu. During Playback Shows/Hides the list of thumbnails on the bottom. Menu Select and playback Shows/Hides the list of thumbnails, or Select Contents List (Bottom) Thumbnail select a thumbnail.
screen If there no supported file in the connected media, "Not Contents Available." is displayed. Inside Memory Connected Storage Media SD / MMC CF USB Connected Storage Loads contents stored in the Inside Memory. Loads contents stored in a SD/MMC card. Loads contents stored in a CF card. Loads contents stored in the media connected via USB port. List Media Media File Types Inside Memory SD / MMC CF All: Loads all files. Shows the contents list that corresponds to the left and right menus.
information you select. Info. Display Replay Mode, BG Music, Number of Files, Server Cond., Date & Time, Weather Info, File Location Auto Replay - Select whether to playback the Server contents automatically or not Replay the content automatically. Select the number of thumbnails to display in the contents Layout Arrangement Picture list. 3X2 Format, 6X4 Format List Select how to sort the thumbnails displayed in the list. Standard Brightness - Adjust brightness from 0 to 100 levels.
OSD Description Play Play back the file. Stop Return to the first of the slide show. Previous File Play the previous file in the contents list. Next File Play the next file in the contents list. | Direct button MENU | | | | : Stops the file being played back MP3 OSD Description Mode Select a mode among Repeat All, Random, and Repeat One. Save Save the file being played back in the selected location. Delete Info Action/Stop Delete the file being played back.
Rotation Select one among 90 on Left, Standard, and 90 on Right. You can install your Digital Photo Frame vertically. Mode Select a mode among Repeat All, Random, and Repeat One. Save Save the file being displayed in the selected location. Delete Info. Delete the file being displayed. Show the information on the file being displayed. Movie OSD Description Mode Select a mode among Repeat All, Random, and Repeat One. Save Save the file being played back in the selected location. Delete Info.
I want to use contents through various connections. I want to set various times. I want to move to other screens. I want to display other information including time while my Digital Photo Frame is turned on. I want to update firmware. I want to use contents through various connections.
I want to set various times. Alarm Select Setup of . Select Time>Alarm. Check the Alarm Available. and set an alarm time. Auto Power Off Select Setup of . Select Time >Auto Power Off. Check the Auto Power Off/On and set an On/Off time I want to move to other screens. Viewing Clock Select Clock of . Playback is stopped and a clock is displayed in full screen mode. You can set the current time at the menu of Setup>Time>Current Time..
I want to update firmware. Preparations Digital Photo Frame (SPL-07) Firmware update file (M-BT07A4KR-1005.exe) USB memory card or USB compatible external storage media Connect USB memory card to PC If you are ready, connect the USB memory card to your PC. Copy the firmware update file you downloaded to the USB memory card. (Make sure to copy the firmware update file to the root directory. ex) H:\MBT07A4KR-1005.exe) Decompress the Double-click the M-BT07A4KR-1005.exe file.
| Specifications | Supported Files Specifications Items Specifications Type 7" TFT/AUO Resolution 800 x 480 Brightness 360 cd/m2 Contrast Ratio 300 : 1 View Angle 40/60/60/60 (Up-Down/Right-Left) Interface 6 bit Panel Supported Formats JPEG, MPEG4, WMV9 Built-in Memory 128 MB Sound 1 W x 1 built-in speaker Version 2.
Product design may differ by model and specifications are subject to change without prior notice for product performance enhancement. Class B Equipment (Information Communication equipment for residential use) This product complies with the Electromagnetic Compatibility Directives for residential use and can be used in all areas including common residential areas. (Class B equipment radiates less electromagnetic influences than class A equipment.
| Troubleshooting | Terminology | Service Centers | Troubleshooting This selection provides various problems and their remedies you can encounter during using the digital photo frame. If you encounter a problem, first check the list given below and take the suggested action if there is any one that matches. After that, if the problem still persists, contact or visit the nearest service center.
does now work. the files stored in it. Try to change the settings on Setup>Replay>Speed & Effect, and Replay Switching to the next photo takes a Effect menus using the buttons at the right side of the product. time. If there is no noticeable error in settings, it may take a different time to switch to the next file depending on file size and format. Screen displayed but no sound heard Change settings on Setup>Replay>Sound menu using the buttons at the right for MPEG4 and WMV9 movies.
(Multi Media Card) widely accepted as the standard for memory card. It is usually used to save movies and photos. Use the up stream terminal when connecting to a PC. This product supports USB 2.0. An A-B type cable which is used to connect your Digital Photo Frame to a PC is provided with the product. A type is the USB connector used to USB Cable connect to a PC. B type is the USB connector used to connect to an external 1) A-B TYPE device.