
Operation Manual


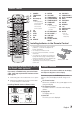
Table Of Contents
- Safety Warnings
- Accessories
- Precautions
- Cautions on Handling and Storing Discs
- Disc Types And Disc Format
- Contents
- Description
- Attaching the toroidal ferrite core to the Power cable (optional)
- Display Function
- CD/MP3/WMA-CD Playback
- Selecting a Track
- Searching for a Specific Music Passage on a CD
- Repeat One or All Tracks on a Compact Disc
- 10 Skip Function
- CD Programming
- Checking or Editing the Programmed Tracks
- Auto Change Function
- Playing a USB Device
- Using Bluetooth
- Setting the Clock
- Timer Function
- Cancelling the Timer
- Listening to Radio
- Selecting a Stored Station
- Recording Function
- Recording Speed
- Selecting EQ Mode
- Selecting LOCAL EQ Mode
- Using the FOOTBALL MODE
- GIGA SOUND Function
- Connecting a Microphone
- Troubleshooting
- Specifications

8 English English 8
English 9
Checking or Editing the
Programmed Tracks
This function is not available during playback of
an MP3/WMA-CD.
• You can program the playback order of up to 24
tracks of your choice.
• However, you must stop playing the CD before
selecting tracks.
1. While in CD playback mode, press the STOP(
@
)
button to stop playing the CD.
2. Press the ENTER
( )
button to display the
message below:
(01= program number, --= track number)
3. Use the
[
or
]
button to move to a desired
track.
• Press
[
to move to the previous track.
• Press
]
to move to the next track.
4. Press the ENTER
( )
button to confirm your
selection. The selection is stored and
is displayed.
5. To select additional tracks, follow Steps 3
to 4 above.
6. Press the
PLAY (+) button
to play the
programmed tracks.
7. Press the STOP(
@
) button to stop playing the
programmed tracks, Press the STOP (
@
) button
again to cancel playing the programmed tracks.
•
If you open the disc tray or turn off the
product, your programming will be canceled.
➣
In CD Program mode, if you press the USB REC
or the AUTO CHANGE buttons, these functions
will not work, and the unit will display "PROG".
You can check a list of programmed tracks and
edit them as you want.
1. If a programmed track is being played, press the
STOP (
@
) button once.
2. Press the ENTER
( )
button twice to display
the message below:
(C=Check, 01= program number)
➣ If a total of 24 tracks are already pro-
grammed, “C” will be displayed rather
than “P” in the display.
3. Press the ENTER
( )
button repeatedly until
the desired track is displayed.
4. Press the
[
or
]
button to select a different
track.
5. Press the ENTER
( )
button to confirm your
selection.
6. To play the programmed tracks, press the
PLAY (
+
) button.
You can play a disc followed by a USB continuously.
1. Press the AUTO CHANGE button.
Each time you press this button, the mode
will
switch as follows:
AUTO CHANGE ON
;
AUTO CHANGE OFF
• When the auto change mode is "ON", the unit will play
the Disc
;
USB continuously.
• When the auto change mode is "ON", if you press
the POWER button, FUNCTION button, or the
OPEN/CLOSE button, the auto change function
automatically switches to "OFF" mode.
• When the USB is playing, if you disconnected the
USB, the auto change function automatically switches
to "OFF" mode.
• When the auto change mode is "ON", the unit cannot
record.
• When the auto change mode is "ON", the REPEAT
and SLEEP functions automatically change to OFF.
• When theautochangemodeis"ON",theCDREC
SPEED,USBREC,REPEAT,PROGRAM,DELETE
andSLEEPfunctionsdonotwork,andtheunit
displays"AUTOCHANGEON".
• When the DISC play ends, if there's no USB, the unit
will continue to play the disc.
• When the USB play ends, if there's no DISC, the unit
will continue to play music from the USB.
Auto Change Function
10 Skip Function
CD Programming
Press the +10 or -10 button while in playback mode.
The unit will skip as many as 10 tracks forward or
10 tracks back from the current track.