BN68-00448G-00Eng.q 9/24/03 4:10 PM Page 1 LCD TV LS32A23W LS40A23W Owner’s Instructions Before operating the unit, please read this manual thoroughly, and retain it for future reference.
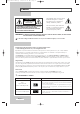
BN68-00448G-00Eng.q 9/24/03 4:10 PM Page 2 Caution The lightning flash and arrow head within the triangle is a warning sign alerting you of “dangerous voltage” inside the product. CAUTION RISK OF ELECTRIC SHOCK DO NOT OPEN The exclamation point within the triangle is a warning sign alerting you of important instructions accompanying the product. CAUTION: TO PREVENT ELECTRICAL SHOCK, DO NOT REMOVE REAR COVER, NO USER SERVICEABLE PARTS INSIDE. REFER SERVICING TO QUALIFIED SERVICE PERSONNEL.
BN68-00448G-00Eng.q 9/24/03 4:10 PM Page 3 Safety Instructions These illustrations represent precautions concerning your set. 75% 10% 35` Do NOT expose your set to extreme temperature or humidity conditions. H H 5` Do NOT expose your set to direct sunlight. Do NOT expose your set to any liquids. If your set is broken, do not try to repair it yourself. Contact qualified service personnel. During storm conditions (especially when there is lightning) unplug your set from the mains socket and aerial.
BN68-00448G-00Eng.q 9/24/03 4:10 PM Page 4 Contents ◆ FOREWORD ■ ■ Caution ................................................................................................................ Safety Instructions ................................................................................................ 2 3 ◆ CONNECTING AND PREPARING YOUR TV ■ ■ ■ ■ ■ ■ ■ ■ ■ Viewing the Control Panel ................................................................................... Viewing the Connection Panel....
BN68-00448G-00Eng.q 9/24/03 4:10 PM Page 5 Contents ◆ SETTING ■ ■ ■ ■ ■ ■ ◆ SETTING ■ ■ ■ ■ ■ ■ ■ ■ ■ ■ ◆ USING ■ ■ ■ ■ THE 32 34 35 36 36 37 TIME THE OTHERS Setting the Blue Screen Mode .............................................................................. 41 Selecting a Device from External Sources ............................................................ 42 Viewing Pictures from External Sources ...............................................................
BN68-00448G-00Eng.q 9/24/03 4:10 PM Page 6 Viewing the Control Panel POWER Press to turn the TV on and off. POWER INDICATOR MENU Press to see an on-screen menu of your TV’s features. Lights up when you turn the power off. – VOL + REMOTE CONTROL SENSOR Press to increase or decrease the volume. Also used to select items on the on-screen menu. Aim the remote control towards this spot on the TV.
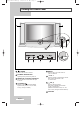
BN68-00448G-00Eng.q 9/24/03 4:10 PM Page 7 Viewing the Connection Panel Power Input ☛ Whenever you connect an audio or video system to your set, ensure that all elements are switched off.
BN68-00448G-00Eng.q 9/24/03 4:10 PM Page 8 Viewing the Connection Panel 5 Connecting Component Devices (DTV/DVD) - Connect component video cables to component connector (“Y”,“Pb”,“Pr”) on the rear of your set and the other ends to corresponding component video out connectors on the DTV or DVD. - If you wish to connect both the Set-Top Box and DTV (or DVD), you should connect the Set-Top Box to the DTV (or DVD) and connect the DTV (or DVD) to component connector (“Y”,“Pb”,“Pr”) on your set.
BN68-00448G-00Eng.q 9/24/03 4:10 PM Page 9 Viewing the Connection Panel 8 Connecting 5.1 Channel Speakers For Home Theater Surround Speaker Surround Speaker Woofer Main Speaker Main Speaker The other speakers (Surround/Center/Sub woofer):Connect the each speaker audio cable to the speaker output jack(surround 10 /Center 12 / Woofer 11 1 )on the rear of your set making sure that the +, - polarities are correctly aligned. LCD TV Rear the speaker cable on ➢ Wind the core twice or more.
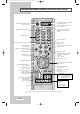
BN68-00448G-00Eng.q 9/24/03 4:10 PM Page 10 Viewing the Remote Control (All Functions Except Teletext) POWER DISPLAY SELECTED INPUT SOURCE AND BATTERY STATUS TELEVISION STANDBY BUTTON (Refer to page 13) PICTURE STANDARD SELECTION (Refer to page 24) TV P.
BN68-00448G-00Eng.q 9/24/03 4:11 PM Page 11 Viewing the Remote Control (Teletext Functions) POWER TV P.MODE SELECT 1 2 3 4 5 6 7 8 9 -/-- PRE-CH 0 P TELETEXT NEXT PAGE VIDEO MUTE TELETEXT PREVIOUS PAGE TELETEXT DISPLAY/MIX INFO IX TTX/M TELETEXT REVEAL ME IT NU EX TELETEXT INDEX ENTER STILL S.MODE DUAL I-II SURROUND TELETEXT HOLD BN59-00373 TELETEXT CANCEL P.
BN68-00448G-00Eng.q 9/24/03 4:11 PM Page 12 Installing Batteries in the Remote Control 1 Side the cover out completely. 2 Install two AAA size batteries. Make sure to match the “+” and “–” ends of the batteries with ➣ the diagram inside the compartment. 3 Replace the cover. Remove the batteries and store them in a cool, dry place if you ➣ won’t be using the remote control for a long time. The remote control can be used up to about 23 feet from the TV.
BN68-00448G-00Eng.q 9/24/03 4:11 PM Page 13 Switching On and Off The mains lead is attached to the rear of your set. 1 Plug the mains lead into an appropriate socket. The main voltage is indicated on the rear of your set and Result: the frequency is 50 or 60Hz. 2 Press the POWER ( ) button on the front of your set. The standby indicator lights up on the front panel.
BN68-00448G-00Eng.q 9/24/03 6:32 PM Page 14 Becoming Familiar with the Remote Control The remote control is used mainly to: ◆ Change channels and adjust the volume ◆ Set up your set using the on-screen menu system POWER TV P.MODE SELECT 1 2 3 4 5 6 7 8 The following table presents the most frequently used buttons and their functions. Button 9 -/-- PRE-CH Viewing Function Menu Function Used to display the next stored channel. - Used to display the previous stored channel.
BN68-00448G-00Eng.q 9/24/03 4:11 PM Page 15 Plug and Play When the set is initially powered ON, several basic customer settings proceed automatically and subsequently. The following settings are available. POWER TV 1 If the set is in standby mode, press the POWER ( remote control. Result: 2 P.MODE SELECT ) button on the The message Plug & Play is displayed. It appears for a little while, and then the Language menu is automatically displayed.
BN68-00448G-00Eng.q 9/24/03 4:11 PM Page 16 Plug and Play IX TTX/M INFO If you want to reset this feature... ME NU IT EX 1 ENTER STILL Press the MENU button. Result: S.MODE DUAL I-II SURROUND 2 BN59-00373 Press the or ❷ button to select Setup. Press the ENTER or ❿ button. Result: The options available in the Setup group are displayed. or ❷ button to select Plug & Play. 3 Press the 4 Press the ENTER Result: 5 English-16 The main menu is displayed. button.
BN68-00448G-00Eng.q 9/24/03 4:11 PM Page 17 Storing Channels Automatically 1 Press the MENU button. Result: 2 Press the Result: 3 NU ME S.MODE DUAL I-II SURROUND BN59-00373 or ❿ button. The Area is selected. 5 Press the ENTER 6 Press the ❷ button to select Auto Store. Press the ENTER or ❿ button. button. The Start is selected. Press ENTER button to search the channels. The sub menu is changed from Start to Stop with channel search started.
BN68-00448G-00Eng.q 9/24/03 4:11 PM Page 18 Sorting the Stored Channels IX TTX/M You can exchange the numbers of two channels, in order to: INFO ME NU IT EX ◆ Modify the numeric order in which the channels have been automatically stored. ◆ Give easily remembered numbers to the channels that you watch most often. ENTER STILL S.MODE DUAL I-II SURROUND 1 Press the MENU button. Result: BN59-00373 2 Press the or ❷ button to select Channel. Press the ENTER or ❿ button.
BN68-00448G-00Eng.q 9/24/03 4:11 PM Page 19 Storing Channels Manually You can store up to 100 channels, including those received via cable networks. When storing channels manually, you can choose: ◆ Whether or not to store each of the channels found ◆ The programme number of each stored channel which you wish to identify 1 Press the MENU button. Result: 2 Press the Result: The main menu is displayed. or ❷ button to select Channel. The options available in the Channel group are displayed.
BN68-00448G-00Eng.q 9/24/03 4:11 PM Page 20 Storing Channels Manually 9 If you know the number of the channel to be stored.... ◆ Press the or ❷ button to select Channel and then press the or ❿ button. ENTER ◆ Select C (Air channel) or S (Cable channel) by pressing the or ❷ button and then press the ENTER or ❿ button. ◆ Select the required number by pressing the then press the ENTER or ❿ button. ➣ 10 If there is abnormal sound or no sound, re-select the sound system required.
BN68-00448G-00Eng.q 9/24/03 4:11 PM Page 21 Editing the Channels IX TTX/M NU ME All channels that you do not specifically choose to skip are displayed during scanning. ENTER STILL 1 The options available in the Channel group are displayed. Press the or ❷ button to select Add/Delete. Press the ENTER or ❿ button. Result: 4 BN59-00373 The main menu is displayed. Press the or ❷ button to select Channel. Press the ENTER or ❿ button. Result: 3 S.MODE DUAL I-II SURROUND Press the MENU button.
BN68-00448G-00Eng.q 9/24/03 4:11 PM Page 22 Assigning Channels Names IX TTX/M INFO ME NU IT EX Channel names will be assigned automatically when channel information is broadcast. These names can be changed, allowing you to assign new names. 1 ENTER Press the MENU button. Result: STILL The main menu is displayed. S.MODE DUAL I-II SURROUND BN59-00373 2 Press the or ❷ button to select Channel. Press the ENTER or ❿ button. Result: 3 Press the or ❷ button to select Name.
BN68-00448G-00Eng.q 9/24/03 4:11 PM Page 23 Fine Tuning Channel Reception If the reception is clear, you do not have to fine-tune the channel, as this is done automatically during the search and store operation. If however the signal is weak or distorted, you may have to fine-tune the channel manually. 1 Press the MENU button. Result: 2 The main menu is displayed. Press the or ❷ button to select Channel. Press the ENTER or ❿ button. Result: The options available in the Channel group are displayed.
BN68-00448G-00Eng.q 9/24/03 4:11 PM Page 24 Changing the Picture Standard You can select the type of picture which best corresponds to your viewing requirements. 1 Press the MENU button. The main menu is displayed. Result: 2 Press the or ❷ button to select Picture. The options available in the Picture group are displayed. Result: 3 Press the ENTER or ❿ button. The Picture Mode is selected. Result: 4 Press the ENTER or ❿ button again.
BN68-00448G-00Eng.q 9/24/03 4:11 PM Page 25 Changing the Colour Tone You can select the most comfortable colour tone to your eye. 1 Press the MENU button. Result: The main menu is displayed. 2 Press the or ❷ button to select Picture. The options available in the Picture group are displayed. Result: 3 Press the ENTER 4 Press the or ❷ button to select Colour Tone and press or ❿ button. Select the required option by pressing the ENTER or ❷ button repeatedly.
BN68-00448G-00Eng.q 9/24/03 4:11 PM Page 26 ME T XI NU Freezing the Current Picture Press the "STILL" button to freeze a moving picture into a still one. Press again to cancel. ENTER STILL ➣ S.MODE DUAL I-II SURROUND This function will not operate in the PC Mode. NT4.43 is not supported in the sub-display. DNIe (Digital Natural Image engine) Samsung’s New Technology brings you more detailed images with contrast and white enhancement.
BN68-00448G-00Eng.q 9/24/03 6:31 PM Page 27 Viewing the Picture In Picture (PIP) You can display a sub picture within the main picture of set program or video input. In this way you can watch or monitor set program or the video input from any connected equipment while watching set or other video input. 1 Press the MENU button. Result: 2 Press the Result: The main menu is displayed. or ❷ button to select Picture. The options available in the Picture group are displayed. or ❿ button.
BN68-00448G-00Eng.q 9/24/03 6:31 PM Page 28 Viewing the Picture In Picture (PIP) 9 Press the or ❷ button to select Position and then press the or ❿ button. ENTER Select the position of sub picture by pressing the or ❷ button and then press the ENTER or ❿ button. Result: ➣ 10 You can move the sub picture counterclockwise. ◆ When the size of sub picture is set to Double1 or Double2, this feature does not work. Press the or ❷ button to select Prog.No.
BN68-00448G-00Eng.q 9/24/03 4:11 PM Page 29 Adjusting the Volume You can adjust the volume using your remote control. 7 8 9 -/-- PRE-CH 0 Press the Result: P button to increase the volume. VIDEO A horizontal bar is displayed and the volume increases until you release the button. The cursor moves to the right to indicate the volume. MUTE INFO IX TTX/M Result: ➣ ME NU button to decrease the volume.
BN68-00448G-00Eng.q 9/24/03 4:11 PM Page 30 Changing the Sound Standard You can select the type of special sound effect to be used when watching a given broadcast. 1 Press the MENU button. Result: 2 Press the Result: STILL or ❷ button to select Sound. The options available in the Sound group are displayed. 3 Press the ENTER or ❿ button. 4 Press the ENTER or ❿ button again. Result: S.MODE DUAL I-II SURROUND BN59-00373 The main menu is displayed. 5 The Sound Mode is selected.
BN68-00448G-00Eng.q 9/24/03 4:11 PM Page 31 Listening to the Sound of the Sub Picture During the PIP feature is activating, you can listen to the sound of the sub picture. 1 Press the MENU button. Result: 2 Press the Result: The main menu is displayed. or ❷ button to select Sound. The options available in the Sound group are displayed. or ❿ button. 3 Press the ENTER 4 Press the or ❷ button to select Sound Select and then press the or ❿ button. ENTER Result: ➢ 5 Main and Sub are displayed.
BN68-00448G-00Eng.q 9/24/03 4:12 PM Page 32 Setting the Dolby Digital Surround The following Dolby surround settings can be adjusted to suit your personal preferences. ◆ Dolby Pro-Logic II On/Off. ◆ Dynamic range for adjusting the volume Dolby Pro-Logic II On/Off during night time viewing. ◆ Speaker setting for Dolby Digital surround. ◆ Activation/Deactivation of test tone to simulate the volume on each speaker. ◆ Volume level control of the each speaker. ◆ Delay time for the rear speakers (0~15ms).
BN68-00448G-00Eng.q 9/24/03 4:12 PM Page 33 Setting the Dolby Digital Surround 11 Select the speaker size(Front Left, Front Right:Small/Large) and select On or Off(Center, Rear Right, Rear Left and Sub Woofer) by pressing the or ❷ button. Press the ENTER or ❿ button. 12 Press the MENU or ➛ button to return to the previous menu. 13 Press the or ❷ button to select Level Control. Press the ENTER or ❿ button. The option available in the Level Control group are Result: displayed with Test Tone selected.
BN68-00448G-00Eng.q 9/24/03 4:29 PM Page 34 Setting the Dolby Pro Logic II In case of “Pro Logic : On” Output Input (Source) Main Left Mono Center Surround Main Right Right Left ✔ ✔ ✔ Sub Woofer ✔ ✔ PCM Stereo (L/R) ✔ ✔ Mono Lo/Ro ✔ ✔ ✔ ✔ ✔ Lt/Rt ✔ ✔ ✔ ✔ ✔ 5.
BN68-00448G-00Eng.q 9/24/03 4:12 PM Page 35 Setting the External Digital Sound You can enjoy Digital sound when the equipment with Digital output is connected to the television. 1 Press the MENU button. The main menu is displayed. Result: 2 Press the or ❷ button to select Sound. The options available in the Sound group are displayed. Result: 3 Press the ENTER 4 Press the or ❷ button to select Ext. Audio. Press the ENTER or ❿ button. The Ext. Audio menu are displayed.
BN68-00448G-00Eng.q 9/24/03 4:12 PM Page 36 Connecting Headphones You can connect a set of headphones to your set if you wish to watch a TV programme without disturbing the other people in the room. Plug a set of headphones into the 3.5mm mini-jack socket on the panel of the set. The sound is heard through the headphones. Result: For further details on how to set your headphone preferences, refer to the section below. ➢ ➣ Prolonged use of headphones at a high volume may damage your hearing.
BN68-00448G-00Eng.q 9/24/03 4:12 PM Page 37 Selecting the Sound Mode The “DUAL I-II” button displays/controls the processing and output of the audio signal. When power is switched on, the mode is automatically preset to either “Dual-I ” or “Stereo”, depending on the current transmission.
BN68-00448G-00Eng.q 9/24/03 4:12 PM Page 38 Setting and Displaying the Current Time You can set the TV’S clock so that the current time is displayed when you press the "INFO" button. You must also set the time if you wish to use the automatic On/Off timers. ➣ 1 If you disconnect the power cord or switch off the power on the front panel, you have to set the clock again. Press the MENU button. Result: 2 Press the or ❷ button to select Setup. Press the ENTER or ❿ button Result: 3 P.
BN68-00448G-00Eng.q 9/24/03 4:12 PM Page 39 Setting the Sleep Timer You can select a time period of between 30 and 180 minutes after which the television automatically switches to standby mode. 1 Press the MENU button. Result: 2 Press the or ❷ button to select Setup. Press the ENTER or ❿ button Result: 3 The main menu is displayed. The options available in the Setup group are displayed with Time selected. Press the ENTER Result: or ❿ button. The Time menu are displayed with clock selected.
BN68-00448G-00Eng.q 9/24/03 4:12 PM Page 40 Switching the Television On and Off Automatically You can set the On/Off timers so that the set will : ◆ Switch on automatically and tune to the channel of your choice at the time you select. ◆ Switch off automatically at the time you select. ➣ 1 The first step is to set the television’s clock (refer to “Setting and Displaying the Current Time” on page 38 ). Press the MENU button. Result: 2 Press the or ❷ button to select Setup.
BN68-00448G-00Eng.q 9/24/03 4:12 PM Page 41 Setting the Blue Screen Mode If no signal is being received or the signal is very weak, a blue screen automatically replaces the noisy picture background. If you wish to continue viewing the poor picture, you must set the "Blue screen" mode to "Off". 1 2 The main menu is displayed. 4 4 4 4 4 4 : English : Off : TV Enter TV Return Setup Time Plug & Play Language Blue Screen Video Out PC Setup Press the or ❷ button to select Setup.
BN68-00448G-00Eng.q 9/24/03 6:32 PM Page 42 Selecting a Device from External Sources P VIDEO MUTE 1 INFO IX TTX/M Your set enables you to choose which audio/video signals are output to the external connector. ME NU IT EX Press the MENU button. Press the ENTER or ❿ button to select Input. Result: The options available in the Input group are displayed. Press the or ❷ button to select Edit Name. Press the ENTER or ❿ button. 2 Result: The options available in the Edit Name menu are displayed.
BN68-00448G-00Eng.q 9/24/03 4:12 PM Page 43 Setting up Your PC Software (Based on Widows 2000 or XP) The Windows display-settings for a typical computer are shown below. But the actual screens on your PC will probably be different, depending upon your particular version of Windows and your particular video card. But even if your actual screens look different, the same, basic set-up information will apply in almost all cases. (If not, contact your computer manufacturer or Samsung Dealer.
BN68-00448G-00Eng.q 9/24/03 4:12 PM Page 44 Adjusting the PC Screen Automatically B N59 -0 0 3 73 P.S IZ E S L E E PPIP DNIe PC RE W S TOPPL AY / PAU S E S E T S WAP RE S E T P Auto adjustment allows the PC screen of set to self-adjust to the incoming PC video signal. The values of fine, coarse and position are adjusted automatically. F F B N59 -0 0 3 73 A ➣ ➣ 1 Press the PC button on the remote control to select the PC mode. This function does not work in DVI-Digital mode.
BN68-00448G-00Eng.q 9/24/03 6:24 PM Page 45 Coarse and Fine Tuning of the Image The purpose of picture quality adjustment is to remove or reduce picture noise. If the noise is not removed by Fine tuning alone, then adjust the frequency as best as possible (coarse) and Fine tune again. After the noise has been reduced, re-adjust the picture so that it is aligned on the center of screen. ➣ ➣ 1 STOP SET SWAP P PLAY/PAUSE RESET The main menu is displayed.
BN68-00448G-00Eng.q 9/24/03 6:24 PM Page 46 Changing the Image Position BN59-00373 P.SIZE SLEEP DNIe PC REW STOP SET PIP SWAP Press the PC button on the remote control to select the PC mode. This function does not work in DVI-Digital mode. P PLAY/PAUSE RESET ➣ ➣ FF 1 Press the MENU button. Result: BN59-00373A The main menu is displayed. 2 Press the or ❷ button to select Setup. Press ENTER or ❿ button. 3 Press the or ❷ button to select PC Setup. Press the ENTER or ❿ button.
BN68-00448G-00Eng.q 9/24/03 6:24 PM Page 47 Selecting the DVI mode You can select the DVI mode(DVI-Analog or DVI-Digital)according to the pc input source(video board, video card or graphics card) ➣ Press the PC button on the remote control to select the PC mode. BN59-00373 P.SIZE DNIe PC REW STOP SET 1 SLEEP PIP SWAP P PLAY/PAUSE RESET BN59-00373A Press the MENU button. Result: The main menu is displayed. 2 Press the or ❷ button to select Setup. Press the ENTER or ❿ button.
BN68-00448G-00Eng.q 9/24/03 6:24 PM Page 48 Teletext Decoder Most set channels carry “teletext”, pages of written information that provide information such as: ◆ Television programme times ◆ News bulletins and Weather forecasts ◆ Sports results ◆ Subtitles for the hard of hearing The teletext pages are organized according to six categories: Part Contents A Selected page number. B Broadcasting station identity. C Current page number or search status. D Date and time. E Text.
BN68-00448G-00Eng.q 9/24/03 6:24 PM Page 49 Selecting a Specific Teletext Page INFO IX TTX/M IT EX Enter the three-digit page number listed in the contents by pressing the corresponding numeric buttons. VIDEO MUTE ME 1 P NU Press the number buttons on the remote control to enter the page number directly: Result: 2 3 The current page counter is incremented and the page is then displayed.
BN68-00448G-00Eng.q 9/24/03 4:12 PM Page 50 Using FLOF to Select a Teletext Page P V IDE O MU TE / MIX INF O 1 Display the teletext contents page by pressing the TTX/MIX ( button. 2 Press the colored button corresponding to the topic that you wish to select (The available topics are listed on the status information line). E NU TTX The various topics included in the teletext pages are color-coded, and can be selected by pressing the colored buttons on the remote control.
BN68-00448G-00Eng.q 9/24/03 4:12 PM Page 51 Troubleshooting: Before Contacting Service Personnel Before contacting Samsung after-sales service, perform the following simple checks. If you cannot solve the problem using the instructions below, note the model and serial number of your set and contact your local dealer. No sound or picture ◆ Check that the mains lead has been connected to a wall socket. ◆ Check that you have pressed the POWER ( ) button on the front of the TV.
BN68-00448G-00Eng.q 9/24/03 4:12 PM Page 52 Installing Stand 1. Lower the TV set in the direction of the arrow (at a right angle) and fix the stand. 2. Use the four screws to tightly fix the stand. Maintenance of Your LCD TV WARNING: To avoid risk of electric shock, do not disassemble the TV cabinet. Users cannot service the TV. User maintenance is restricted to cleaning as explained below: Unplug the LCD TV from the power outlet before cleaning.
BN68-00448G-00Eng.q 9/24/03 4:12 PM Page 53 Using the Anti-Theft Kensington Lock The Kensington lock is a device used to physically fix the system when using it in a public place. The locking device has to be purchased separately. The appearance and locking method may differ from the illustration depending on the manufacturer. Please refer to the manual provided with the Kensington lock for proper use. Cable Figure 2 Figure 1 1.
BN68-00448G-00Eng.q 9/24/03 4:12 PM Page 54 How to Install the Wall Bracket List of Contents Wall bracket Main body bracket Screws 1 Bracket bar Plastic screw anchors: 4 1 Wall bracket plate 2 Brackets (Left and Right) (The two brackets are interchangeable.) Screws: 4 Screws: 8 2 Assembly hinges (Make sure they are a left/right pair.) How to Adjust the Angle of the Bracket ➢ Please adjust the angle of the bracket to 0 degrees before you fix it to the wall.
BN68-00448G-00Eng.q 9/24/03 4:12 PM Page 55 How to Install the Wall Bracket How to Attach the LCD TV to the Bracket The LCD TV in the picture may not look exactly like yours. (You assemble the plastic screw anchors and the screws the same way regardless of the model of your TV.) 1 Assemble the plastic screw anchors and the screws. (See the picture below.) 2 Assemble the main body bracket as below and put the plastic screw anchors in.
BN68-00448G-00Eng.q 9/24/03 4:13 PM Page 56 Technical and Environmental Specifications Model Name Panel Size Display Size Type Pixel Pitch Viewing Angle LS32A23W LS40A23W 32" Diagonal 687.36 (H) x 412.42 (V) mm 40" Diagonal 871.68 (H) x 523.008 (V) mm PVA 0.537 (H) x 0.537 (V) mm 0.681 (H) x 0.681 (V) mm 170/170 (H/V) Frequency Horizontal Vertical Display Colour 30 ~ 61 kHz 56 ~ 75 Hz 16,777,216 colours Display Resolution Maximum Mode 1280 x 768 @ 60 Hz Input Signal Sync.
BN68-00448G-00Eng.q 9/24/03 4:13 PM Page 57 Technical and Environmental Specifications Model LS32A23W LS40A23W Environmental Considerations Operating Temperature Operating Humidity Storage Temperature Storage Humidity 10 °C to 40 °C (50 °F to 104 °F) 10% to 80% -25 °C to 45 °C (- 13 °F to 113 °F) 5% to 95% Audio Characteristics Audio Input Audio Input (PC) Headphone Output Frequency Response RCA Jack (L, R), 0.5Vrms (-9dB) 3.5Ø Stereo Jack, 0.5Vrms (-9dB) Max. 10mW Output (3.
BN68-00448G-00Eng.
BN68-00448G-00Eng.q 9/24/03 6:25 PM Page 59 Setting Up Your Remote Control After it has been set up properly, your remote control can operate in four different modes: TV, VCR, Cable, or DVD. Pressing the corresponding button on the remote control allows you to switch between these modes, and control whichever piece of equipment you choose. POWER Note The remote control might not be compatible with all DVD Players, VCRs and Cable boxes. TV Setting Up the Remote to Operate Your VCR P.
BN68-00448G-00Eng.q 9/24/03 6:25 PM Page 60 Setting Up Your Remote Control Setting Up the Remote to Operate Your Cable Box POWER TV P.MODE SELECT 1 2 3 4 5 6 7 8 1 Turn off your cable box. 2 Press the SELECT button and make sure that the Cable LED is illuminated. 3 Press the SET button on your TV’s remote control. 4 Using the number buttons on your remote control, enter three digits of the cable box code listed on page 62 of this manual for your brand of cable box.
BN68-00448G-00Eng.q 9/24/03 6:25 PM Page 61 Setting Up Your Remote Control Setting Up the Remote to Operate Your DVD 1 Turn off your DVD. 2 Press the SELECT button and make sure that the DVD LED is illuminated. 3 Press the SET button on your TV’s remote control. 4 Using the number buttons on your remote control, enter three digits of the DVD code listed on page 62 of this manual for your brand of DVD. Make sure you enter three digits of the code, even if the first digit is a “0”.
BN68-00448G-00Eng.
BN68-00448G-00Eng.
BN68-00448G-00Eng.q 9/24/03 7:06 PM Page 64 - AFTER SALES SERVICE - Do not hesitate to contact your retailer or service agent if a change in the performance of your product indicates that a faulty condition may be present.