HW-C900 AV Receiver System user manual imagine the possibilities Thank you for purchasing this Samsung product. To receive more complete service, please register your product at www.samsung.com/register - HW-C900-XAA_0831.
Safety information SAFETY WARNINGS TO REDUCE THE RISK OF ELECTRIC SHOCK, DO NOT REMOVE THE COVER(OR BACK). NO USER-SERVICEABLE PARTS ARE INSIDE. REFER SERVICING TO QUALIFIED SERVICE PERSONNEL. CAUTION RISK OF ELECTRIC SHOCK DO NOT OPEN This symbol indicates “dangerous voltage” inside the product that presents a risk of electric shock or personal injury. This symbol indicates important instructions accompanying the product.
ENG IMPORTANT SAFETY INSTRUCTIONS This device complies with part 15 of the FCC Rules. Operation is subject to the following two conditions: (1) This device may not cause harmful interference, and (2) this device must accept any interference received, including interference that may cause undesired operation. IMPORTANT NOTE: FCC Radiation Exposure Statement This equipment complies with FCC radiation exposure limits set forth an uncontrolled environment.
Safety information PRECAUTIONS 2.7 inches 3.9 inches 3.9 inches 3.9 inches Ensure that the AC power supply in your house complies with the identification sticker located on the back of your player. Install your player horizontally, on a suitable base (furniture), with enough space around it for ventilation (3~4inches). Make sure the ventilation slots are not covered. Do not stack anything on top of the amplifier.
ENG Features Digital AV Receiver This product is a pure digital AV receiver that performs digital signal processing to minimize signal distortion and loss. Dolby Pro Logic llx Dolby Pro Logic IIx is a new technology that provides discrete 7.1 channels out of 2 channel or multi channel sources.It also provides Music,Movie and Game modes. Dolby Pro Logic IIx is an improved surround system that is optimized to a 7.1 CH multimedia system, enabling you to maximize your entertainment experience.
Contents SAFETY INFORMATION 2 FEATURES 2 3 4 Safety Warnings Important Safety Instructions Precautions 5 Accessories 8 10 12 13 13 14 Front Panel Rear Panel Display Insert Remote Control Batteries Operation Range of the Remote Control Tour of the Remote Control 16 18 19 20 22 23 24 25 26 27 28 29 29 30 32 32 Speaker Positioning Connecting the Speakers Connecting the Bi-Amp Speaker Connecting the ZONE2 Speaker Connecting External Devices/Your TV via HDMI HDMI Function Connecting to your TV Connectin
ENG SETUP 37 55 MISCELLANEOUS 62 TROUBLESHOOTING 53 54 54 Setup Menu Tree Setting the Speaker Size Connection setting for surround BACK Setting the Speaker Listening Distance Setting the Speaker Level Setting the Test Tone Setting Dolby Pro Logic Mode Setting Dolby Pro Logic IIx Setting Tone Control Setting NEO:6 Mode Setting EX/ES Mode AV SYNC MP3 Enhancer Smart Volume ASC (Auto Sound Calibration) Setup DRC Setup DUAL MONO SetUp HDMI Setup Variable Set (Low Power Consumption SETUP) Video Conv.
Description FRONT PANEL 1 2 3 4 5 6 7 8 9 10 11 12 13 14 15 16 17 18 19 20 21 22 1 INPUT SELECT CONTROL Used to select a source. (FM BD/DVD SAT TV VCR CD AUX1 AUX2 7.1 MULTI CH IPOD AUDIO IPOD VIDEO). 2 AUDIO ASSIGN BUTTON Toggles to select an input mode for the selected source. 3 AUDIO EFFECT BUTTON Toggles to select a surround sound mode. 4 MULTI ZONE BUTTON Selects either ZONE2 or main unit. 5 SETUP BUTTON Displays the SETUP menu.
ENG Used to select the S.DIRECT mode. 11 S.DIRECT BUTTON 12 MASTER VOLUME CONTROL Adjusts the volume level. 13 POWER Turns the receiver on/off. 14 PHONE JACK Used to connect a set of headphones. 15 AUX IN JACKS Auxiliary AV input terminals used to connect a camcorder, portable DVD player or gaming device. 16 ASC MIC JACK Used to connect the ASC MIC for setting up ASC (Auto Sound Calibration). 17 UP(,), DOWN(.), LEFT(<), RIGHT(>) BUTTONS Used to move the cursor up, down, left or right.
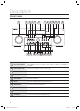
Description REAR PANEL 1 8 9 2 3 4 5 6 7 19 10 11 15 20 12 13 14 16 17 18 10 - HW-C900-XAA_0831.
ENG OPTICAL IN JACKS (DIGITAL AUDIO IN) Receives the digital optical audio signal. 2 COAXIAL IN JACK (DIGITAL AUDIO IN) Receives the digital coaxial audio signal. 3 COMPONENT VIDEO IN JACKS Receives the component video signal. 4 COMPONENT VIDEO OUT JACKS Outputs the component video signal. 5 HDMI IN JACKS Receives digital video and audio signals simultaneously using an HDMI cable. 6 HDMI OUT JACK Outputs digital video and audio signals simultaneously using an HDMI cable.
Description DISPLAY 1 2 3 4 5 7 6 1 SPEAKER INDICATORS Displays the connected speakers. 2 LISTENING MODE INDICATORS Displays the current listening mode. 3 TUNING INDICATORS Displays the status of the current radio broadcast. 4 AUDIO INPUT INDICATORS Displays the audio input signal type of the currently connected external audio source. 5 SPEAKER LEVEL INDICATOR Displays the speaker level. 6 RADIO FREQUENCY INDICATORS Displays the current radio frequency range.
ENG INSERT REMOTE CONTROL BATTERIES * Batteries (AAA size) ● DESCRIPTION M Follow these precautions to avoid leaking or cracking cells: Place batteries in the remote control so they match the polarity : (+) to (+) and (–) to (–). Assuming typical TV usage, the batteries last for about one year. Use the correct type of batteries. Batteries that look similar may differ in voltage. Always replace both batteries at the same time. Do not expose the batteries to heat or a flame.
Description TOUR OF THE REMOTE CONTROL INPUT SELECT TV SOURCE POWER 1 2 3 4 AMP/TV MAIN/ ZONE2 BD/DVD 1 2 3 4 5 NEO:6 SLEEP 7 8 6 DIMMER 9 PROLOGIC AUDIO ASSIGN DSP 0 5 24 8 11 MUTE VOL ASC TUNING / CH TUNER MEMORY SUB WOOFER MO/ST 26 27 INFO 28 29 EXIT 30 13 15 25 SETUP/MENU 12 14 20 21 23 7 10 19 22 6 9 16 17 18 RETURN BD/DVD SAT TV/AUX1 MULTI CH VCR/AUX2 CD iPod 14 - HW-C900-XAA_0831.
Turns the receiver on/off. 2 AMP/TV BUTTON Used to select the AMP/TV mode. - If you select the AMP mode, the button will flash orange. - If you select the TV mode, the button will flash green. 3 NUMBER BUTTONS Used to select a TV channel. 4 NEO : 6 BUTTON Select the desired NEO:6 mode. 5 PROLOGIC BUTTON Select the desired Dolby Pro Logic audio mode. 6 SKIP BUTTONS Press to skip backwards or forwards on a connected DVD/BD player or iPod.
Connections This section involves various methods of connecting the AV receiver to other external components. Before moving or installing the product, be sure to turn off the power and disconnect the power cord. SPEAKER POSITIONING There are two methods for positioning the speakers. When using Dolby Pro Logic IIz, place the Surround Back Speakers in the FHL, FHR position and connect them to SURROUND BACK/ FRONT HEIGHT Jack. FHL 6.6~9.8 feet (2~3m) 6.6~9.
ENG Surround Speakers Place these speakers behind your listening position. If there isn't enough room, place these speakers so they face each other. ● CONNECTIONS Place them about 2 to 3 feet (60 to 90cm) above your ears, facing slightly downward. Unlike the front and center speakers, the surround speakers are used to handle mainly sound effects and sound will not come from them all the time.
Connections CONNECTING THE SPEAKERS FRONT (R) SURROUND (R) SURROUND BACK (R) SURROUND BACK (L) SURROUND (L) FRONT (L) ACTIVE SUBWOOFER CENTER M If you want to use two active subwoofer speakers, connect both subwoofer speakers into the SUBWOOFER OUT terminals in the rear panel. When using Dolby Pro Logic IIz, connect the Surround Back Speakers (FHL, FHR) to SURROUND BACK/FRONT HEIGHT Jack. Connecting Speaker Wire 1. Loosen the knob by turning counterclockwise. 2.
ENG CONNECTING THE Bi-AMP SPEAKER Connect the tweeter (high range) port and woofer (low range) to the front port and surround back speaker port respectively as appropriate. Then, you can use the bi-amplification feature that supports enriched high range and base tones. 2. Connect the FRONT R connector (rear side of main unit) to the Tweeter port in the front right speaker. 3. Connect the SURROUND BACK L connector (rear side of main unit) to the Woofer port in the front left speaker. 4.
Connections ZONE 2 • In addition to your main listening room, you can also enjoy playback in the other room (Zone 2). • You can simultaneously play back the same source in both the Main Zone and Zone 2. You can also play back the separate sources in the Main Zone and Zone 2. • Use an RCA video cable to connect the AV receiver’s ZONE 2 Video OUT jacks to an Video input on your Zone 2 TV. M It is not possible to play the digital audio signals input from the HDMI, Coaxial or Optical connectors.
ENG 1. Connecting the speakers directly to the main unit (Powered ZONE2) This setup allows 5.1-channel playback in your main room and 2-channel stereo playback in Zone 2, with a different source in each room. • Connect your Zone 2 speakers to the AV receiver’s Surround Back Speaker terminals. M ● CONNECTIONS Zone 2 To enable the Powered ZONE2 feature, you must set SB SETUP to ZONE2 in SETUP menu. See page 42.
CONNECTING EXTERNAL DEVICES/YOUR TV VIA HDMI HDMI is a digital standard interface for connection to such devices as a TV, projector, DVD player, Blu-ray player, set-top box and more. HDMI removes any loss of signal from analog conversion, enabling you to enjoy video and audio sound quality as it was originally created in the digital source. By connecting through the HDMI(High-Definition Multimedia Interface) interface, you can play back digital video and audio.
ENG HDMI FUNCTION Using Anynet+(HDMI-CEC) ● CONNECTIONS Anynet+ is a function that enables you to control other Samsung Devices with your Samsung TV's remote control. Anynet + can be used by connecting this AV Receiver to a SAMSUNG TV using an HDMI Cable. This is only available with SAMSUNG TVs and SAMSUNG AV Products that support Anynet+. 1. Connect the AV receiver to a Samsung TV with an HDMI cable. (See page 22) 2. Set the Anynet+ function on your TV.
CONNECTING TO YOUR TV or or OPTICAL OUT AUDIO OUT COMPONENT IN VIDEO IN Video Connection If your television is equipped with Component Video inputs, connect a Component video cable(not supplied) from the Component Video Output (PR, PB and Y) jacks on the back of your AV Receiver to the Component Video Input jacks on your TV. OR Connect the Video cable from the VIDEO OUT (MONITOR) jack on the back of your AV Receiver to the Video Input jack on your TV.
ENG CONNECTING A DVD OR BD(Blu-ray) PLAYER COMPONENT IN VIDEO IN ● CONNECTIONS or or OPTICAL OUT COMPONENT OUT AUDIO OUT or VIDEO OUT DVD or BD Player Video Connection Connect a Component video cable(not supplied) from the COMPONENT IN (BD/DVD) (PR, PB and Y) jacks on the back of your AV Receiver to the Component Video Output jacks on your DVD/BD player. OR Connect a Video cable from the VIDEO IN (BD/DVD) jack on the back of your AV Receiver to the Video Output jack on your DVD/BD player.
CONNECTING A CABLE, SATELLITE OR SET-TOP BOX COMPONENT IN VIDEO IN or or OPTICAL OUT COMPONENT OUT AUDIO OUT or VIDEO OUT SAT(Cable/Satellite/Set-top box) Video Connection Connect a Component video cable(not supplied) from the COMPONENT IN (SAT) (PR, PB and Y) jacks on the back of your AV Receiver to the Component Video Output jacks on your SAT. OR Connect a Video cable from the VIDEO IN (SAT) jack on the back of your AV Receiver to the Video Output jack on your SAT.
ENG CONNECTING A VCR VCR VIDEO OUT (For playback) VIDEO IN AUDIO IN ● CONNECTIONS AUDIO OUT VIDEO IN (For recording) Video Connection For playback Connect a Video cable from the VIDEO IN (VCR) jack on the back of your AV Receiver to the Video Output jack on your VCR. For recording Connect a Video cable from the VIDEO OUT (VCR) jack on the back of your AV Receiver to the Video Input jack on your VCR.
Connections CONNECTING A CD PLAYER or OPTICAL OUT or COAXIAL OUT AUDIO OUT CD player Audio Connection Connect the Digital Input (COAXIAL, OPTICAL1~3) on your AV Receiver to the Digital Output of the CD Player. OR Connect AUDIO IN (CD) on your AV Receiver to the Audio Out of the CD player. M If the CD player has only one audio output jack, connect it to either the right or left audio input jack of the main unit. Connect the audio cable's red plug to the red jack and white cable to the white jack.
ENG CONNECTING 7.1 CHANNEL DEVICES You can connect the AV receiver to a DVD player, SUPER AUDIO CD player or other device with 7.1 channel output. ● CONNECTIONS C SW SW FRONT SURROUND C CENTER SUB WOOFER SURROUND BACK 5.1 CH 7.1 CH 7.1 Channel device CONNECTING THE TRIGGER OUT JACKS Once you connect TRIGGER OUT 1 and 2 ports on the rear panel to TRIGGER IN (if available) of the external device, you can control various functions of the external device including turning it on/off.
Connections CONNECTING AN iPod You can listen to audio from an iPod through the main unit. For iPod operation with your receiver, see this page and pages 58 ~ 59. 1. Connect the iPod dock connector to the iPod jack on your reciever. 2. Place the iPod in the Dock. • If you want to play a movie stored in your iPod player, you should set the player's TV Out option to On before inserting it into the dock. See page 59. 3. Press the iPod button on the remote control.
ENG CONNECTING AN iPod (Continued) iPod models that are compatible with HW-C900 iPod nano 1st generation 2nd generation 1GB 2GB 4GB (aluminum) 3rd generation (video) 4th generation (video) 4GB 8GB 8GB 16GB 1GB 2GB 4GB ● CONNECTIONS iPod nano iPod nano iPod nano iPod iPod iPod iPod 1st+2nd generation 3rd generation 4th generation 5GB 10GB 20GB 10GB 15GB 20GB 30GB 40GB 20GB 40GB 5th generation(video) 30GB 60GB 80GB iPod iPod mini iPod classic 4th generation (color display) 4GB 6G
Connections CONNECTING THE FM ANTENNA 1. Connect the FM antenna supplied to the FM ANTENNA terminal as a temporary measure. 2. Slowly move the antenna wire around until you find a location where reception is good, then fasten it to a wall or other rigid surface. FM antenna (supplied) M Do not place the antenna cable close to the power cord. Keep it as far away as possible. If you experience poor FM reception, use an external antenna.
ENG Basic functions of your AV Receiver BEFORE USING THE AV RECEIVER Turning On/Off Press the POWER button on the main unit for 2 seconds. • This unit will be turned on. • You can also turn the unit on/off by pressing the POWER button on the remote control. Remote control functions You can operate your AMP (this AV receiver)/ TV and BD(Samsung only)/DVD player with this remote control. See pages 62 ~ 64 for more details. To select a function Method 1 Press the INPUT SELECT button.
Basic functions of your AV Receiver BASICS OF ZONE2 (Continued) Using the ZONE 2 controls Operation This Unit Remote Control Unit POWER POWER Display & Indicator Main On MAIN/ ZONE2 Zone 2 Mode Zone 2 Power On MULTI ZONE MAIN/ZONE2 POWER POWER INPUT SELECT TV SOURCE Function (Turn on ZONE2 to display “Z” next to the display of the input source.
ENG 1 2 INPUT SELECT TV SOURCE POWER MAIN/ ZONE2 BD/DVD 1 2 3 ● BASIC FUNCTIONS OF YOUR AV RECEIVER 6 AMP/TV MUTE 3 4 5 VOL ASC TUNING / CH TUNER MEMORY SUB WOOFER 1 MULTI ZONE 4 Tuner Preset Mode 2 Indicator 5 Volume Control 3 Function 6 Tuner Preset Frequency M BD/DVD SAT MO/ST TV/AUX1 MULTI CH VCR/AUX2 CD iPod In ZONE2 FM mode, you can switch only between the preset channels that you have specified in the main zone.
Basic functions of your AV Receiver SELECTING DIGITAL/(HDMI)/ANALOG You can listen to sound in 2 channel analog , Dolby Digital or DTS using this unit. 1. Press the INPUT SELECT button to select a desired function (BD/DVD, SAT,TV, CD, AUX). See page 33. 4 5 6 SLEEP 7 8 9 PROLOCIC AUDIO ASSIGN DSP 2. Press the AUDIO ASSIGN button on the remote control to select the audio input source of the external device you have connected.
ENG Setup For your convenience, you can set this AV receiver's features for the best use. SETUP MENU TREE Here’s a quick look at how the setup menus are organized on your AV Receiver. ● SETUP AUDIO SETUP BD/DVD OPT 1,2,3 COAX OPT 1,2,3 COAX OPT 1,2,3 COAX OPT 1,2,3 COAX SAT TV CD SPK SIZE SB SETUP SPK DISTANCE SPK LEVEL TEST TONE DPLIIX SETUP TONE CONTROL NEO:6 SETUP EX/ES SETUP A/V SYNC MP3 ENHANCER SMART VOLUME ASC SETUP DRC SETUP DUAL MONO HDMI SETUP VARIABLE SET VIDEO CONV.
Setup SETUP MENU TREE (Continued) AUDIO SETUP SPK SIZE FRONT LARGE SMALL CENTER LARGE SMALL NONE SURR LARGE SMALL NONE SBACK LARGE SMALL NONE FRONTH LARGE SMALL SUBW YES NO CROVR SB SETUP 60Hz, 80Hz, 100Hz, 120Hz, 150Hz, 180Hz, 200Hz SURR-BACK PLIIZ ZONE2 Bi-AMP SPK DISTANCE F.L F.R CEN S.L 1 ~ 30 FT (1 foot steps) , default : 10 FT S.R SBL/FHL SBR/FHR S.W SPK LEVEL F.L F.R CEN S.L -10 ~ +10dB (1dB step) , default : 00dB S.R SBL/FHL SBR/FHR S.W TEST TONE AUTO MANUAL F.
ENG SETUP MENU TREE (Continued) DPLIIX SETUP ● SETUP TEST TONE PANORAMA OFF ON DIMENSION -7 ~ 0 ~ +7 C- WIDTH 0~7 TONE CONTROL TONE OFF ON BASS -6dB ~ +6dB (1dB Step) TREBLE -6dB ~ +6dB (1dB Step) NEO:6 SETUP C-IMAGE 0~5 EX/ES SETUP A/V SYNC AUTO OFF ON SYNC OFF ~ SYNC 240MS (10MS Step) 39 - HW-C900-XAA_0831.
Setup SETUP MENU TREE (Continued) MP3 ENHANCER OFF ON SMART VOLUME OFF ON ASC SETUP START EQ ON / EQ OFF DRC SETUP AUTO DUAL MONO CH1 HDMI SETUP SYNC MAX STD CH2 MIN CH1CH2 OFF ON AVR TV ON OFF OFF AUTO AUDIO ANYNET+ TV ARC VARIABLE SET OFF ON VIDEO CONV. AUTO BYPASS ZONE 2 SETUP FIXED VARIABLE 12-V TRIGGER T1 OFF BD/DVD SAT OFF BD/DVD SAT T2 40 - HW-C900-XAA_0831.
ENG SETTING THE SPEAKER SIZE Signal outputs and frequency response from the speaker will be adjusted according to your speaker configuration and whether certain speakers are used or not. 2. Press the ENTER button to select SETUP ENTER. ● SETUP 1. Press the SETUP/MENU button on the remote control. • Each time the button is pressed, the mode switches between SETUP ENTER and SETUP OFF. Æ 3. Press the ▲▼ buttons to select SPK SIZE, and then press the ENTER or ► button. 4.
Setup CONNECTION SETTING FOR SURROUND BACK Settings for the surround back speaker differ depending on the connection method and installation site of the speaker to be connected. You must configure the SB SETUP settings according to the connected speaker before you listen to music properly. 1. Press the SETUP/MENU button on the remote control. • Each time the button is pressed, the mode switches between SETUP ENTER and SETUP OFF. 2. Press the ENTER button to select SETUP ENTER. Æ 3.
ENG SETTING THE SPEAKER LISTENING DISTANCE If the speakers cannot be placed at equal distances from the listening position, you can adjust the delay time of the audio signals from the center and surround speakers. 2. Press the ENTER button to select SETUP ENTER. ● SETUP 1. Press the SETUP/MENU button on the remote control. • Each time the button is pressed, the mode switches between SETUP ENTER and SETUP OFF. Æ 3. Press the ▲▼ buttons to select SPK DISTANCE, and then press the ENTER or ► button. 4.
Setup SETTING THE SPEAKER LEVEL You can set the balance and level of speakers. 1. Press the SETUP/MENU button on the remote control. • Each time the button is pressed, the mode switches between SETUP ENTER and SETUP OFF. 2. Press the ENTER button to select SETUP ENTER. 3. Press the ▲▼ buttons to select SPK LEVEL, and then press the ENTER or ► button. 4. Press the ▲▼ buttons to select the speaker you want, and then press the ENTER or ► button. • Each time you press this button, F.L F.R CEN S.L S.R SBL SBR S.
ENG SETTING THE TEST TONE Use the test tone to check the speaker connection status or level. 2. Press the ENTER button to select SETUP ENTER. Æ 3. Press the ▲▼ buttons to select TEST TONE, and then press the ENTER or ► button. 4. Press the ▲▼ buttons to select the option you want, and then press the ENTER or ► button. • AUTO : Test signal will be automatically output as follows; F.L CEN S.W F.R S.R SBR SBL S.L.
Setup SETTING DOLBY PRO LOGIC MODE This mode provides up to 7.1 channel sound from 2 channel sources, or provides 7.1 channel sound from 5.1 channel sources for music or movie mode. Press the PROLOGIC button on the remote control. • MOVIE : Adds realism to the movie soundtrack. • MUSIC : Provides up to 7.1 channel surround sound for digital, analog or existing stereo sources. • GAME : Enhances the excitement of the game’s sound. • MATRIX : You will hear up to 7.1 channel surround sound.
ENG SETTING TONE CONTROL This will enable you to adjust the bass and treble level. 2. Press the ENTER button to select SETUP ENTER. 3. Press the ▲▼ buttons to select TONE CONTROL, and then press the ENTER or ► button. 4. Press the ▲▼ buttons to select the option you want, and then press the ENTER or ► button. • Each time you press this button, TONE BASS TREBLE will be selected in turn. ● SETUP 1. Press the SETUP/MENU button on the remote control.
Setup SETTING EX/ES MODE When surround back speakers are connected, you can listen to 7.1 multi-channel sound using the built-in Dolby Digital Surround EX or DTS ES decoder. This function works when a Dolby Digital or DTS source (such as a DVD player) is input, and does not work with L.PCM and Dolby Digital 2 channel sources. 1. Press the SETUP/MENU button on the remote control. • Each time the button is pressed, the mode switches between SETUP ENTER and SETUP OFF. 2.
ENG MP3 ENHANCER This also helps enhance your sound experience (ex. mp3 music). Use this if you want to hear better sound from a low quality mp3 source. 2. Press the ENTER button to select SETUP ENTER. ● SETUP 1. Press the SETUP/MENU button on the remote control. • Each time the button is pressed, the mode switches between SETUP ENTER and SETUP OFF. Æ 3. Press the ▲▼ buttons to select MP3 ENHANCER, and then press the ENTER or ► button. 4. Press the ▲▼ buttons to select ON or OFF.
Setup ASC (AUTO SOUND CALIBRATION) SETUP By setting the ASC function just once when you relocate or install the unit, you can have the unit automatically recognize the distance between speakers, levels between channels, and frequency characteristics to create a 7.1channel sound field optimized for your environment. - Before Setting 1. Plug the ASC microphone into the ASC MIC jack. 2. Place the ASC microphone at the listening position. 3.
ENG DRC SETUP You can use this function to enjoy Dolby Digital sound when watching movies at low volume at night.DRC compresses the audio to make the loudest sounds quieter and the quietest sounds louder. ● SETUP 1. Press the SETUP/MENU button on the remote control. • Each time the button is pressed, the mode switches between SETUP ENTER and SETUP OFF. 2. Press the ENTER button to select SETUP ENTER. 3. Press the ▲▼ buttons to select DRC SETUP, and then press the ENTER or ► button. 4.
Setup HDMI SETUP Use this if you want to receive audio from HDMI connected external devices. 1. Press the SETUP/MENU button on the remote control. • Each time the button is pressed, the mode switches between SETUP ENTER and SETUP OFF. 2. Press the ENTER button to select SETUP ENTER. 3. Press the ▲▼ buttons to select HDMI SETUP, and then press the ENTER or ► button. 4. Press the ▲▼ buttons to select the option you want, and then press the ENTER or ► button. 5.
ENG VIDEO CONV. (Video Conversion) You can convert the incoming composite or component video signal into a maximum quality of the connected TV if you output the converted video via HDMI OUT. ● SETUP 1. Press the SETUP/MENU button on the remote control. • Each time the button is pressed, the mode switches between SETUP ENTER and SETUP OFF. 2. Press the ENTER button to select SETUP ENTER. 3. Press the ▲▼ buttons to select VIDEO CONV., and then press the ENTER or ► button. 4.
Setup ZONE2 SETUP You can use the remote control or the master volume of the main unit to adjust the volume of ZONE2. 1. Press the SETUP/MENU button on the remote control. • Each time the button is pressed, the mode switches between SETUP ENTER and SETUP OFF. 2. Press the ENTER button to select SETUP ENTER. 3. Press the ▲▼ buttons to select ZONE2 SETUP, and then press the ENTER or ► button. 4. Press the ▲▼ buttons to select VARIABLE or FIXED.
ENG Operation USING THE SURROUND MODES Using the AUDIO EFFECT button on the front of the main unit Selecting the DPLIIx mode SFE will be selected in turn. 2. Press the UP/DOWN ( ,,. ) button. • Each time you press the UP/DOWN ( ,,. ) button, MUSIC GAME MATRIX PL PL OFF MOVIE will be selected in turn. • If you turn Dolby Pro Logic IIz on, HEIGHT PL OFF will be selected in turn. • You can also select the DPLIIx mode by pressing the PROLOGIC button on the remote control. ● OPERATION 1.
Operation USING THE SURROUND MODES (Continued) Input Signal and Surround Chart o = active, – = inactive Input Signal Surround Mode Dolby Digital Dolby Digital Dolby Digital EX Dolby Digitital EX Dolby Digital + ProLogic IIx Dolby Digital + ProLogic Iiz Dolby Digital Plus Dolby Digital Plus Dolby TrueHD Dolby TrueHD DTS (5.
ENG LISTENING TO THE RADIO You can listen to the radio by using either automatic or manual tuning. 1. Press the INPUT SELECT button to select FM. M ● OPERATION 2. Select a frequency (radio broadcast). • Preset tuning : Press the #,$ buttons on the remote control to select the preset frequency. • Manual tuning 1 (Automatic tuning): Press and hold the TUNING/CH ( .,, ) buttons on the remote control to automatically tune in a frequency. • Manual tuning 2 : Press the TUNING/CH ( .
Operation USING AN iPod You can enjoy playback of your iPod using the supplied remote control. Listening to Music (iPod audio function) You can play music files stored in the iPod player by connecting it to the AV receiver. 1. Connect the iPod dock connector to the iPod jack on the AV Receiver. 2. Place the iPod in the dock. • Your iPod is automatically turned on. 3. Press the INPUT SELECT button on the remote control to select IPOD AUDIO mode. 4. Press the PLAY button on the remote control to play.
ENG USING AN iPod (Continued) Watching a Movie (iPod Video function) 1. Connect the iPod dock connector to the iPod jack on the AV receiver. 2. In the iPod screen, move to Videos > Settings and set the TV Out option to On. 3. Place the iPod in the dock. 4. Press the INPUT SELECT button on the remote control to select IPOD VIDEO mode. 5. Set the AV IN option of the TV connected to the AV receiver to COMPOSITE.
Operation CONVENIENT FUNCTIONS Sleep timer function You can set the time that this unit will shut itself off. Press the SLEEP button. • SLEEP : OFF 15 30 selected in turn. 4 45 60 90 120 MIN will be 5 NEO:6 SLEEP 7 8 6 DIMMER PROLOGIC AUDIO ASSIGN 9 DSP 0 To check sleep timer Press the SLEEP button. • The remaining time before this unit will shut itself off is shown on the display. • Pressing the button again changes the sleep time from what you set previously.
ENG Reset function When the Power is on, 1. Press the MUTE button. • MUTE appears on the display. 3. Press the ▲▼ buttons to select YES. • The unit will turn off after 5 seconds. SLEEP 7 8 PROLOGIC AUDIO ASSIGN DIMMER 9 DSP 0 MUTE VOL ASC TUNER MEMORY SUB WOOFER ● OPERATION 2. Press the 2 button five times and then press the ENTER button. • INITIAL : NO appears on the display. NEO:6 TUNING / CH MO/ST SETUP/MENU INFO When the Power is Off, 1.
Miscellaneous OPERATING YOUR TV WITH THE REMOTE CONTROL 1. Press the POWER button to turn on the TV. 2. Press the AMP/TV button to set the remote to TV mode. • If you select the AMP mode, the button will flash orange. • If you select the TV mode, the button will flash green. 3. Point the remote control toward the TV. 4. While holding down the POWER button, enter the code corresponding to your brand of TV.
ENG OPERATING YOUR TV WITH THE REMOTE CONTROL (Continued) TV Brand Code List Brand AOC Bell & Howell (M.
Miscellaneous OPERATING YOUR DVD OR BD PLAYER WITH THE REMOTE CONTROL 1. Press the POWER button to turn on the DVD (BD) player. 2. Press the BD/DVD button on the remote control to set the remote to DVD (BD) mode. 3. Point the remote control toward the DVD (BD). 4. While holding down POWER button, enter the code corresponding to your brand of DVD (BD). • If there is more than one code listed for your DVD (BD) in the table, enter one at a time to determine which code works.
ENG Troubleshooting Before requesting service, please check the following. Symptom Check Remedy • Is the power cord plugged into the outlet? • Connect the power plug to the outlet. A function does not work when the button is pressed. • Is there static electricity in the air? • Disconnect the power plug and connect it again. Sound is not produced. • Are the speakers and external components connected properly? • Connect them correctly.
Troubleshooting Symptom Check Remedy Can't select Dolby Pro Logic llx mode. • Is the input signal selected properly? • Only 2 channel signal can select Dolby Pro Logic IIx mode. (ex:Dolby Digital, PCM, 2 channel analog input signal.) Can't select NEO:6 mode. • Is the input signal selected properly? • Use PCM and Analog input signal. There is no sound when playing a DTS encoded DVD.
ENG Appendix SPECIFICATIONS FM TUNER AMPLIFIER FREQUENCY RESPONSE HDMI VIDEO OUTPUT 120V, 60 Hz Standby power consumption 0.9W Power consumption 75W Weight 12.3 Ibs Dimensions (W x H x D) 17 x 6.5 x 14.2 inches Operating temperature range 41°F~+95°F Operating humidity range 10%~75% Frequency response 87.5~108.0MHz Usable sensitivity 12dBf S/N ratio MONO/STEREO 55/55dB Distortion MONO/STEREO 0.3/0.8% Stereo separation 30dB Rated output 20Hz~20kHz/THD = 0.
SAMSUNG AV receiver LIMITED WARRANTY TO ORIGINAL PURCHASER This SAMSUNG brand product, as supplied and distributed by Samsung Electronics America, Inc.
Contact SAMSUNG WORLD WIDE If you have any questions or comments relating to Samsung products, please contact the SAMSUNG customer care center. Area Contact Center ` North America Canada 1-800-SAMSUNG (726-7864) Mexico 01-800-SAMSUNG (726-7864) U.S.
QUESTIONS OR COMMENTS? COUNTRY IN THE US CALL 1-800-SAMSUNG (7267864) OR VISIT US ONLINE AT WRITE www.samsung.com/us Samsung Electronics America, Inc. 105 Challenger Road Ridgefield Park, NJ 07660-0511 Code No. AH68-02312R - HW-C900-XAA_0831.