Contact SAMSUNG WORLDWIDE If you have any questions or comments relating to Samsung products, please contact the SAMSUNG customer care center. Contacte con SAMSUNG WORLDWIDE Si tiene alguna pregunta o comentario referente a nuestros productos, por favor contacte con nuestro Servicio de Atención al Cliente. Country CANADA U.S.A Customer Care Center 1-800-SAMSUNG(726-7864) 1-800-SAMSUNG(726-7864) Web Site www.samsung.com/ca www.samsung.com Address Samsung Electronics Canada Inc.
Important Warranty Information Regarding Television Format Viewing Wide screen format LCD Displays (16:9, the aspect ratio of the screen width to height) are primarily designed to view wide screen format full-motion video. The images displayed on them should primarily be in the wide screen 16:9 ratio format, or expanded to fill the screen if your model offers this feature and the images are constantly moving.
English Contents General Information PC Display ■ ■ ■ ■ ■ ■ ■ Using Your TV as a Computer (PC) Display.....................43 ■ Display Modes..................................................................43 ■ Setting up the TV with your PC........................................44 List of Features...................................................................2 Accessories........................................................................2 Viewing the Control Panel...........................
General Information List of Features • • • • • • • • Adjustable picture settings that can be stored in the TV’s memory. Automatic timer to turn the TV on and off. A special sleep timer. Excellent Digital Interface & Networking : With a built-in HD digital tuner, non-subscription HD broadcasts can be viewed with no Cable Box/Satellite receiver (Set-Top Box) needed. You can listen to music files and view pictures on USB Mass Storage Class (MSC) devices. HDMI/DVI connection of your PC to this TV.
Viewing the Control Panel Buttons on the Lower-Right Part of the Panel The buttons on the lower-right panel control your TV’s basic features, including the on-screen menu. To use the more advanced features, you must use the remote control. 1 2 1 3 4 5 6 78 ➣ The product color and shape may vary depending on the model. 1 SPEAKERS 2 REMOTE CONTROL SENSOR Aim the remote control towards this spot on the TV.
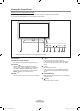
Viewing the Connection Panel Use the connection panel jacks to connect A/V components that will be connected continuously, such as DVD players or a VCR. For more information on connecting equipment, see pages 6~11. [TV Rear Panel] [TV Side Panel] ➣ The product color and shape may vary depending on the model. 1 AUDIO OUT Connects to the audio input jacks on your Amplifier/ Home theater. 8 2 DIGITAL AUDIO OUT (OPTICAL) Connects to a Digital Audio component. 9 POWER INPUT Connects the supplied power cord.
Remote Control You can use the remote control up to a distance of about 23 feet from the TV. 1 POWER Turns the TV on and off. % PRE-CH Tunes to the previous channel. 2 TV Selects the TV mode directly. ^ CH / CH Press to change channels. 3 NUMERIC BUTTONS Press to change the channel. & SOURCE Press to display and select the available video sources. 4 ress to select additional P channels (digital and analog) being broadcast by the same station.
Installing Batteries in the Remote Control 1. 2. 3. Lift the cover at the back of the remote control upward as shown in the figure. Install two AAA size batteries. ➣ Make sure to match the “+” and “–” ends of the batteries with the diagram inside the compartment. Replace the cover. ➣ Remove the batteries and store them in a cool, dry place if you won’t be using the remote control for a long time. The remote control can be used up to about 23 feet from the TV.
Connecting Cable TV To connect to a cable TV system, follow the instructions below. Cable without a Cable Box 1. Plug the incoming cable into the ANT IN terminal on the back of the TV. ➣ Because this TV is cable-ready, you do not need a cable box to view unscrambled cable channels. ANT IN Connecting to a Cable Box that Descrambles All Channels 1. 2. Find the cable that is connected to the ANT OUT terminal on your cable box. ➣ This terminal might be labeled “ANT OUT”, “VHF OUT” or simply, “OUT”.
Connecting a DVD Player or Cable Box/Satellite receiver (Set-Top Box) via HDMI This connection can only be made if there is an HDMI Output connector on the external device. 1. Connect an HDMI Cable between the HDMI IN (1, 2 or 3) jack on the TV and the HDMI jack on the DVD Player or Cable Box/Satellite receiver (Set-Top Box).
Connecting a DVD Player or Cable Box/Satellite receiver (Set-Top Box) via Component cables The rear panel jacks on your TV make it easy to connect a DVD Player or Cable Box/Satellite receiver (Set-Top Box) to your TV. 1. Connect a Component Cable between the COMPONENT IN (1 or 2) [Y, PB, PR] jacks on the TV and the COMPONENT [Y, PB, PR] jacks on the DVD Player or Cable Box/Satellite receiver (Set-Top Box). 2.
Connecting a VCR Video Connection These instructions assume that you have already connected your TV to an antenna or a cable TV system (according to the instructions on pages 6~7). Skip step 1 if you have not yet connected to an antenna or a cable system. 1. Unplug the cable or antenna from the back ANT IN of the TV. 2. Connect the cable or antenna to the ANT IN terminal on the back of the VCR. 3.
Connecting a Digital Audio System The rear panel jacks on your TV make it easy to connect a Digital Audio System (Home theater/Receiver) to your TV. 1. Connect an Optical Cable between the “DIGITAL AUDIO OUT (OPTICAL)” jacks on the TV and the Digital Audio Input jacks on the Digital Audio System. When a Digital Audio System is connected to the “DIGITAL AUDIO OUT (OPTICAL)” jack: Decrease the volume of the TV and adjust the volume level with the system’s volume control.
Operation Turning the TV On and Off Press the POWER button on the remote control. You can also use the POWER button on the TV. Plug & Play Feature When the TV is initially powered on, basic settings proceed automatically and subsequently. 1. Press the POWER button on the remote control. The message “Menu Language, Store Demo, Channels, and Time will be set.” is displayed. Press the ENTER button, then “Select Language of the OSD.” menu is automatically displayed. Press the ENTER button.
6. Press the ENTER button. Press the ▲ or ▼ button to select “Auto”, then Press the ENTER The message “Set to daylight saving time.” is displayed. If you select “Manual”, “Set current date and time” is displayed. (See page 46) button. Plug & Play Set the Clock Mode. Clock Mode : Auto Auto Manual Move 7. Press the ▲ or ▼ button to select “Off” or “On”, then press the ENTER button. The message “Select the time zone in which you live.” is displayed.
Using the Button The button is used to select stations that broadcast a digital signal. 1. For example, for Channel 7-1, press 7, then , then 1. ➣ HD indicates the TV is receiving a Digital High Definition signal. SD indicates the TV is receiving a Standard Definition signal. ➣ For quick channel change, press the number buttons, then press the ENTER button. Using the PRE-CH Button to select the Previous Channel 1. Press the PRE-CH button. The TV will switch to the last channel viewed.
Using the TOOLS Button You can use the TOOLS button to select your frequently used functions quickly and easily. The “Tools” menu changes depending on which external input mode you are viewing. 1. Press the TOOLS button. The “Tools” menu will appear. 2. Press the ▲ or ▼ button to select a menu. 3. Press the ▲/▼/◄/►/ENTER buttons to display, change, or use the selected items. For a more detailed description of each function, refer to the corresponding page.
Storing Channels in Memory (Automatic Method) Channel 1. Press the MENU button to display the menu. Press the ▲ or ▼ button to select “Channel”, then press the ENTER button. 2. Press the ▲ or ▼ button to select “Auto Program”, then press the ENTER button. Antenna : Air Auto Program ► Clear Scrambled Channel Channel List Fine Tune Signal Strength 3. Press the ▲ or ▼ button to select the antenna connection, then press the ENTER button. ➣ Air: “Air” antenna signal. Cable: “Cable” antenna signal.
To Select the Source Input Use to select TV or other external input sources such as DVD players or Cable Box/Satellite receivers (Set-Top Box) connected to the TV. Use to select the input source of your choice. 1. Press the MENU button to display the menu. Press the ▲ or ▼ button to select “Input”, then press the ENTER button. 2. Press the ENTER button to select “Source List”. Press the ▲ or ▼ button to select signal source, then press the ENTER button.
Picture Control Changing the Picture Standard Picture You can select the type of picture which best corresponds to your viewing requirements. 1. Press the MENU button to display the menu. Press the ENTER button to select “Picture”. :Standard Backlight :7 Contrast : 95 Brightness : 45 Sharpness : 50 Color : 50 Tint (G/R) : G50/R50 Detailed Settings 2. Press the ENTER button to select “Mode”. Press the ▲ or ▼ button to select “Dynamic”, “Standard” or “Movie”. Press the ENTER button.
Adjusting the Detailed Settings Samsung’s new TVs allow you to make even more precise picture settings than previous models. See below to adjust detailed picture settings. Activating Detailed Settings Picture 1. Press the MENU button to display the menu. Press the ENTER button to select “Picture”. 2. Press the ENTER button to select “Mode”. Press the ▲ or ▼ button to select “Standard” or “Movie”, then press the ENTER button. ➣ “Detailed Settings” is available in “Standard” or “Movie” mode.
Adjusting the Gamma You can adjust the Primary Color (Red, Green, Blue) Intensity. (-3 ~ +3) 8. Press the ▲ or ▼ button to select “Gamma”, then press the ENTER button. 9. Press the ◄ or ► button to decrease or increase the value. Press the ENTER button.
Adjusting the White Balance You can adjust the color temperature for more natural picture colors. 17. Press the ▲ or ▼ button to select “White Balance”, then press the ENTER button. 18. Select the required option by pressing the ▲ or ▼ button, then press the ENTER button. 19. Press the ◄ or ► button to decrease or increase the value of a particular item. Press the ENTER button. • • • • • • • R-Offset: Adjusts the red color darkness. G-Offset: Adjusts the green color darkness.
Setting the xvYCC Setting the xvYCC mode to “On” increases detail and color space when watching movies from an external device (ie. DVD player) connected to the HDMI or Component IN jacks. 24. Press the ▲ or ▼ button to select “xvYCC”, then press the ENTER button. 25. Press the ▲ or ▼ button to select “Off” or “On”. Press the ENTER button. ➣ “xvYCC” is available when the picture mode is set to “Movie”, and the external input is set to “HDMI” or “Component” mode.
Configuring Picture Options Activating Picture Options Tint (G/R) Picture 1. Press the MENU button to display the menu. Press the ENTER button to select “Picture”. 2. Press the ▲ or ▼ button to select “Picture Options”, then press the ENTER button. ➣ Press the ▲ or ▼ button to select a particular item. Press the ENTER button. button. ➣ When you are satisfied with your setting, press the ENTER ➣ In PC mode, you can only make changes to the “Color Tone” and “Size” from among the items in “Picture Options”.
➣ When Double ( , ) mode has been set in PIP, the Picture Size cannot be set. ➣ Temporary image retention may occur when viewing a static image on the set for more than two hours. ➣ After selecting “Zoom1”, “Zoom2” or “Wide Fit”: Size Press the ◄ or ► button to select “Position”, then press the ENTER 16:9 button. Press the ▲ or ▼ button to move the picture up and down. Zoom1 Position Reset: Press the ◄ or ► button to select “Reset”, then press the ENTER button. You can initialize the setting.
Setting the Digital Noise Reduction If the broadcast signal received by your TV is weak, you can activate the Digital Noise Reduction feature to help reduce any static and ghosting that may appear on the screen. 1. Follow the “Activating Picture Options” instructions numbers 1 and 2. (Refer to page 23) 2. Press the ▲ or ▼ button to select “Digital NR”, then press the ENTER button. 3. Press the ▲ or ▼ button to select “Off”, “Low”, “Medium”, “High” or “Auto”. Press the ENTER button.
Setting the Film Mode Picture Options The TV can be set to automatically sense and process film signals from all sources and adjust the picture for optimum quality. 1. Follow the “Activating Picture Options” instructions numbers 1 and 2. (Refer to page 23) 2. Press the ▲ or ▼ button to select “Film Mode”, then press the ENTER button. Color Tone : Normal Size : 16:9 Digital NR : Auto DNle : Off HDMI Black Level : Normal Film Mode : Off Blue Only Mode : Off ► ▼ Move 3.
Viewing Picture-in-Picture You can use the PIP feature to simultaneously watch the TV tuner (analog broadcasts only) and one external video source. (See page 33 to select the PIP picture sound.) This product has one built-in tuner, which does not allow PIP to function in the same mode. Please see ‘PIP Settings’ below for details. ➣ While V-Chip (See page 50) is in operation, the PIP function cannot be used. Activating Picture-in-Picture 2. Press the ENTER button again.
Changing the PIP Channel PIP 5. Press the ▲ or ▼ button to select “Air/Cable”, then press the ENTER button. 6. Press the ▲ or ▼ button to select “Air” or “Cable”, then press the ENTER button. PIP : On Size : Position : Air/Cable Air : Air Channel : Air 11 Cable Move Enter Return PIP 7. Press the ▲ or ▼ button to select “Channel”, then press the ENTER button. 8. Press the ▲ or ▼ button to select the desired channel in the PIP window. Press the ENTER button.
Sound Control Changing the Sound Standard Sound You can select the sound mode to best suit the programming you’re watching. 1. Press the MENU button to display the menu. Press the ▲ or ▼ button to select “Sound”, then press the ENTER button. Mode : Custom ► Equalizer • • • • • Standard: Selects the normal sound mode. Music: Emphasizes music over voices. Movie: Provides the best sound for movies Speech: Emphasizes voice over other sounds. Custom: Recalls your customized sound settings.
4. Press the ▲ or ▼ button to select a particular frequency to adjust. Press the ◄ or ► button to increase or decrease the level of the particular frequency. • Mode: Selects the sound mode among the predefined settings. • Balance L/R: Adjusts the balance between the right and left speaker. • Bandwidth Adjustment (100Hz, 300Hz, 1kHz, 2kHz, 3kHz, 10kHz): To adjust the level of different bandwidth frequencies.
Choosing Preferred Language Equalizer SRS TruSurround XT Sound The digital-TV transmission system is capable of simultaneous transmission of many audio tracks (for example, simultaneous translations of the program into foreign languages). Select the language you would like to hear the audio track in. 1. Press the MENU button to display the menu. Press the ▲ or ▼ button to select “Sound”, then press the ENTER button.
Automatic Volume Control Sound Reduces the differences in volume level among broadcasters. 1. Press the MENU button to display the menu. Press the ▲ or ▼ button to select “Sound”, then press the ENTER button. 2. Press the ▲ or ▼ button to select “Auto Volume”, then press the ENTER button. Preferred Language : English Multi-Track Sound : Stereo Auto Volume : Off Select Speaker : TV Speaker ► Sound Select : Main Sound Reset Sound 3.
Listening to the Sound of the Sub (PIP) Picture Sound When the PIP feature is activated, you can listen to the sound of the sub (PIP) picture. 1. Press the MENU button to display the menu. Press the ▲ or ▼ button to select “Sound”, then press the ENTER button. 2. Press the ▲ or ▼ button to select “Sound Select”, then press the ENTER button. 3. Press the ▲ or ▼ button to select “Main” or “Sub”, then press the ENTER button. Press the EXIT button to exit.
Channel Control Managing Channels Using this menu, you can Add/Delete or set Favorite channels and use the program guide for digital broadcasts. Viewing All Channels Press the ◄ button to select “Added Channels”. Clear Scrambled Channel Channel List Fine Tune Signal Strength Added Channels 2. Auto Program Channel Show all currently available channels. To use the Channel List function, first run “Auto Program” (see page 16). 1. Press the MENU button.
Erasing and Adding Channels 2. Auto Program Clear Scrambled Channel Channel You can delete or add a channel to display the channels you want. 1. Press the MENU button. Press the ▲ or ▼ button to select “Channel”, then press the ENTER button. Press the ▲ or ▼ button to select “Channel List”, then press the ENTER button. Channel List Fine Tune Signal Strength Press the ◄ button to select “Added Channels”. Added Channels 2 Air 4 Air 4-2 8 13 13-1 Air Antenna All Channels 3.
Setting Your Favorite Channels Press the ◄ button to select “Added Channels”. Channel List Fine Tune Signal Strength 2 Air 4 Air 4-2 ♥ TV #8 8 Air 13 13-1 Air Antenna All Channels Air ♥ TV #3 2 Air 4 Air 4-2 Air Antenna Air Air ♥ TV #3 Air 4 Air Air 13 Air Air Antenna Option Delete Add to Favorite ♥ TV #8 8 13-1 Alice’s Adventures in Wonderland Zoom Select 2 4-2 Option ♥ TV #8 13 13-1 Alice’s Adventures in Wonderland Zoom Select 8 All Channels 3.
Reserving a Program (Timer Viewing) Channel If you reserve a program you want to watch, the channel is automatically switched to the reserved channel in the Channel List; even when you are watching another channel. To reserve a program, set the current time first. See pages 46~47. Reserved channels can only be set if they are in the “Channel List” (See page 34). 1. Press the MENU button. Auto Program Press the ▲ or ▼ button to select “Channel”, then press the ENTER Clear Scrambled Channel button.
Confirming a Viewing Reservation Auto Program Clear Scrambled Channel Channel You can view, modify or delete a reservation. 1. Press the MENU button. Press the ▲ or ▼ button to select “Channel”, then press the ENTER button. Press the ▲ or ▼ button to select “Channel List”, then press the ENTER button. Fine Tune Signal Strength Added Channels 2. Press the ◄ button to select “Added Channels”. Channel List 2 Air 4 Air 4-2 8 13 13-1 Air Antenna Programmed 3.
Labeling Channels - Analog Channels can labeled so that their call letters appear whenever the channel is selected. 1. Press the MENU button. Press the ▲ or ▼ button to select “Channel”, then press the ENTER button. Press the ▲ or ▼ button to select “Channel List”, then press the ENTER button. Auto Program Clear Scrambled Channel Channel Channel List Fine Tune Signal Strength Added Channels 2. Press the ▲ or ▼ button to select the channel to be assigned a new name, then press the TOOLS button.
Selecting and Deselecting All Channels Added Channels 1. Press the MENU button. Press the ▲ or ▼ button to select “Channel”, then press the ENTER button. Press the ▲ or ▼ button to select “Channel List”, then press the ENTER button. 2. Press the ▲ or ▼ button to select the channel, then press the TOOLS button. 3. Press the ▲ or ▼ button to select “Select All” or “Deselect All”, then press the ENTER button. ➣ You can select(or Deselect) all channel in the channel list.
Clearing Scrambled Channels - Digital 2. Press the ▲ or ▼ button to select “Clear Scrambled Channel”, then press the ENTER button. It searches scrambled channels, which are to be removed from the list. ➣ To stop searching scrambled channels; Press the ENTER button to select “Stop”. Press the ◄ button to select “Yes”, then press the ENTER button. 3. When the scrambled channel searching is completed, press the ENTER button. Press the EXIT button to exit. ➣ This function is only available in “Cable” mode.
Checking the Digital-Signal Strength Channel Unlike analog channels, which can vary in reception quality from “snowy” to clear, digital (HDTV) channels have either perfect reception quality or you will not receive them at all. So, unlike analog channels, you cannot fine tune a digital channel. You can, however, adjust your antenna to improve the reception of available digital channels. 1. Press the MENU button to display the menu.
PC Display Using Your TV as a Computer (PC) Display Setting Up Your PC Software (Based on Windows XP) The Windows display-settings for a typical computer are shown below. The actual screens on your PC will probably be different, depending upon your particular version of Windows and your particular video card. However, even if your actual screens look different, the same basic set-up information will apply in almost all cases. (If not, contact your computer manufacturer or Samsung Dealer.) 1.
Setting up the TV with your PC How to Auto Adjust Use the Auto “Adjust function” to have the TV set automatically adjust the video signals it receives. The function also automatically fine-tunes the settings and adjusts the frequency values and positions. ➣ This function does not work in DVI-Digital mode. ➣ Preset: Press the SOURCE button to select PC mode. 1. Press the MENU button to display the menu. Press the ▲ or ▼ button to select “Picture”, then press the ENTER button.
Changing the Screen Position 2. Press the ▲ or ▼ button to select “Screen”, then press the ENTER button. Sharpness Picture Adjust the PC’s screen positioning if it does not fit the TV screen. ➣ Preset: Press the SOURCE button to select PC mode. 1. Press the MENU button to display the menu. Press the ▲ or ▼ button to select “Picture”, then press the ENTER button.
Time Setting Setting the Clock Setting the clock is necessary in order to use the various timer features of the TV. Also, you can check the time while watching the TV. (Just press the INFO button.) Option 1: Setting the Clock Manually button. button. Plug & Play Language Setup 1. Press the MENU button to display the menu.
Option 2: Setting the Clock Automatically Plug & Play button. button. Language Setup The Clock can be set automatically if you are receiving a digital signal. 1. Press the MENU button to display the menu. Press the ▲ or ▼ button to select “Setup”, then press the ENTER Press the ▲ or ▼ button to select “Time”, then press the ENTER : English Time ► V-Chip Caption External Settings Entertainment : Off Energy Saving : Off PIP Software Upgrade 2. Press the ENTER Time button to select “Clock”.
Setting the Sleep Timer Setup The sleep timer automatically shuts off the TV after a preset time (30, 60, 90, 120, 150 and 180 minutes). 1. Press the MENU button to display the menu. Plug & Play Press the ▲ or ▼ button to select “Setup”, then press the ENTER button. Language Press the ▲ or ▼ button to select “Time”, then press the ENTER button. : English Time ► V-Chip Caption External Settings Entertainment : Off Energy Saving : Off PIP Software Upgrade 2.
Setting the On/Off Timer Plug & Play button. Language Setup 1. Press the MENU button to display the menu. Press the ▲ or ▼ button to select “Setup”, then press the ENTER button. Press the ▲ or ▼ button to select “Time”, then press the ENTER : English Time ► V-Chip Caption External Settings Entertainment : Off Energy Saving : Off PIP Software Upgrade 2. Three different On/Off Timer Settings can be made.
Function Description Selecting a Menu Language Plug & Play Setup 1. Press the MENU button to display the menu. Press the ▲ or ▼ button to select “Setup”, then press the ENTER button. Press the ▲ or ▼ button to select “Language”, then press the ENTER button. Language : English ► Time V-Chip Caption External Settings Entertainment : Off Energy Saving : Off PIP 2. Plug & Play Setup Press the ▲ or ▼ button to select “English”, “Español” or “Français”. Press the ENTER button.
3. The “V-Chip” screen will appear. Press the ▲ or ▼ button to select “Change PIN”, then press the ENTER button. The Change PIN screen will appear. Choose any 4 digits for your PIN and enter them. As soon as the 4 digits are entered, the “Confirm New PIN.” screen appears. Re-enter the same 4 digits. When the Confirm screen disappears, your PIN has been memorized. Press the EXIT button to exit.
How to Set up Restrictions Using the TV Parental Guidelines Setup First, set up a personal identification number (PIN) and enable the V-Chip. (See previous section.) Parental restrictions can be set up using either of two methods: The TV guidelines or the MPAA rating. 1. Press the MENU button to display the menu. Language : English Press the ▲ or ▼ button to select “Setup”, then press the ENTER button. Time 2. Press the ▲ or ▼ button to select “V-Chip”, then press the ENTER V-Chip button.
How to Set up Restrictions Using the MPAA Ratings: G, PG, PG-13, R, NC-17, X, NR Setup The MPAA rating system uses the Motion Picture Association of America (MPAA) system and its main application is for movies. When the V-Chip lock is on, the TV will automatically block any programs that are coded with objectionable ratings (either MPAA or TV-Ratings). 1. Press the MENU button to display the menu. Language : English Press the ▲ or ▼ button to select “Setup”, then press the ENTER button. Time 2.
How to Set up Restrictions Using the Canadian English Language : English Time Setup 1. Press the MENU button to display the menu. Press the ▲ or ▼ button to select “Setup”, then press the ENTER button. 2. Press the ▲ or ▼ button to select “V-Chip”, then press the ENTER button. The message “Enter PIN” will appear. Enter your 4 digit PIN number. V-Chip ► Caption External Settings Entertainment : Off Energy Saving : Off PIP Software Upgrade 3. The “V-Chip” screen will appear.
How to Set up Restrictions Using the Canadian French Language : English Time Setup 1. Press the MENU button to display the menu. Press the ▲ or ▼ button to select “Setup”, then press the ENTER button. 2. Press the ▲ or ▼ button to select “V-Chip”, then press the ENTER button. The message “Enter PIN” will appear. Enter your 4 digit PIN number. V-Chip ► Caption External Settings Entertainment : Off Energy Saving : Off PIP Software Upgrade V-Chip 3. The “V-Chip” screen will appear.
Using the V-Chip for Digital channels Language : English Time Setup Parental restriction information can be used while watching DTV channels. 1. Press the MENU button to display the menu. Press the ▲ or ▼ button to select “Setup”, then press the ENTER button. 2. Press the ▲ or ▼ button to select “V-Chip”, then press the ENTER button. The message “Enter PIN” will appear. Enter your 4 digit PIN number.
Viewing Closed Captions (On-Screen Text Messages) - Analog Setup The Analog Caption function operates in either analog TV channel mode or when a signal is supplied from an external device to TV. (Depending on the broadcasting signal, the Analog Caption function may operate on digital channels.) 1. Press the MENU button to display the menu. Time Press the ▲ or ▼ button to select “Setup”, then press the ENTER button. V-Chip 2.
Viewing Closed Captions (On-Screen Text Messages) - Digital Time Setup The Digital Captions function operates on digital channels. 1. Press the MENU button to display the menu. Press the ▲ or ▼ button to select “Setup”, then press the ENTER button. 2. Press the ▲ or ▼ button to select “Caption”, then press the ENTER button. 3. Press the ENTER button to select “Caption”. Press the ▲ or ▼ button to select “On”, then press the ENTER button.
Adjusting the TV On/Off Melody Sound V-Chip Setup A melody sound can be set to come on when the TV is powered On or Off. 1. Press the MENU button to display the menu. Press the ▲ or ▼ button to select “Setup”, then press the ENTER button. 2. Press the ▲ or ▼ button to select “External Settings”, then press the ENTER button. Off: Turns off the melody function. Low: Sets the melody volume to low. Medium: Sets the melody volume to medium. High: Sets the melody volume to high.
Using the Energy Saving Feature External Settings Setup This feature adjusts the brightness of the TV in order to reduce power consumption. When watching TV at night, set the "Energy Saving “ mode option to “High” to reduce eye fatigue as well as power consumption. 1. Press the MENU button to display the menu. Press the ▲ or ▼ button to select “Setup”, then press the ENTER button. : Off ► Software Upgrade External Settings Setup Off: Turns off the energy saving function.
Self diagnosis Picture Test Please perform the picture test if there is a problem on the screen. Check the color pattern on the screen, and analyze whether the TV is defective. 1. Please press the ‘-’ button for more than 5 seconds. ➣ The “Self Diagnostic Test” message is displayed. 2. Press the ▲ or ▼ button to select “Picture Test”, then press the ENTER button. ➣ The “Does the problem still exist with this test pattern?” message will appear. Self Diagnostic Test 3.
WISELINK Using the WISELINK Function Connecting a USB Device TV Side Panel HDMI IN3 This function enables you to view and listen to photo (JPEG) and audio files (MP3) saved on a USB Mass Storage Class (MSC) device. 1. Press the POWER button on the remote control or front panel. ➣ The TV is powered on. 2. Connect a USB device containing JPEG and/or MP3 files to the WISELINK jack (USB jack) on the side of the TV.
Using the WISELINK Menu 1. Press the MENU button. Press the ▲ or ▼ button to select “Application”, then press the ENTER button. 2. Press the ▲ or ▼ button to select “WISELINK”, then press the ENTER button. ➣ The “WISELINK” menu is displayed. WISELINK SUM 851.98MB/995.00MB Free PHOTO Photo Music Setup SUM Device e Exit O Press the W.LINK button on the remote control to display the “WISELINK” menu.
Screen Display Photo 2 image_1.jpg Month Date Color Composition Folder Favorite 1File(s) Selected6 : Jan : Jan.01.2008 : Gray : : P-other : ★★★ 1 Preference Monthly 3 SUM5 4 Jan Nov ▲ Timeline 7 Device Favorites Setting Select Jump Option 1 Currently selected photo Shows the currently selected photo. 2 Photo Information Window Shows information about the currently selected photo. You can change the “Color”, “Composition”, and “Favorite”.
Sorting Photo List You can sort photos in the Photo List by a particular standard. 1. Press the W.LINK button on the remote control to display the “WISELINK” menu. 2. Press the ◄ or ► button to select “Photo”, then press the ENTER button. ➣ Photo files are displayed. 3. Press the ▲ or ▼ button to select a sorting standard. (“Monthly”, “Timeline”, “Color”, “Composition”, “Folder”, “Preference”) ➣ The photos are sorted according to the newly selected sorting standard. 4.
Color Sorts photos by color. ➣ You can change the photo color information. 1. Select “Color” as the sorting standard in the Photo List. 2. Press the ◄ or ► button to select from the sublist of files grouped by color. ➣ To move to the previous / next group, press the (REW) or (FF) button. 3. Press the TOOLS button. Press the ▲ or ▼ button to select “Play Current Group”. 4. Press ENTER to play the selected group of photo files from the sublist. Changing the color information 1.
Folder Sorts photos by folder. ➣ If there are many folders in USB, the photos files are shown in order in each folder. The photo file in the Root folder is shown first and the others are shown in alphabetical order by name. 1. Select “Folder” as the sorting standard in the Photo List. 2. Press the ◄ or ► button to select from the sublist of files grouped by folder. ➣ To move to the previous / next group, press the (REW) or (FF) button. 3. Press the TOOLS button.
Deleting the Photo file 1. Press the ◄ or ► button to select the desired photo in the Photo list. 2. Press the TOOLS button. 3. Press the ▲ or ▼ button to select “Delete”, then press the ENTER button. ➣ The “Delete this file?” message appear. 4. Press the ◄ or ►button to select “OK”, then press the ENTER button. ➣ The photo is deleted. ➣ When a read-only file is deleted, the “Read-only file(s). Delete the file(s)?” message appear. ➣ If you select “Cancel”, the deletion is cancelled. 5.
Viewing a Photo or Slide Show Viewing a Slide Show 1. Press the W.LINK button on the remote control to display the “WISELINK” menu. 2. Press the ◄ or ► button to move to “Photo”, then press the ENTER button. ➣ Photo files are displayed. 3. Press the ◄ or ► button to select the desired photo in the Photo list. 4. Press the TOOLS button. 5. Press the ▲ or ▼ button to select “Slide Show”, then press the ENTER button. Photo image_1.jpg Month Date Color Composition Folder Favorite : Jan Slide Show : Jan.
Viewing a photo 1. Press the W.LINK button on the remote control to display the “WISELINK” menu. 2. Press the ◄ or ► button to move to “Photo”, then press the ENTER button. ➣ Photo files are displayed. 3. Press the ◄ or ► button to select the desired photo in the Photo list. Then Press the Yellow button to select only one file. 4. Press the ENTER button over a photo icon. ➣ The currently selected photo is displayed in full screen. 20/22 image_1.jpg SUM 440x440 E Slide Show Previous 2.
Zoom You can zoom into images in full screen mode. Press the ▲ or ▼ button to select “Zoom”, then press the ENTER button. Press the ◄ or ► button repeatedly to increase or decrease the Zoom effect. (x1 → x2 → x4) To move the enlarged photo image, press the ENTER button, then press the ▲/▼/◄/► buttons. ➣ Note that when the enlarged picture is smaller than the original screen size, the location change function doesn’t work. ➣ The enlarged file is not saved.
Background Music Setting You can set the background music. Press the ▲ or ▼ button to select “Background Music Setting”, then press the ENTER button. ➣ If you turn off the “Background Music”, even if the “Background Music Settings” have been set up, the background music will not be played. ➣ Loading music files is needed to change BGM mode. Play music files in music category to load. ➣ “Background Music setting” menu is displayed. Press the ◄ or ► button to select the desired BGM (Background music) mode.
Using the Music List This menu shows MP3 files from among the files saved on a USB memory device. 1. Press the W.LINK button on the remote control to display the “WISELINK” WISELINK menu. SUM 851.98MB/995.00MB Free Music Photo Music Setup SUM 2. Press the ◄ or ► button to select “Music”, then press the ENTER button. ➣ Music files are displayed. (Play) / ENTER button over a music icon to play ➣ Press the the music. (REW) or ➣ To move to the previous / next group, press the (FF) button.
5 Item Selection Information Shows the number of music files that are selected by pressing the Yellow button. 6 Help Items • Red(Device) button: Selects a connected device. • Green(Favorites Setting) button: Changes the favorites setting for the selected music. Press this button repeatedly until the desired value appears. (Refer to page 76) • Yellow(Select) button: Selects music files from the music list. Selected music files are marked with a symbol the left.
Artist Sorts music files by the artist. ➣ It sorts the music file by artist in alphabetical order. 1. Select “Artist” as the sorting standard in the Music List. 2. Press the ◄ or ► button to select from the sublist of files grouped in alphabetical order. ➣ To move to the previous / next group, press the (REW) or (FF) button. 3. Press the TOOLS button. 4. Press the ▲ or ▼ button to select “Play Current Group”. 5. Press ENTER to play the selected group of music files from the sublist.
Genre Sorts music files by the genre. 1. Select “Genre” as the sorting standard in the Music List. 2. Press the ◄ or ► button to select from the sublist of files grouped by Genre. ➣ To move to the previous / next group, press the (REW) or (FF) button. 3. Press the TOOLS button. 4. Press the ▲ or ▼ button to select “Play Current Group”. 5. Press ENTER to play the selected group of music files from the sublist.
Deleting the Music file 1. Press the ◄ or ► button to select the desired music file in the music list. 2. Press the TOOLS button. 3. Press the ▲ or ▼ button to select “Delete”, then press the ENTER button. ➣ The “Delete this file?” message appear. 4. Press the ◄ or ► button to select “OK”, then press the ENTER button. ➣ The music is deleted. ➣ When a read-only file is deleted, the “Read-only file(s). Delete the file(s)?” message appear. ➣ If you select “Cancel”, the deletion is cancelled. 5.
Playing a Music File Playing a music file 1. Press the W.LINK button on the remote control to display the WISELINK menu. 2. Press the ◄ or ► button to select “Music”, then press the ENTER button. ➣ Music files are displayed. 3. Pressing the ◄ or ► button to select a music file to be played, then press the ENTER button. ➣ This menu only shows files with the MP3 file extension. Files with other file extensions are not displayed, even if they are saved on the same USB device.
Playing the selected music files 1. Press the W.LINK button on the remote control to display the WISELINK menu. 2. Press the ◄ or ► button to select “Music”, then press the ENTER button. 3. Press the ◄ or ► button to select the desired music file, then press the yellow button. Repeat the above operation to select multiple music files. ➣ The mark appears to the left of the selected music file. Music 4. Press the (Play) / ENTER button. ➣ Only the selected file is played.
Using the Setup Menu Setup displays the user settings of the WISELINK menu. 1. Press the W.LINK button on the remote control to display the WISELINK menu. 2. Press the ◄ or ► button to select “Setup”, then press the ENTER button. 3. Press the ▲ or ▼ button to select the desired option. (Slide Show Speed, Music Repeat Mode, Screen Saver Run Time, Information, Safe Remove) 4. Press the ◄ or ► button to select the option, then press the ENTER button.
About Anynet+ What is Anynet+? Anynet+ is a function that enables you to control all connected Samsung devices that support Anynet+ with your Samsung TV’s remote. Connecting Anynet+ Devices The Anynet+ system can be used only with Samsung devices that have the Anynet+ feature. To be sure your Samsung device has this feature, check if there is an Anynet+ logo on it. To connect to a TV TV Anynet+ Device 1 HDMI 1. Cable HDMI 1.
Setting Up Anynet+ The following settings help set the Anynet+ functions. To use the Anynet+ Function, Anynet+ (HDMI-CEC) must be set to On WISELINK Application 1. Press the MENU button. Press the ▲ or ▼ button to select “Application”, then press the ENTER button. 2. Press the ▲ or ▼ button to select “Anynet+ (HDMI-CEC)”, then press the ENTER button. 3. Press the ▲ or ▼ button to select “Setup”, then press the ENTER button. 4.
Scanning and Switching between Anynet+ Devices 1. Press the TOOLS button. Press the ENTER button to select “Anynet+ (HDMI-CEC)”. View TV 2. Press the ▲ or ▼ button to select “Device List”, then press the ENTER Device List button. Recording: DVDR ➣ Anynet+ devices connected to the TV are listed. If you cannot find a device you want, press the red button to scan for DVDR Operation devices. Receiver : On ➣ Only when you set “Anynet+ (HDMI-CEC)” to On in the “Setup” menu, the Setup “Device List” menu appears.
Recording You can make a recording of a TV program using a Samsung recorder. 1. Press the TOOLS button. Press the ENTER button to select “Anynet+ (HDMI-CEC)”. 2. Press the ▲ or ▼ button to select “Recording: (device_name)”, then press the ENTER button. Recording begins. When there is more than one recording device When multiple recording devices are connected, the recording devices are listed. Press the ▲ or ▼ button to select a recording device and press the ENTER button. Recording begins.
Troubleshooting for Anynet+ Symptom Anynet+ does not work. Solution • Check if the device is an Anynet+ device. The Anynet+ system supports Anynet+ devices only. • Connect only one receiver (home theater). • Check if the Anynet+ device power cord is properly connected. • Check the Anynet+ device’s Video/Audio/HDMI 1.3 cable connections. • Check whether Anynet+ (HDMI-CEC) is set to On in the Anynet+ setup menu. • Check whether the TV remote control is in TV mode.
Appendix Troubleshooting If the TV seems to have a problem, first try this list of possible problems and solutions. If none of these troubleshooting tips apply, call Samsung customer service at 1-800-SAMSUNG. Problem Possible Solution Poor picture. Try another channel. Adjust the antenna. Check all wire connections. Poor sound quality. Try another channel. Adjust the antenna. No picture or sound. Try another channel. Press the SOURCE button. Make sure the TV is plugged in.
Problem Possible Solution Screen is black and power indicator light blinks steadily. On your computer check: Power, Signal Cable. The TV is using its power management system. Move the computer's mouse or press any key on the keyboard. Image is not stable and may appear to vibrate when you have a computer connected to the PC input. If the setting is not correct, use your computer utility program to change the display settings.
Installing the Stand 1. 2. Attach your LCD TV to the stand. ➣ Two or more people should carry the TV. ➣ Make sure to distinguish between the front and back of the stand when attaching it. ➣ To make sure the TV is installed on the stand at a proper level, do not apply excess downward pressure to the upper left of right sides of the TV. Fasten two screws at position 1 and then fasten two screws at position 2. ➣ Stand the product up and fasten the screws.
Auto Wall-Mount Adjustment (Sold separately) Once the auto wall mount is installed, your TV’s position can be easily adjusted. V-Chip Auto Wall-Mount Caption Setup TV Rear Panel External Settings ► Entertainment : Off Energy Saving : Off PIP Software Upgrade EX-LINK Cable (Not supplied) Entering the menu External Settings 1. Press the ▲, ▼, ◄ or ► button on your remote control. ➣ The Wall Mount Adjustment screen is displayed.
Wall Mount Kit Specifications (VESA) Install your wall mount on a solid wall perpendicular to the floor. When attaching to other building materials, please contact your nearest dealer. If installed on a ceiling or slanted wall, it may fall and result in severe personal injury. Product Family LCD-TV PDP-TV ➣ ➣ ➣ ➣ ➣ ➣ ➣ ➣ inches VESA Spec.
Using the Anti-Theft Kensington Lock The Kensington Lock is a device used to physically fix the system when using it in a public place. The appearance and locking method may differ from the illustration depending on the manufacturer. Refer to the manual provided with the Kensington Lock for proper use. The locking device has to be purchased separately. Cable Figure 2 Figure 1 ➣ The location of the Kensington Lock may be different depending on its model. 1.
경고 주의 Securing the TV to the Wall Caution: Pulling, pushing, or climbing on the TV may cause the TV to fall. In particular, ensure your children do not 경고 hang over or destabilize the TV; doing so may cause the TV to tip over, causing serious injuries or death. Follow 주의 all safety precautions provided on the included Safety Flyer. For added stability, install the anti-fall device for safety purposes, as follows. To avoid the TV from falling: 1.
Specifications Model Name LN40A630M1F LN46A630M1F LN52A630M1F Screen Size (Diagonal) 40 inches (39.9 inches measured diagonally) 46 inches (45.9 inches measured diagonally) 52 inches (52 inches measured diagonally) PC Resolution 1920 x 1080 @ 60 Hz 1920 x 1080 @ 60 Hz 1920 x 1080 @ 60 Hz 10W x 2 10W x 2 10W x 2 38.9 x 3.3 x 24.0 inches (987.8 x 83.1 x 610.3 mm) 38.9 x 9.4 x 26.4 inches (987.8 x 240.0 x 669.5 mm) 44.0 x 3.7x 27.0 inches (1118.7 x 93.8 x 686.2 mm) 44.0 x 10.2 x 29.
Dimensions LN40A630M1F TOP VIEW JACK PANEL DETAIL 3.7"H X 9.1"W 3.3 38.9 34.9 19.6 24.0 26.4 22.8 9.4 FRONT VIEW / SIDE VIEW 7.9 (200 mm) 7.9 (200 mm) REAR VIEW NOTE: All drawings are not necessarily to scale. Some dimensions are subject to change without prior notice. Refer to the dimensions prior to performing installation of your TV. Not responsible for typographical or printed errors. © 2008 Samsung Electronics America, Inc. English - 94 BN68-01669A-00Eng.
Dimensions LN46A630M1F TOP VIEW JACK PANEL DETAIL 3.7"H X 9.1"W 3.7 44.0 40.1 22.6 27.0 29.3 24.4 10.2 FRONT VIEW / SIDE VIEW 23.6 (600 mm) 15.7 (400 mm) REAR VIEW NOTE: All drawings are not necessarily to scale. Some dimensions are subject to change without prior notice. Refer to the dimensions prior to performing installation of your TV. Not responsible for typographical or printed errors. © 2008 Samsung Electronics America, Inc. English - 95 BN68-01669A-00Eng.
Dimensions LN52A630M1F TOP VIEW JACK PANEL DETAIL 3.7"H X 9.1"W 4.1 50.0 45.5 25.7 30.7 33.0 24.4 11.5 FRONT VIEW / SIDE VIEW 23.6 (600 mm) 15.7 (400 mm) REAR VIEW NOTE: All drawings are not necessarily to scale. Some dimensions are subject to change without prior notice. Refer to the dimensions prior to performing installation of your TV. Not responsible for typographical or printed errors. © 2008 Samsung Electronics America, Inc. English - 96 BN68-01669A-00Eng.
The GNU General Public License (GPL) Version 2, June 1991 Copyright (C) 1989, 1991 Free Software Foundation, Inc. 59 Temple Place, Suite 330, Boston, MA 02111-1307 USA Everyone is permitted to copy and distribute verbatim copies of this license document, but changing it is not allowed. Preamble The licenses for most software are designed to take away your freedom to share and change it.
These requirements apply to the modified work as a whole. If identifiable sections of that work are not derived from the Program, and can be reasonably considered independent and separate works in themselves, then this License, and its terms, do not apply to those sections when you distribute them as separate works.
9. The Free Software Foundation may publish revised and/or new versions of the General Public License from time to time. Such new versions will be similar in spirit to the present version, but may differ in detail to address new problems or concerns. Each version is given a distinguishing version number.
GNU Lesser General Public License (LGPL) Version 2.1, February 1999 Copyright (C) 1991, 1999 Free Software Foundation, Inc. 59 Temple Place, Suite 330, Boston, MA 02111-1307 USA Everyone is permitted to copy and distribute verbatim copies of this license document, but changing it is not allowed. [This is the first released version of the Lesser GPL. It also counts as the successor of the GNU Library Public License, version 2, hence the version number 2.1.
TERMS AND CONDITIONS FOR COPYING, DISTRIBUTION AND MODIFICATION 0. This License Agreement applies to any software library or other program which contains a notice placed by the copyright holder or other authorized party saying it may be distributed under the terms of this Lesser General Public License (also called “this License”). Each licensee is addressed as “you”.
5. A program that contains no derivative of any portion of the Library, but is designed to work with the Library by being compiled or linked with it, is called a “work that uses the Library”. Such a work, in isolation, is not a derivative work of the Library, and therefore falls outside the scope of this License.
10. Each time you redistribute the Library (or any work based on the Library), the recipient automatically receives a license from the original licensor to copy, distribute, link with or modify the Library subject to these terms and conditions. You may not impose any further restrictions on the recipients’ exercise of the rights granted herein. You are not responsible for enforcing compliance by third parties with this License. 11.
END OF TERMS AND CONDITIONS How to Apply These Terms to Your New Libraries If you develop a new library, and you want it to be of the greatest possible use to the public, we recommend making it free software that everyone can redistribute and change. You can do so by permitting redistribution under these terms (or, alternatively, under the terms of the ordinary General Public License). To apply these terms, attach the following notices to the library.
This page is intentionally left blank. 3_BN68-01669A-Eng (81~).