
User's Manual


12
Installation
The solo Desktop system is easily installed into either the office or
conference room environment. Simply plug the power supply into a
convenient outlet and attach the USB cable to a computer or
laptop, or connect one of the 2.5mm audio cables to an audio
system or telephone headset port.
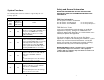
Computer Software Set-up
Use the supplied cable to connect the mini USB connector to the
Charger Base and the standard end to your computer USB port.
Your computer will alert you that it has found new hardware, and
the solo-Desktop operating software will automatically load.
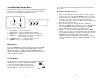
It is possible to configure your computer settings to playback audio
through the earpiece attached to the microphone (default settings)
or through the computer speakers (internal or desktop). The
examples shown below are using the Windows XP Operating
System Classic settings - other Windows operating systems might
look slightly different.
5
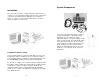
System Components
Your solo Desktop System package contains a
compact Charger Base, a bi-directional (full
duplex) wireless microphone, a volume
adjustable earpiece, a 5V power supply, a USB
cable, a headset cable, an external audio cable
and a quick release lanyard. There are many
features that this system provides that increase
the productivity of personal communication
whether in standard hands free phone use, IP
telephony, or even in large group conference
applications.