
User's Manual


10
to return the microphone. If the microphone is moved back into
range within 5 minutes the connection will automatically be re-
established to its original state, and the beeping will cease. If
not, the microphone will turn off after 5 minutes.
Adjusting the Volume
The volume of the Microphone is set at the factory and cannot be
adjusted on the Wireless Microphone. It may be possible to
change the volume on computer or IP calls by adjusting the
software control parameters (see Computer Software Settings,
below).
Note: Moving the Microphone closer to the mouth will increase the
volume.
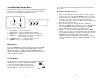
To change the volume on the earpiece,
use the dial on the earpiece wire.
Turning the dial towards the earpiece
will increase the volume, and turning
the dial towards the Microphone will
decrease the volume.
Pairing the Microphone to the Charger Base
“Pairing” creates an association between the Wireless Microphone
and the Charger Base with a unique electronic serial number.
When the Microphone and Charger Base have been previously
paired, the Microphone will automatically try to connect to the
Charger Base whenever it is lifted from the Charger Base.
Remember, the Microphone is always muted (flashing RED
LED) when it is removed from the Charger Base and the MUTE
button needs to be pressed to make it “live” (flashing GREEN
LED).
The Microphone in new systems come paired to the Charger Base.
However, if a replacement Microphone is ever required, it will need
to be manually “paired.”
If a Microphone is lifted from the Charger Base and the
Microphone LED slowly flashes alternating RED and GREEN for
7
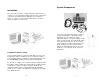
USB Connection
Use the supplied cable to connect the mini USB connector to the
Charger Base and the standard end to your
computer USB port. Your computer will alert you
that it has found new hardware, and the solo-
Desktop operating software will automatically
load. See the user settings specified above for
adjusting the audio connections to your liking.
Headset Audio Connection
The Desktop System can be used as a full-duplex, hands-free,
wearable headset. If your telephone has
a port for a headset, use the supplied
double ended 2.5mm cable to connect from the Charger Base
audio port to your desktop phone. Phone call audio will be sent
from the Microphone, and received by attaching the included
earpiece to the Microphone audio port. Phone calls should be
answered conventionally by lifting the handset, and then pressing
the “Headset” function on the phone. Press the “Headset” button
on the phone again to go back to using the telephone handset.
External Audio Connection
The Desktop System also provides a cable for connecting the
Charger Base to an external audio or
conferencing system. This feature
can be used to amplify a presenter at
a lectern, for example. The 2.5mm to
RCA cable included with the system allows for the unbalanced low
level audio from the Microphone to be connected into a mixer or
conferencing system using the RCA male jack. Further, output
from the mixer or conferencing system can be connected to the
RCA female plug to be heard through the earpiece connected to
the Microphone.