
Manual


10
ENGINE START (AC800 ONLY)
The Engine start function on the AC800 is designed to provide a short term ‘Boost” to the
battery and then assist the battery to start the vehicle.
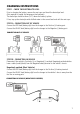
1. Connect the charger to the battery as described above in step 2b ‘In Vehicle Connection’.
2. Connect the battery charger to the 240V mains power.
3. Set the ‘Charge/Engine Start’ switch to the ‘Engine Start’ position.
4. Connect the charger to the battery as described above in step 2b ‘In Vehicle Connection’.
Connect the battery charger to the 240V mains power. Turn on the 240V Mains Power.
The RED ‘POWER ON’ LED will illuminate to confirm that the charger is receiving power.
If the battery is connected properly and above the charger’s minimum voltage the Orange
‘Charging’ LED will illuminate to confirm that the battery is being charged.
5. After 5 minutes or if the Green ‘Fully Charged’ LED illuminates, attempt to crank the engine
(with the charger connected / turned on).
6. If the engine starts:
• Turn ‘OFF’ the 240V mains power and disconnect the charger from the mains power.
• Remove the chassis connection.
• Remove the battery terminal connection.
7. If the engine does not start:
• Turn ‘OFF’ the 240V mains power.
• Wait 20 minutes and then repeat steps
4–6.
• If after 3 cycles the engine does not start, the battery is probably too flat or defective.
Recharge the battery completely.
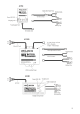
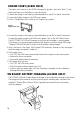
‘ON BOARD’ BATTERY CHARGING (AC250B ONLY)
The AC250B ‘On Board’ charger allows the charger to be conveniently mounted on the vehicle.
The charger can be mounted to any flat surface using the mounting tabs or bolted to the
supplied ‘L’ Bracket (Bolts, Washers & Nuts Supplied) and mounted next to the battery
as per the diagram.
Push in
Engine Start side