AUTOMATIC BATTERY CHARGER CHARGE N’ MAINTAIN P/No’S.
WARNING • • • • • • • • • • • 22 Explosive gases. Prevent flames and sparks. Provide adequate ventilation during charging. Before charging, read the instructions. For indoor use. Do not expose to rain. For charging lead acid batteries ONLY (of the size & voltage specified in the specifications table). Disconnect the 240V mains supply before making or breaking the connections to the battery. Do not attempt to charge non-rechargeable batteries. Never charge a frozen battery.
FEATURES Automatic Charger An automatic battery charger stops charging when the battery is full. You can leave the charger connected to the battery without risk of overcharging. Once the battery is full, the battery charger will automatically start to maintain the battery. The charger monitors the battery Voltage and continues to top up the battery, keeping it fully charged and ready for use.
Input: Type: P/No. 0.09A (17W) 240VAC 50Hz AUTOMATIC AC150 0.2A (28W) 240VAC 50Hz AUTOMATIC AC250B 0.23A (53W) 240VAC 50Hz AUTOMATIC AC400 0.37A (70W) 240VAC 50Hz AUTOMATIC AC600 0.43A (91W) 240VAC 50Hz AUTOMATIC AC800 0.5A (108W) 240VAC 50Hz AUTOMATIC AC1000 0.83A (161W) 240VAC 50Hz AUTOMATIC AC1500 24VDC 0.
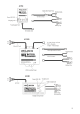
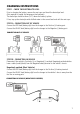
CHARGING INSTRUCTIONS STEP 1 - CHECK THE ELECTROLYTE LEVEL Prior to charging the battery, remove the vent caps and check the electrolyte level. (Not required on sealed & maintenance free batteries). The electrolyte should be 6mm (1/4”) above the battery’s plates. If low, top up the electrolyte with distilled water to the correct level and refit the vent caps. STEP 2A - CONNECTION OUT OF VEHICLE Connect the RED lead (battery clip) from the charger to the Positive (+) battery post.
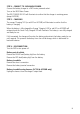
Positively earthed Connect the BLACK lead (battery clip) from the charger to the Negative (-) battery terminal. Connect the RED lead (battery clip) from the charger to the vehicle’s chassis away from the fuel line or moving parts. CONNECTION IN VEHICLE (POSITIVELY EARTHED) STEP 2C - CONNECTION IN VEHICLE WITH HARNESS (AC150 & AC250B ONLY) Connect the RED ring terminal of the harness to the Positive (+) battery terminal. Connect the BLACK ring terminal of the harness to the Negative (-) battery terminal.
STEP 4 - CONNECT TO 240V MAINS POWER. Connect the battery charger to a 240V mains powered socket. Turn on the 240V Mains Power. The RED ‘POWER ON’ LED will illuminate to confirm that the charger is receiving power (except AC250B). STEP 5 - CHARGING The orange ‘Charging’ LED (or red LED on AC250B) will illuminate to confirm that the battery is charging. When the battery is fully charged the Orange ‘Charging’ LED (or red LED on AC250B) will extinguish and the Green ‘Fully Charged’ LED will illuminate.
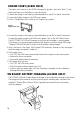
ENGINE START (AC800 ONLY) The Engine start function on the AC800 is designed to provide a short term ‘Boost” to the battery and then assist the battery to start the vehicle. 1. Connect the charger to the battery as described above in step 2b ‘In Vehicle Connection’. 2. Connect the battery charger to the 240V mains power. 3. Set the ‘Charge/Engine Start’ switch to the ‘Engine Start’ position. Push in Engine Start side 4.
FREQUENTLY ASKED QUESTIONS Q. How do I know if the battery is charged? A. The battery charger’s GREEN ‘FULLY CHARGED’ LED will illuminate to indicate when the battery is fully charged. Alternatively use a Battery Hydrometer (Projecta Part No. BH100). A reading of 1.250 or more in each cell indicates a fully charged battery. Q. Why does the battery charger have two ratings? A. Battery chargers for automotive use have traditionally been given an RMS rating or peak rating in the past.
WARRANTY STATEMENT Brown & Watson International Pty. Ltd. (“BWI”) of 1500 Ferntree Gully Road, Knoxfield, Vic., telephone (03) 9730 6000, fax (03) 9730 6050, warrants that all products described in its current catalogue will under normal use and service be free of failures in material and workmanship for a period of one (1) year from the date of the original purchase by the customer as marked on the invoice (see elsewhere for specific warranty period).