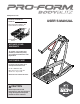
www.proform.com Model No. PFSY39116.1 Serial No. Write the serial number in the space above for reference. Serial Number Decal ACTIVATE YOUR WARRANTY To register your product and activate your warranty today, go to www.proformservice.com/ registration. CUSTOMER CARE For service at any time, go to www.proformservice.com. Or call 1-888-533-1333 Mon.–Fri. 6 a.m.–6 p.m. MT Sat. 8 a.m.–12 p.m. MT Please do not contact the store.
TABLE OF CONTENTS WARNING DECAL PLACEMENT . . . . . . . . . . . . . . . . . . . . . . . . . . . . . . . . . . . . . . . . . . . . . . . . . . . . . . . . . . . . . . .2 IMPORTANT PRECAUTIONS. . . . . . . . . . . . . . . . . . . . . . . . . . . . . . . . . . . . . . . . . . . . . . . . . . . . . . . . . . . . . . . . . . 3 BEFORE YOU BEGIN. . . . . . . . . . . . . . . . . . . . . . . . . . . . . . . . . . . . . . . . . . . . . . . . . . . . . . . . . . . . . . . . . . . . . . . .5 ASSEMBLY . . . . . . . . .
IMPORTANT PRECAUTIONS WARNING: To reduce the risk of serious injury, read all important precautions and instructions in this manual and all warnings on your exercise system before using your exercise system. ICON assumes no responsibility for personal injury or property damage sustained by or through the use of this product. 1. It is the responsibility of the owner to ensure that all users of the exercise system are adequately informed of all precautions. 8.
STANDARD SERVICE PLANS 4
BEFORE YOU BEGIN Thank you for selecting the innovative PROFORM® BODY BLITZ exercise system. The BODY BLITZ exercise system is designed to help you develop the major muscle groups of the upper body. Whether your goal is a shapely figure, increased muscle size and strength, or a healthier cardiovascular system, the exercise system will help you achieve the specific results you want. after reading this manual, please see the front cover of this manual.
ASSEMBLY • To hire an authorized service technician to assemble this product, call 1-800-445-2480. • Assembly requires two persons. • In addition to the included hex key, assembly requires the following tool: • Because of its weight and size, the exercise system should be assembled in the location where it will be used. Make sure that there is enough clearance to walk around the exercise system as you assemble it. one adjustable wrench Assembly may be easier if you have a set of wrenches.
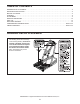
2. Orient the Base (1) as shown. 2 With the help of a second person, orient the Right and Left Uprights (4, 5) and the attached Press Arm (7) as shown, and set the Uprights on the Base (1). Have the second person hold the Uprights until this step is completed. 7 Attach the Right Upright (4) with an M10 x 53mm Bolt (37) and an M10 Locknut (13); do not tighten the Locknut yet. 5 Attach the Left Upright (5) in the same way. Next, tighten both M10 Locknuts (13).
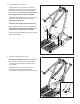
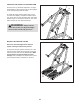
4. Hold the Press Arm (7) with one hand, lift it slightly, and pull the upper end of the Link Arm (6) away from the Selector Plate (8). Then, raise or lower the Press Arm, pivot the Link Arm forward or backward, and insert the Link Arm Pin (18) on the Link Arm fully into one of the holes near the lower edge of the Selector Plate. 4 8 7 18 6 See the inset drawing. Make sure that the Link Arm Pin (18) is fully inserted so that the green Indicator Ring (27) is visible.
ADJUSTMENT This section explains how to adjust the exercise system. See the EXERCISE GUIDELINES on page 12 for important information about how to get the most benefit from your exercise program. Also, refer to the accompanying exercise chart to see the correct form for several exercises. ADJUSTING THE RESISTANCE To adjust the resistance of the exercise system, first step off the Platform (3).
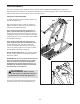
ADJUSTING THE HEIGHT OF THE PRESS ARM 8 The Press Arm (7) should be adjusted to an appropriate height for each exercise (see the photographs on the accompanying exercise chart). 12 To adjust the height, hold the Press Arm (7) with one hand, lift it slightly, and pull the Selector Knob (12). Then, raise or lower the Press Arm, and slowly release the pin on the Selector Knob into one of the holes near the top of the Selector Plate (8).
FOLDING THE EXERCISE SYSTEM 8 To fold the exercise system, first hold the Press Arm (7) with one hand, lift it slightly, and pull the Selector Knob (12). Then, raise or lower the Press Arm, and slowly release the pin on the Selector Knob into the center hole near the top of the Selector Plate (8).
EXERCISE GUIDELINES WORKOUT GUIDELINES EXERCISE FORM Familiarize yourself with the equipment and learn the proper form for each exercise. Use your own judgment to determine the appropriate length of time for each workout, and the numbers of repetitions and sets to complete. Progress at your own pace and be sensitive to your body’s signals. Follow each strength workout with at least one day of rest. Move through the full range of motion for each exercise, and move only the appropriate parts of the body.
EXERCISE LOG Make copies of this page, and use the copies to schedule and record your strength and aerobic workouts. Scheduling and recording your workouts will help you to make exercise a regular and enjoyable part of your life. Strength Date: Exercise 6. 2. 7. 3. 8. 4. 9. 5. 10. Exercise Strength Date: Exercise Time Lbs. Sets Reps 6. 2. 7. 3. 8. 4. 9. 5. 10. Exercise Strength Date: Exercise Time Lbs. Sets Reps 6. 2. 7. 3. 8. 4. 9. 5. 10.
PART LIST Key No. Qty. 1 2 3 4 5 6 7 8 9 10 11 12 13 14 15 16 17 18 19 20 1 1 1 1 1 1 1 1 2 1 1 1 3 2 4 2 4 1 2 2 Model No. PFSY39116.1 R1216A Description Key No. Qty.
EXPLODED DRAWING Model No. PFSY39116.
ORDERING REPLACEMENT PARTS To order replacement parts, please see the front cover of this manual.