Model No. PFEVRW41016.0 Serial No. Write the serial number in the space above for reference. USER’S MANUAL Serial Number Decal CUSTOMER SERVICE UNITED KINGDOM Call: 0330 123 1045 From Ireland: 053 92 36102 Website: www.iconsupport.eu E-mail: csuk@iconeurope.com Write: ICON Health & Fitness, Ltd. Unit 1D, The Gateway Fryers Way, Silkwood Park OSSETT WF5 9TJ UNITED KINGDOM AUSTRALIA Call: 1800 993 770 E-mail: australiacc@iconfitness.
TABLE OF CONTENTS WARNING DECAL PLACEMENT . . . . . . . . . . . . . . . . . . . . . . . . . . . . . . . . . . . . . . . . . . . . . . . . . . . . . . . . . . . . . . .2 IMPORTANT PRECAUTIONS. . . . . . . . . . . . . . . . . . . . . . . . . . . . . . . . . . . . . . . . . . . . . . . . . . . . . . . . . . . . . . . . . . 3 BEFORE YOU BEGIN. . . . . . . . . . . . . . . . . . . . . . . . . . . . . . . . . . . . . . . . . . . . . . . . . . . . . . . . . . . . . . . . . . . . . . . .4 ASSEMBLY . . . . . . . . .
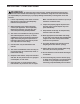
IMPORTANT PRECAUTIONS WARNING: To reduce the risk of serious injury, read all important precautions and instructions in this manual and all warnings on the rower before using the rower. ICON assumes no responsibility for personal injury or property damage sustained by or through the use of this product. 1. It is the responsibility of the owner to ensure that all users of the rower are adequately informed of all precautions. Make sure that there is at least 2 ft. (0.6 m) of clearance around the rower. 8.
BEFORE YOU BEGIN Thank you for selecting the new PROFORM® R 600 rower. Rowing is an effective exercise for increasing cardiovascular fitness, building endurance, and toning the body. The R 600 rower is designed to let you enjoy this effective exercise in the convenience and privacy of your home. this manual, please see the front cover of this manual. To help us assist you, note the product model number and serial number before contacting us.
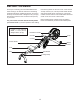
ASSEMBLY • Assembly requires two persons. • Assembly requires the following tool(s): one Phillips screwdriver • Place all parts in a cleared area and remove the packing materials. Do not dispose of the packing materials until you finish all assembly steps. one adjustable wrench To avoid damaging parts, do not use power tools. 1. G o to www.iconsupport.eu on your computer and register your product.
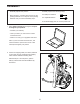
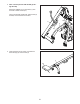
3. Have a second person hold the Rail (2) during this step. 3 Attach the Stabilizer (3) to the Frame (1) with two M10 x 20mm Screws (61). Then, hold the Rail Handle (34), pull the Rail (2) outward, and set the Rail on the floor. 1 2 3 34 61 4. Orient the Seat (23) as shown, and slide the Seat Carriage (5) onto the Rail (2).
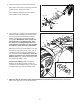
5. Slide the Seat (23) to the front of the Rail (2). 5 Next, attach a Stop (32) to each side of the Rail (2) with an M4 x 19mm Screw (69). 23 Then, attach the Rail Cap (38) to the Rail (2) with two M4 x 19mm Screws (69). 2 69 32 69 32 69 38 6. The Console (51) requires four AA batteries (not included); alkaline batteries are recommended. Do not use old and new batteries together or alkaline, standard, and rechargeable batteries together.
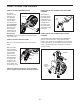
HOW TO USE THE ROWER HOW TO ADJUST THE RESISTANCE HOW TO MOVE THE ROWER IN THE UNFOLDED POSITION To vary the intensity of your exercise, you Handle can adjust the resistance that you feel when you pull the row bar. To increase the resistance, move the resistance handle toward the front of the rower; to decrease the resistance, move the resistance handle toward the rear of the rower. Stand behind the rower and lift the rail until the rower will roll on the wheels.
HOW TO FOLD AND STORE THE ROWER Then, pull the Rail Handle (34) inward until the Folding Clamp (35) engages the bar on the Stabilizer (3). The rower can be stored in a folded position to conserve space. Store the rower in a location where children cannot tip it. Remove the batteries from the console when storing the rower for extended periods of time. 52 To store the rower, first slide the Seat (23) to the rear of the Rail (2).
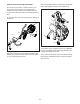
HOW TO ROW ON THE ROWER at the waist), keeping your back straight. As you straighten your legs, pull the row bar toward your chest. Keep your elbows outward. Sit on the seat, place your feet in the footrests, and adjust the straps to fit your feet. Then, hold the row bar with an overhand grip. 3. The third phase is the FINISH. Your legs should be nearly straight. Continue to pull the row bar until your hands are even with your chest. Correct rowing form consists of three phases: 1.
HOW TO USE THE CONSOLE FEATURES OF THE CONSOLE HOW TO USE THE CONSOLE The easy-to-use console features several modes that provide instant exercise feedback during your workouts. The modes are described below. Make sure that batteries are installed in the console (see assembly step 6 on page 7). If there is a sheet of clear plastic on the console, remove the plastic. 1. Turn on the console. To turn on the console, press the On/Reset button on the console or simply begin rowing. 2.
MAINTENANCE AND TROUBLESHOOTING MAINTENANCE See the EXPLODED DRAWING on page 15. Locate the Right and Left Shields (7, 8), and remove the four M4 x 19mm Screws (69) and the ten M4 x 16mm Screws (68) from the Right and Left Shields. Then, gently remove the Right and Left Shields. Regular maintenance is important for optimal performance and to reduce wear. Inspect and properly tighten all parts each time the rower is used. Replace any worn parts immediately.
EXERCISE GUIDELINES Aerobic Exercise—If your goal is to strengthen your cardiovascular system, you must perform aerobic exercise, which is activity that requires large amounts of oxygen for prolonged periods of time. For aerobic exercise, adjust the intensity of your exercise until your heart rate is near the highest number in your training zone. WARNING: Before beginning this or any exercise program, consult your physician.
PART LIST Key No. Qty. 1 2 3 4 5 6 7 8 9 10 11 12 13 14 15 16 17 18 19 20 21 22 23 24 25 26 27 28 29 30 31 32 33 34 35 36 37 38 39 40 41 42 43 44 45 1 1 1 1 1 2 1 1 1 1 1 1 1 2 2 2 1 1 1 1 1 1 1 2 4 1 2 2 1 1 2 4 1 1 1 2 2 1 2 2 2 4 2 5 2 Model No. PFEVRW41016.0 R0916A Description Key No. Qty.
18 66 17 12 4 15 57 71 65 56 53 69 78 22 71 65 44 55 19 59 58 52 27 51 25 77 79 88 44 16 58 21 86 56 62 65 59 56 57 57 57 63 23 46 45 44 82 81 25 58 80 30 88 44 20 86 87 69 28 69 55 6 68 44 24 62 39 38 63 3 40 37 56 84 76 62 75 35 69 25 71 57 36 63 76 64 54 73 67 42 43 13 76 76 54 10 71 27 49 83 47 54 54 25 78 5 26 29 8 76 69 54 24 42 74 1 50 69 41 60 62 63 68 75 73 61 65 84 57 56 48 68 69 54 54 1
ORDERING REPLACEMENT PARTS To order replacement parts, please see the front cover of this manual.