® Model No, PFEL7806.0 Serial No. USER'S Serial Number Decal (on underside of frame) QUESTIONS? As a manufacturer, we are cornrnitted to providing complete customer satisfaction. If you have questions, or if parts are damaged or missing, PLEASE CONTACT OUR CUSTOMER SERVICE DEPARTMENT DIRECTLY. CALL TOLL-FREE: 1-888-533-1333 Moao-Fri., 6 a.rn.-6 p.m. MST Sat. 8 a.rn.-5 p.m. MST ON THE WEB: www.proforrnservice.corn Read all precautions and instructions in this manual before using this equipment.
® TABLE OF CONTENTS IMPORTANT PRECAUTIONS ................................................................ BEFORE YOU BEGIN ...................................................................... ASSEMBLY ............................................................................... HOW TO USE THE ELLIPTICAL EXERCISER .................................................. MAINTENANCE AND TROUBLESHOOTING ................................................... CONDITIONING GUIDELINES ................................
m iMPORTANT PRECAUTmONS WARNING: Toreduce ther skofse.ousnjury, read thefo.owing important precautionsbefore using the elliptical exerciser, 1. Read all instructions in this manual and all warnings on the elliptical exerciser before using the elliptical exerciser. Use the eHi ptieal exercise onJy as described in this manual, 10. The pulse sensor is Various factors may heart rate readings. intended only as an ing heart rate trends 2.
BEFORE YOU BEGIN Thank you for selecting the revolutionary PROFORM _' 20.0 CROSSTRAINER elliptical exerciser. The 20.0 CROSSTRAINER elliptical exerciser provides a wide array of features designed to make your workouts at home more effective and enjoyable. tacting us. The model number is PFEL7806.0. The sedal number can be found on a decal attached to the elliptical exerciser (see the front cover of this manual for the location of the decal).
To hire an authorized service technician to assembJe the elliptical exerciser, call toll-free 1-800-445-2480. AssembJy requires two persons. PJace aJl parts of the eJJipticaJexerciser in a cleared area and remove the packing matedaJs. Do not dispose of the packing materials until assembly is compJeted, Jn addition to the incJuded he× keys, assembly requires a phHJips screwdriver _;I .......
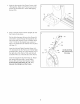
mationon 89 page 5 before YQUbegin assem_ 25 Orient the the Front Stabilizer (35) as shown, Attach the two Wheels (25) to the Front Stabilizer with two M10 x 62mm Bolts (89) and two M10 Nylon Locknuts (97), \ 89_ 35 Attach two Leveling Feet (26) to the underside of the Front Stabilizer (35), 26 Have a second person tip the Frame (2) backward, Attach the Front Stabilizer (35) to the Frame with two M10 x 78mm Button Screws (90), 2 9O \ 35 Position the Base (1) near the Frame (2) as shown, See the
4. Hook the front ends of the Frame Covers (105, 106) together. Attach each Frame Cover to the Frame (2) with three M4 x 16mm Self-tapping Screws (79). 4 106 79 105 Have a second person hoJd the Upright (6) near the Frame (2) as shown. Puff the Wire Harness (48) out of the Frame (2) and insert it upward through the Upright (6). Do not let the Wire Harness or the ControJJer Wires (110, 111) falJ into the Upright; use a piece of tape or an eJastic band to hoJd the wires in place untiJ step 15.
6. Orient the Left Roller Leg (12), which is marked with a "Left" sticker, near the left Crank Arm (36) as shown. 6 98 Apply a small amount of the included grease to both sides of a Wave Washer (98). Slide the Wave Washer onto the end of the left Crank Arm (36). Next, slide the Left Roller Leg (12) onto the Crank Arm and set the Roller (22) on the Base (1). Attach the Left Roller Leg with an M10 x 23ram Shoulder Screw (80), an M10 x 20mm x 1.5mm Washer (84), and a Crank Axle Cap (30).
Cover(18)andan 8. Positionan InnerHandlebar OuterHandlebar Cover(19)aroundtheLeft Handlebar (8)asshown.Then,pulltheLeft Handlebar Wire(108)outoftheLeftHandlebar andinsertit throughthe InnerHandlebar Cover. 8 AttachtheInnerandOuterHandlebar Covers(18,19)withthreeM4x 16mmSelfotapo pingScrews(79)andanM4x 13mmWasher (93).Startall threeSelf-tappingScrewsbefore tighteninganyof them.Avoidpinchingthe Left Handlebar Wire (108) during this step. Avoid pinching the Handlebar Wires (108, 109) during this step.
11. Identify the Left Pedal (13) and the Left Pedal Leg (14), which are marked with "Left" stickers, and orient them as shown. 11 Attach the Left Pedal (13) to the Left Pedal Leg (14) with four M6 x 35mm Phillips Screws (87) and four M6 Split Washers (88). Start aJJfour Phillips Screws before tightening any of them. 14 Repeat this step to attach the Right Pedal to the Right Pedal Leg (not shown). 88d '%87 12. Apply a generous amount of grease to two Pedal Leg Axles (32).
13. The Console (5) requires four 1.5V "D" batteries (not included); alkaJine batteries are recommended. IMPORTANT: If the eHipical exerciser has been exposed to cold temperatures, allow it to warm to room temperature before inserting batteries into the Consoleo If you do not do this, the console disptays or other eJectronic components may become damaged. Remove the battery cover and insert four batteries into the Console. Make sure that 13 / the batteries are oriented as shown at the right.
HOW TO USE THE ELLIPTICAL HOW TO MOVE THE ELUPTICAL EXERCISER HOW TO EXERCISE ON THE ELUPTtCAL EXERCISER Due to the size and weight of the eltipticaJ exerciser, moving it requires two persons. Stand in front of the elJipticaJ exerciser, hoJd the upright, and pJace one foot against one of the front wheels. Pull on the upright and have a second person lift the base until the elliptical exerciser will roll on the front wheels.
CONSOLE DtAGRAM iNTERACTIVE CROSS TRAINER PROGRAMS V CERTHED PERSONAL TRAINER PROGRAMS ENTER 1 12 II 2 11 II 3 lO II 4 9 JJ J FEATURES OF THE CONSOLE Heart Rate Programs The console also offers two heart rate programs that automatically control the resistance of the pedals and prompt you to maintain a constant pedaling pace to keep your heart rate near target heart rate settings during your workouts, The revolutionary console offers an array of features designed to make your workouts more
HOW TO USE TNEMANUAL Follow your progress MODE with the dispJay. The upper left corner of the display will show the elapsed time. Note: When a program is selected, the display will show the time remaining in the program instead of the elapsed time. Note: If there is a sheet of clear plastic on the face of the console, remove the plastic. Begin pedaling or press any button on the console to turn on the console. A moment after you begin pedaling or press a button, the display will light.
Measure your heart rate if desired. HOW TO USE A CROSS TRAINER PROGRAM tf there are sheets of dear plastic on the metaJ contacts on the handgdp puJse sensor, remove the plastic. To measure Begin pedaling or press any button on the console to turn on the consote. Contacts A moment after you begin pedaling or press a button, the dispJay wiJJlight. SeJect a cross your heart rate, hold the handgrip pulse sensor with your palms resting against the metal contacts.
As you exercise, you will be prompted to keep your pedaling pace near the target rpm setting for the current segment. When an upward arrow appears in the display, increase your pace. When a downward arrow appears in the display, decrease your pace. When no arrows appear, maintain your current pace. Note: Refer to the accompanying exercise chart to see the correct form for each exercise. When performing lunges, alternate legs with each repetition.
As you exercise, you will be prompted to keep your pedaling pace near the target rpm setting for the current segment. When an upward arrow appears in the display, increase your pace. When a downward arrow appears in the display, decrease your pace. When no arrows appear, maintain your current pace. HOW TO USE A SMART _ROGRAM Begin pedaling or press any button on the console to turn on the console. A moment after you begin pedaling or press a button, the display will light. Select a smart program.
,oWTOUSE A.EART RATE F'ROGRAM When the first segment of the program ends, the entire profile will shift one column to the left. The target heart rate setting for the second segment will then be shown in the flashing column of the profile. Begin pedaling to turn on the console. A moment after you turn on the console, the display will light, As you pedal, the console will regularly compare your heart rate to the target heart rate setting.
Your goal is to maneuver the blocks so that they form a complete row of black squares across the entire arena. HOW TO PLAY THE FAT BLOCKER GAME The Fat Blocker game requires quick thinking and fast reflexes. In addition to the console buttons, you will use the four-button game controllers on the handlebar to play the game. Follow the steps below to play the Fat Blocker game.
Between the drones and the laser blaster are five shields. You can hide the laser blaster below a shield if desired. However, each time a shield is hit by a laser, a piece will be vaporized. HOW TO PLAY THE CALORIE DESTROYER GAME The Calorie Destroyer game is a fast-paced game that pits you against a squadron of Jaser-fidng drones. In addition to the consoJe buttons, you will use the fourbutton game controllers on the handlebar to play the game. Follow the steps below to play the Calorie Destroyer game.
Next, press the play button on your MP3 player or CD player. Adjust the volume of the speakers using the volume control on your MP3 pJayer or CD player. HOW TOUSE THE STEREO SOUND SYSTEM To play your own music or audio books through the console's stereo sound system while you exercise, first locate the jack under the ledge on the console. Plug an audio cable (not included) into the jack on the console and into a jack on your MP3 player or CD player; make sure that the audio cabte is fulJy ptugged in.
CONDITIONING GUIDELINES desired results is to exercise with the proper intensity. The proper intensity level can be found by using your heart rate as a guide. AWARNING'. Before beginning this or any exercise program. consult your physician.This isespecially important for persons over the age of 35 or persons with pre-existing health problems.
STRENGTH TRAINING GUIDELINES To increase the size and strength of your muscles, you must work your muscles at a level close to their maximum capacity, Your muscles will adapt and grow as you progressively increase the amount of weight that you use, You can tone your muscles by working them at a moderate percentage of their capacity, The proper amount of weight to use for each strength exercise depends on you--you must gauge your limits and select an appropriate amount of weight, During strength exercises,
PART LlST Model Key No. Qty. 1 2 3 4 5 6 7 8 9 10 11 12 13 14 15 16 17 18 19 20 21 22 23 24 25 26 27 28 29 30 31 32 33 34 35 36 37 38 39 40 41 42 43 44 45 46 47 48 49 50 1 1 2 2 1 1 2 1 1 1 2 1 1 1 1 1 2 2 2 2 1 2 2 2 2 4 4 1 1 2 4 4 8 4 1 2 1 2 1 1 12 2 1 2 1 8 4 1 2 1 No. PFEL7806.0 Description Ro4o7A Key No. Qty.
Key No. Qty. 101 102 103 104 105 106 107 108 2 1 2 1 1 1 4 1 Description Key No. Qty. M4 x lOmm Screw Rear Base Cover Side Base Cover Center Base Cover Left Frame Cover Right Frame Cover M8 x 75mm Button Screw Left Handlebar Wire 109 110 111 112 * * * 1 1 1 1 4 1 1 Description Right Handlebar Wire Left Controller Wire Right Controller Wire M4 x 12mm Bright Screw Hex Key Grease User's Manual Note: .....
X 101.., 79 _ 23 66 64 86 89 r 0 101 109 86 65 / / 74 38, 47, 44- .
X lie O 33 33 32 15 31 14 8O 32 80 92 l Z 41 91 94 1 86 30 ,,,,q 54 / ! 79 O 87 54 Q., Z © 80 21 32 -'t98 m 41%._ 94 79 98 91 41 lie 34 91 94 O@ 98 b 83 34 27 34 27 22 o o .
ORDERING REPLACEMENT PARTS To order replacement parts, please see the front cover of this manual, To help us assist you, please be prepared to provide the following information when contacting us: • the MODEL NUMBER of the product (PFEL7806,0) • the NAME of the product (PROFORM 20,0 CROSSTRAINER elliptical exerciser) • the SERIAL NUMBER of the product (see the front cover of this manual) • the KEY NUMBER and DESCRIPTION of the part(s) (see pages 24 to 27) LIMITED WARRANTY ICON Health & Fitness, Inc,