
Manual


ASSEMBLY
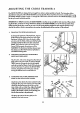
Assembly requires two persons.To assemblethe CROSSTRAINERe, usethe includedvideocassetteor followthe
instructionsbelow. Due to theweight of the CROSSTRAINER e, it shouldbe assembledin thelocationwhere itwill be
used.Place all partsin a cleared a_-,a and remove the packing materials. Do not disposeof the packing materials until
assembly iscompleted.Make sure ta lawer the resistancecylindersand pedalsbefore beginning assembly;if the
resistance cyfindersfall, they may damage the side shields.Read each assemblystepand examine each drawing
carefully. Referta thePart Identification Chart accompanying thisowners manual, to help idenfi_/the hardware usedin
assembly.Make sure that all parts are orlenled as shown in the drawings.
The followlng loals (notincluded)are required for assembly:,two 8" Adjustable Wrenches _ and a
RubberMallet _. A small amountof soapy water isalso required.
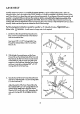
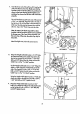
1. Set the Front Base(7) .andtheRear Base(8) on the
floorasshown.Turn theRear Base so theindented
holesare towardthe floor.
Insert seven3/8" x 2 1/2" Carriage Bolts(1) up
through the indicatedholesin the Frontand Rear
Bases(7, 8).
2. With thehelpof a secondperson,set the Tower
Frame (10) near the indicatedendsof the Frontand
Rear Bases(7, 8). The TowerFrame mustbe turned
so the Pedals (75, 76) are on the some side as the
extension on theFront Base.Raisethe Tower Frame
and lower itonto the two indicated3/8" x 2 1/2"
Carriage Bolts(1) in theRear Base.
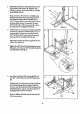
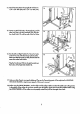
3. Raisethe front of the Tower Frame(10) and lower it
ontothe two indicated 3/8 _'x 2 1/2" Carriage Baits
(1) in the FrontBase(7).
Adjust thepositionof the Tower Frame (10) so the
fourindicated 3/8" x 2 1/2' Carriage Bal_(1) ore
centeredin the slottedholesin the Tower Frame.
Thread a 3/8" Nut (2) with a 3/8" Iockwasher (3)
ontoeach Carriage Bolt.Do not fighlen the Nuls
yet.
2
3
8
1 7
I
I0
3