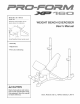
Model No. 831.15615.0 Serial No. Write the seriaU number in the space above for reference. WEIGHT BENCH EXERCISER User's Manua_ • Assembly • Adjustments Part List and Drawing CAUTION Read aH precautions and instructions Jn this manuaJ before using this equipment. Save this manual for future reference. Sears, Roebuck and Co.
TABLE OF CONTENTS WARNING DECAL PLACEMENT ............................................................. iMPORTANT PRECAUTIONS ................................................................ BEFORE YOU BEGIN ...................................................................... ASSEMBLY .............................................................................. ADJUSTMENTS ........................................................................... EXERCISE GUiDELiNES .....................................
iMPORTANT PRECAUTIONS WARNING: before using the weight Toreduce theriskofse.ousnjuryread thefo,owingmportant precaut ono bench. Read aJJ instructions in this manual and all warnings on the weight bench before using the weight bench. Use the weight bench onJy as described in this manual 2. it is the responsibility of the owner to ensure that all users of the weight bench are adequately informed of all precautions. 3. The weight bench is intended for home use onJy.
BEFORE YOU BEGIN Thank you for sebcting the versatib WELDER _ XP 160 weight bench, The weight bench is designed to help develop every major muscle group of the body, Whether your goal is to tone your body, build dramatic muscle size and strength, or improve your cardiovas° cuDr system, the weight bench will help you to achieve the specific results you want, reading this manual, call 1-800-4-MYoHOME _ (1-800-469-4663), To help us assist you, please note the product model number and serial number before call
, Tighten all parts as you assemble them, unless instructed to do otherwise. Make Things Easier for Yourself Everything in this manual is designed to ensure that the weight bench can be assembled successfully by anyone. Mosl people find that by setting aside plenty of time. assembly wiii go smoothly, • For het identif in small IDENTIFICATION CHART.
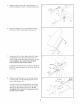
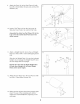
2, Attachthe FrontFoot(15)totheSeatBase(1) withtwoM4x 16mmSerf-tapping Screws(38) andtwoM4Washers(39), 2 38 Attachthe RightandLeftBases(2,33)to the SeatBase(1)withtwoM10x58mmButtonBoUts (48)andtwo M1ONylonLocknuts (41),Do not tightenthe Locknutsyet. Unsert twoM10x 1O0mm Screws(45)upthrough theBaseHate(34)andtheSeatBase(1),Place a pieceof tapeoverthe Bolt headsto hold themin place.
5, Attach the Seat Frame (5) to the Seat Base (1) with the indicated two MIO x lOOmm Screws (45), 5 33 Attach the Backrest (11) to the Backrest Frame (8) with four M6 x 15mm Button Screws (40), / 11 / / / / 4O 4O Grease the MIO x 87mm Button BoUt(50), Attach the Backrest Frame (8) to the Seat Frame (5) with the BoUtand an MIO NyUonLocknut (41), Do not overtighten the Locknut; the Backrest Frame must be abJe to pivot easily. G rease \ Engage the Backrest Frame (8) with the Backrest Knob (22) and
9, Attach the Seat (12) to the Seat Frame (5) with four M6 x 63mm Button Screws (43) and four M6 Washers (44), 5 43 10, Unserta Pad Tube (10) into the Leg Lever (6), Sfide two Foam Pads (14) onto the Pad Tube, 10 10 6 AssembJe the other two Pad Tubes (10} to the Leg Lever (6} and the Seat Frame (5} in the same manner. 14 14 10 \ 11, Attach a Weight Rest Pin (24) to the Left Weight Rest (51) with an M4 x 16mm Serf-tapping Screw (38), 11 f-.
ADJUSTMENTS This section expUains how to adjust the weight bench. See the EXERCISE GUUDEMNES on page 10 for important information about how to get the most benefit from your exercise program. Abo, refer to the accompanying exercise guide to see the correct form for each exercise.
ATTACHmNG WEmGHTS To use the Leg Lever (6), slide the desired weight (not inciuded) onto the weight tube, Secure the weight with the Spring CHip(35), \ Weight / i EXERCISE GUIDELINES THE FOUR BASIC TYPES OF WORKOUTS Muscle Building To increase the size and strength of your muscies, push them chose to their maximum capacity, Your muscies wHi adapt and grow as you progressiveiy increase the intensity of your exercise, You can adjust the intensity ievei of an individuai exercise in two ways: by changing the
* Rest for three minutes after each set for a muscle building workout, * Rest for one minute after each set for a toning workout, * Rest for 30 seconds after each set for a weight loss workout, Schedub your workouts for the time of day when your energy bveU is the highest, Each workout shouUd be foF bwed by at bast one day of rest, Once you find the schedub that is right for you, stick with it, EXERCmSE FORM Plan to spend the first couple of weeks familiarizing yourself with the equipment and learning the
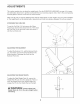
PART iDENTiFiCATiON CHART Refer to the drawings beUow to identify small parts used in assemMy, The number in parentheses by each drawing is the key number of the part, from the PART LUST in the center of this manual Note: Some small parts may have been pre-attached. If a part is not in the parts bag, check to see if it has been pre-attached.
PART LiST--Model No, 831.15615.0 n080 A Key No. Qty. Description Key No. Qty.
EXPLODED DRAWING--Model , No. 831.15815.0 RososA 9 _18 38 I 38 i G26 4O 41 28 47 46 28 40 37 17 e_39 41 A, \ 38 38 46 33 47 25 30 / 19
Your Home For repair - in your home - of all major brand appliances, lawn and garden equipment, or heating and cooling systems, no matter who made it, no matter who sold it! For the replacement parts, accessories, and user's manuals that you need to do-it-yourself. For Sears professional installation of home appliances and items like garage door openers and water heaters. 1-800-4-MY-HOME _ Anytime, day or night (U.S.A. and Canada) www, sears.