Patent Pending Model No. 831.28543.0 Serial No. ELLIPTICAL EXERCISER User’s Manual Serial Number Decal • Assembly • Operation • Maintenance • Part List and Drawing CAUTION Read all precautions and instructions in this manual before using this equipment. Keep this manual for future reference. Sears, Roebuck and Co.
TABLE OF CONTENTS IMPORTANT PRECAUTIONS . . . . . . . . . . . . . . . . . . . . . . . . . . . . . . . . . . . . . . . . . . . . . . . . . . . . . . . . . . . . . . . .3 BEFORE YOU BEGIN . . . . . . . . . . . . . . . . . . . . . . . . . . . . . . . . . . . . . . . . . . . . . . . . . . . . . . . . . . . . . . . . . . . . . .4 ASSEMBLY . . . . . . . . . . . . . . . . . . . . . . . . . . . . . . . . . . . . . . . . . . . . . . . . . . . . . . . . . . . . . . . . . . . . . . . . . . . . . . .
IMPORTANT PRECAUTIONS WARNING: To reduce the risk of serious injury, read the following important precautions before using the elliptical exerciser. 1. Read all instructions in this manual and all warnings on the elliptical exerciser before using the elliptical exerciser. Use the elliptical exercise only as described in this manual. 10. The pulse sensor is not a medical device. Various factors may affect the accuracy of heart rate readings.
BEFORE YOU BEGIN Congratulations for selecting the new PROFORM® XP 110 elliptical exerciser. The PROFORM XP 110 is an incredibly smooth exerciser that moves your feet in a natural elliptical path, minimizing the impact on your knees and ankles. And the unique XP 110 features adjustable resistance and a state-of-the-art console to help you get the most from your exercise. tions after reading this manual, call 1-800-4-MYHOME® (1-800-469-4663).
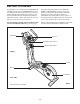
ASSEMBLY Assembly requires two persons. Place all parts of the elliptical exerciser in a cleared area and remove the packing materials. Do not dispose of the packing materials until assembly is completed. In addition to the , an adjustable included allen wrenches, assembly requires a phillips screwdriver wrench , and a rubber mallet . As you assemble the elliptical exerciser, use the drawings below to identify small parts.
1. Identify the Front Stabilizer (3). While another person lifts the front of the Frame (1), attach the Front Stabilizer to the Frame with two M10 x 112mm Carriage Bolts (34) and two M10 Nylon Locknuts (29). Make sure that the Front Stabilizer is turned so the Wheels (32) are not touching the floor. 1 32 34 32 3 2. While another person lifts the back of the Frame (1), attach the Rear Stabilizer (4) to the Frame with two M10 x 112mm Carriage Bolts (34) and two M10 Nylon Locknuts (29).
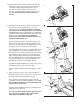
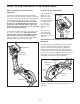
5. While another person holds the Console (5) near the Upright (2), connect the wire harness on the Console to the Upper Wire Harness (86). Insert the excess wire harness into the Upright. Next, attach the Console to the Upright with four M4 x 16mm Screws (66). Be careful to avoid pinching the wire harnesses. 5 66 66 6. Identify the Left Handlebar (9), which is marked with a sticker.
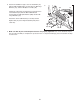
. Attach a Pedal Bracket (16) to the Left Pedal Arm (14) with two M8 x 65mm Button Screws (99), two M8 Large Washers (53), and two M8 Nylon Locknuts (46). Identify the Left Pedal (13). Attach the Left Pedal to the Left Pedal Arm (14) with two M8 x 50mm Button Screws (89), two M8 Split Washers (100) and two M8 Large Washers (53). Attach the other Pedal Bracket (not shown) and the Right Pedal (12) to the Right Pedal Arm (103) in the same way. 8 103 12 46 53 14 99 16 53 100 89 13 53 9.
HOW TO USE THE ELLIPTICAL EXERCISER HOW TO EXERCISE ON THE ELLIPTICAL EXERCISER HOW TO USE THE HANDLEBARS To dismount the elliptical exerciser, wait until the pedals come to a complete stop. Note: The elliptical exerciser does not have a free wheel; the pedals will continue to move until the flywheel stops. When the pedals are stationary, step off the highest pedal first. Then, step off the lowest pedal. To exercise only your lower body, hold the handgrip pulse sensor as you exercise.
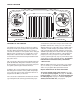
CONSOLE DIAGRAM FEATURES OF THE CONSOLE The advanced console offers a selection of features designed to make your workouts more enjoyable and effective. When the manual mode of the console is selected, the resistance of the pedals can be changed with the touch of a button. As you pedal, the console will provide continuous exercise feedback. You can even measure your heart rate using the built-in handgrip pulse sensor. The console also offers four preset programs.
To turn on the console, press the On/Reset button On/Reset or begin pedaling. Button Note: If there are sheets of clear plastic on the face of the console, remove the plastic. The center of the display will show the elapsed time, your pedaling pace in minutes per mile, and the approximate number of grams of carbs you have burned. The display will change from one number to the next every few seconds.
5 6 Measure your heart rate if desired. If there are thin sheets of plastic on the metal contacts on the handgrip pulse sensor, Contacts peel off the plastic. Place your hands on the handgrip pulse sensor, with your palms on the contacts closest to you and your fingers touching the contacts on the opposite side of the handgrip pulse sensor. Avoid moving your hands. When your pulse is detected, the heart-shaped indicator in the upper part of the display will begin to flash each time your heart beats.
HOW TO USE A PRESET PROGRAM 1 2 3 Turn on the console. See step 1 on page 11. Select one of the preset programs. 5 To select a preset program, press the Program button repeatedly until one of the four preset program indicators lights. 6 7 Press the Start button or begin pedaling to start the program. 8 Each preset program consists of several oneminute periods. One resistance setting and one target pace are programmed for each period.
3 4 5 Enter your age or a target heart rate. When only three seconds remain in the first period of the program, a series of tones will sound and the time will flash in the display. If pulse program 1 is selected, the word “AGE” will flash in the lower part of the display. You must enter your age to use this program. If you have already entered your age, press the Enter button and go to step 4.
HOW TO CONNECT YOUR PORTABLE STEREO HOW TO CONNECT YOUR CD PLAYER, VCR, OR COMPUTER To use iFIT.com CDs, the elliptical exerciser must be connected to your portable CD player, portable stereo, home stereo, or computer with CD player. See pages 15 and 16 for connecting instructions. To use iFIT.com videocassettes, the elliptical exerciser must be connected to your VCR. See page 17 for connecting instructions. To use iFIT.
HOW TO CONNECT YOUR HOME STEREO HOW TO CONNECT YOUR COMPUTER A. Plug one end of a 1/8” to RCA stereo audio cable (available at electronics stores) into the jack beneath the console. Plug the other end of the cable into the LINE OUT jack on your stereo. A. Plug one end of a 1/8” to 1/8” stereo audio cable (available at electronics stores) into the jack beneath the console. Plug the other end of the cable into the LINE OUT jack on your computer.
HOW TO CONNECT YOUR VCR HOW TO USE AN IFIT.COM CD AND VIDEO PROGRAM Note: If your VCR has an unused AUDIO OUT jack, see instruction A below. If the AUDIO OUT jack is being used, see instruction B. If you have a TV with a built-in VCR, see instruction B. If your VCR is connected to your home stereo, see HOW TO CONNECT YOUR HOME STEREO on page 16. To use iFIT.
1 Note: If the resistance of the pedals and/or the pace guide does not change when a “chirp” is heard: 2 • Make sure that the iFIT.com indicator is lit. • Adjust the volume of your CD player or VCR. If the volume is too high or too low, the console may not detect the program signals. 5 6 7 8 3 • Make sure that the audio cable is properly connected and that it is fully plugged in. 4 Monitor your progress with the display. 5 See step 4 on page 11. Measure your heart rate if desired.
MAINTENANCE AND TROUBLESHOOTING HANDGRIP PULSE SENSOR TROUBLESHOOTING Inspect and tighten all parts of the elliptical exerciser regularly. Replace any worn parts immediately. • Avoid moving your hands while using the handgrip pulse sensor. Excessive movement may interfere with heart rate readings. To clean the elliptical exerciser, use a damp cloth and a small amount of mild soap. Important: To avoid damage to the console, keep liquids away from the console and keep the console out of direct sunlight.
CONDITIONING GUIDELINES WARNING: Before beginning this or any exercise program, consult your physician. This is especially important for persons over the age of 35 or persons with pre-existing health problems. The pulse sensor is not a medical device. Various factors may affect the accuracy of heart rate readings. The pulse sensor is intended only as an exercise aid in determining heart rate trends in general.
PART LIST—Model No. 831.28543.0 Key No. Qty.
23 22 53 22 9 24 95 71 66 15 27 50 24 25 46 26 28 27 79 96 11 86 97 66 5 24 2 30 24 26 66 105 96 74 46 25 24 71 27 28 22 28 27 50 87 79 24 53 95 23 10 6 74 7 84 74 67 74 80 74 74 59 59 51 74 84 67 51 74 74 EXPLODED DRAWING A—Model No. 831.28543.
53 100 89 53 16 100 89 99 13 45 31 32 33 23 14 53 56 94 18 46 53 82 72 34 88 3 48 98 32 92 18 98 72 20 94 8 106 63 68 19 47 29 17 65 36 93 93 61 90 78 81 46 91 58 57 37 91 58 77 73 66 69 107 66 83 70 38 40 102 20 93 35 92 99 29 18 51 52 49 75 88 103 18 46 47 21 57 40 54 60 59 39 94 16 76 104 46 29 42 53 85 89 19 17 106 101 1 21 100 41 43 107 65 46 53 12 101 61 55 90 62 70 83 64 60 44 75104 42 59 60 94 45 8 4
FULL 90 DAY WARRANTY For 90 days from the date of purchase, if failure occurs due to defect in material or workmanship in this Sears Elliptical Exerciser, contact the nearest Sears Service Center throughout the United States and Sears will repair or replace the Elliptical Exerciser, free of charge. This warranty does not apply when the Elliptical Exerciser is used commercially or for rental purposes.