Model No. PFTL51105.0 Serial No. USER'S MANUAL Serial Number Decal QUESTIONS? As a manufacturer, we are committed to providing complete customer satisfaction. If you have questions, or if parts are damaged or missing, PLEASE CONTACT OUR CUSTOMER SERVICE DEPARTMENT DIRECTLY. CALL TOLL-FREE: 1-888-533-1333 Mon.–Fri., 6 a.m.–6 p.m. MST ON THE WEB: www.proformservice.com CAUTION Read all precautions and instructions in this manual before using this equipment. Save this manual for future reference.
TABLE OF CONTENTS IMPORTANT PRECAUTIONS . . . . . . . . . . . . . . . . . . . . . . . . . . . . . . . . . . . . . . . . . . . . . . . . . . . . . . . . . . . . . . . .3 BEFORE YOU BEGIN . . . . . . . . . . . . . . . . . . . . . . . . . . . . . . . . . . . . . . . . . . . . . . . . . . . . . . . . . . . . . . . . . . . . . .5 ASSEMBLY . . . . . . . . . . . . . . . . . . . . . . . . . . . . . . . . . . . . . . . . . . . . . . . . . . . . . . . . . . . . . . . . . . . . . . . . . . . . . . .
IMPORTANT PRECAUTIONS WARNING: To reduce the risk of burns, fire, electric shock, or injury to persons, read the following important precautions and information before operating the treadmill. 1. It is the responsibility of the owner to ensure that all users of this treadmill are adequately informed of all warnings and precautions. toll-free telephone number on the front cover of this manual and order part number 146148, or see your local electronics store. 2. Use the treadmill only as described. 12.
20. When folding or moving the treadmill, make sure that the storage latch is fully closed. treadmill, and before performing the maintenance and adjustment procedures described in this manual. Never remove the motor hood unless instructed to do so by an authorized service representative. Servicing other than the procedures in this manual should be performed by an authorized service representative only. 21. Inspect and properly tighten all parts of the treadmill regularly. 22.
BEFORE YOU BEGIN Thank you for selecting the revolutionary PROFORM® 6.0 GSX treadmill. The 6.0 GSX treadmill offers an impressive array of features designed to make your workouts at home more enjoyable and effective. And when you’re not exercising, the unique 6.0 GSX treadmill can be folded up, requiring less than half the floor space of other treadmills. number and serial number before calling. The model number of the treadmill is PFTL51105.0.
ASSEMBLY To hire an authorized service technician to assemble the treadmill, call toll-free 1-800-445-2480. Assembly requires two persons. Set the treadmill in a cleared area and remove all packing materials. Do not dispose of the packing materials until assembly is completed. Note: The underside of the treadmill walking belt is coated with high-performance lubricant. During shipping, a small amount of lubricant may be transferred to the top of the walking belt or the shipping carton.
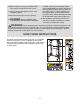
2. With the help of a second person, carefully raise the Uprights (84) to a vertical position. 2 Console Assembly Have the second person hold the console assembly near the Uprights (84) as shown. Look under the console assembly and locate the Console Wire Harness (78). Cut the plastic ties securing the Upright Wire Harness (77) to the right Upright (84). Next, connect the Upright Wire Harness to the Console Wire Harness (78). Make sure to connect the connectors properly (see the inset drawing).
If you purchase the optional chest pulse sensor (see page 16), follow the steps below to install the receiver included with the chest pulse sensor. 1. Make sure that the key is removed from the console and that the power cord is unplugged. Remove the indicated Screw (3) and the Access Door (76) from the back of the Console Base (85). 2. Connect the wire on the receiver (A) to the indicated wire extending from the Console Base (85).
OPERATION AND ADJUSTMENT THE PRE-LUBRICATED WALKING BELT tric shock. This product is equipped with a cord having an equipment-grounding conductor and a grounding plug. Plug the power cord into a surge suppressor, and plug the surge suppressor into an appropriate outlet that is properly installed and grounded in accordance with all local codes and ordinances. Important: The treadmill is not compatible with GFCI-equipped outlets. Your treadmill features a walking belt coated with highperformance lubricant.
CONSOLE DIAGRAM Key Note: If there is a sheet of clear plastic on the face of the console, remove it. Clip FEATURES OF THE CONSOLE Handgrip Pulse Sensor In addition, the console features four preset programs. Each program automatically controls the speed and incline of the treadmill as it guides you through an effective workout. The console also offers two heart rate programs that control the speed and incline of the treadmill to keep your heart rate near target heart rates during your workouts.
HOW TO TURN ON THE POWER mph. As you exercise, change the speed of the walking belt as desired by pressing the Speed increase and decrease buttons. Each time a button is pressed, the speed setting will change by 0.1 mph; if a button is held down, the speed setting will change in increments of 0.5 mph. Note: After the buttons are pressed, it may take a moment for the walking belt to reach the selected speed setting.
sor, remove the plastic. Before using the handgrip pulse sensor, make sure that your hands are clean. Note: If you use the handgrip pulse sensor and the optional chest pulse sensor at the same time, the console will not display your heart rate accurately. The left side of the display will show the incline level of the treadmill, the elapsed time, and the distance you have walked or run.
When only three seconds remain in the first segment of the program, both the Current Segment column and the column to the right will flash and a series of tones will sound. If the speed and/or incline of the treadmill is about to change, the speed setting and/or the incline setting will flash in the display to alert you. HOW TO USE A PRESET PROGRAM 1 Insert the key into the console. See HOW TO TURN ON THE POWER on page 11.
4 Follow your progress with the display. HOW TO USE A HEART RATE PROGRAM See step 5 on page 11. 5 CAUTION: Measure your heart rate if desired. If you have heart problems, or if you are over 60 years of age and have been inactive, do not use the heart rate programs. If you are taking medication regularly, consult your physician to find whether the medication will affect your exercise heart rate. See step 6 on page 12. 6 Turn on the fan if desired. See step 7 on page 12.
4 series of tones will sound. If a different target heart rate is programmed for the next segment, the speed setting and the incline setting will flash in the display to alert you. When the first segment ends, all target heart rate settings will move one column to the left. The target heart rate setting for the second segment will then be shown in the flashing Current Segment column. Enter a target heart rate setting.
THE INFORMATION MODE/DEMO MODE mode, the power cord can be plugged in, the key can be removed from the console, and the indicators in the display will automatically appear in a preset sequence, although the buttons on the console will not operate. If a “d” appears when the information mode is selected, press the Speed decrease button so “d” disappears.
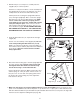
HOW TO FOLD AND MOVE THE TREADMILL HOW TO FOLD THE TREADMILL FOR STORAGE Before folding the treadmill, adjust the incline to the lowest position. If this is not done, the treadmill may be permanently damaged. Next, unplug the power cord. CAUTION: You must be able to safely lift 45 pounds (20 kg) to raise, lower, or move the treadmill. 1. Hold the treadmill with your hands in the locations shown by the arrow at the right. To decrease the possibility of injury, bend your legs and keep your back straight.
HOW TO LOWER THE TREADMILL FOR USE 1. Hold the upper end of the treadmill with your right hand. Pull the latch knob to the left and hold it. Pivot the treadmill down until the catch is past the latch pin. Catch Latch Knob Latch Pin 2. Hold the treadmill firmly with both hands, and lower the treadmill to the floor. Do not drop the treadmill frame to the floor. To decrease the possibility of injury, bend your legs and keep your back straight.
TROUBLESHOOTING Most treadmill problems can be solved by following the steps below. Find the symptom that applies, and follow the steps listed. If further assistance is needed, please call the toll-free telephone number on the front cover of this manual. PROBLEM: The power does not turn on SOLUTION: a. Make sure that the power cord is plugged into a surge suppressor, and that the surge suppressor is plugged into a properly grounded outlet (see page 9).
With the help of a second person, carefully raise the Uprights (84) to the position shown. Carefully pivot the Hood (41) off. Locate the Reed Switch (63) and the Magnet (46) on the left side of the Pulley (47). Turn the Pulley until the Magnet is aligned with the Reed Switch. Make sure that the gap between the Magnet and the Reed Switch is about 1/8”. If necessary, loosen the Screw (3), move the Reed Switch slightly, and then retighten the Screw.
CONDITIONING GUIDELINES WARNING: Before beginning this or any exercise program, consult your physician. This is especially important for individuals over the age of 35 or individuals with preexisting health problems. The pulse sensor is not a medical device. Various factors, including your movement, may affect the accuracy of heart rate readings. The sensor is intended only as an exercise aid in determining heart rate trends in general. The following guidelines will help you to plan your exercise program.
SUGGESTED STRETCHES The correct form for several basic stretches is shown at the right. Move slowly as you stretch—never bounce. 1. Toe Touch Stretch Stand with your knees bent slightly and slowly bend forward from your hips. Allow your back and shoulders to relax as you reach down toward your toes as far as possible. Hold for 15 counts, then relax. Repeat 3 times. Stretches: Hamstrings, back of knees and back. 1 2. Hamstring Stretch Sit with one leg extended.
PART LIST—Model No. PFTL51105.0 R0705A To locate the parts listed below, see the EXPLODED DRAWING attached in the center of this manual. Key No. Qty.
5 53 8 90 70 16 55 6 5 3 83 9 69 3 52 3 5 53 49 4 57 33 8 1 51 12 83 11 5 90 48 54 9 70 15 5 70 10 5 26 58 32 17 47 5 28 46 42 27 32 25 19 23 5 11 10 22 30 1 12 3 70 25 32 62 18 24 22 30 5 23 EXPLODED DRAWING—Model No. PFTL51105.
80 81 8 32 64 89 50 83 82 72 67 8 65 88 83 82 21 73 29 87 86 56 68 80 8 32 32 82 84 64 68 83 82 83 89 81 65 8 33 8 64 83 31 77 82 67 3 8 64 29 82 83 32 44 20 32 44 31 13 3 3 3 EXPLODED DRAWING—Model No. PFTL51105.
ORDERING REPLACEMENT PARTS To order replacement parts, see the front cover of this manual. To help us assist you, please be prepared to give the following information: • the MODEL NUMBER of the product (PFTL51105.0) • the NAME of the product (PROFORM 6.