
User`s manual


7
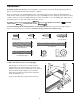
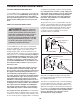
2. Identify the Right Handrail (72), which has a large hole in
the left side. Feed the Upright Wire (42) into the hole in
the bottom of the Right Handrail and out of the large hole
in the side. Note: It may be helpful to use needlenose pli
-
ers to pull the Wire Harness out of the hole.
Attach the upper end of the Right Handrail (72) to the
right Upright (69) with a 3” Bolt (37). Do not tighten the
Bolt yet. Attach the lower end of the Right Handrail with
a Handrail Bolt (98) and a Star Washer (101). Tighten
both Bolts; be careful not to overtighten the Handrail
Bolt.
Attach the upper end of the Left Handrail (71) to the left
Upright (69) with a 3” Bolt (37). Do not tighten the Bolt
yet. Attach the lower end of the Left Handrail with a
Handrail Bolt (98) and a Star Washer (101). Tighten
both Bolts; be careful not to overtighten the Handrail
Bolt. Note: There is not a wire harness on the left side.
42
Hole
72
101
98
37
71
69
69
101
98
Hole
2
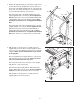
3. With the help of another person, carefully lower the
Uprights (69) as shown. Note: It may be helpful to place
one foot on one of the Extension Legs (63) as you tip the
Uprights. Make sure that the Extension Legs remain
in the Uprights.
Attach each Extension Leg (63) with two 1” Tek Screws
(39) and a Base Pad (57) as shown. Attach the lower
Tek Screw, without the Base Pad, first.
Attach two Base Pads (57) to the base of the Uprights
(69) with two 1” Tek Screws (39).
Attach the two Wheels (66) with two Wheel Bolts (64)
and two Wheel Nuts (32) as shown. Do not overtighten
the Bolts; the Wheels should be able to turn freely.
With the help of another person, carefully raise the
Uprights (69) to the vertical position.
39
69
63
39
57
63
57
57
39
64
66
32
69
64
66
32
57
39
3
37