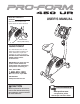
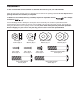
Model No. PFEX44177.1 Serial No. USER'S MANUAL Write the serial number in the space above for future reference. Serial Number Decal (under frame) QUESTIONS? As a manufacturer, we are committed to providing complete customer satisfaction. If you have questions, or if parts are missing, PLEASE DO NOT CONTACT THE STORE; please contact Customer Care. IMPORTANT: You must note the product model number and serial number (see the drawing above) before contacting us: CALL TOLL-FREE: 1-888-533-1333 Mon.–Fri.
TABLE OF CONTENTS 246724 246723 WARNING DECAL PLACEMENT . . . . . . . . . . . . . . . . . . . . . . . . . . . . . . . . . . . . . . . . . . . . . . . . . . . . . . . . . . . . . .2 IMPORTANT PRECAUTIONS . . . . . . . . . . . . . . . . . . . . . . . . . . . . . . . . . . . . . . . . . . . . . . . . . . . . . . . . . . . . . . . .3 BEFORE YOU BEGIN . . . . . . . . . . . . . . . . . . . . . . . . . . . . . . . . . . . . . . . . . . . . . . . . . . . . . . . . . . . . . . . . . . . . . .4 ASSEMBLY . . . . . .
IMPORTANT PRECAUTIONS WARNING: To reduce the risk of serious injury, read all important precautions and instructions in this manual and all warnings on your exercise cycle before using your exercise cycle. ICON assumes no responsibility for personal injury or property damage sustained by or through the use of this product. 1. Before beginning any exercise program, consult your physician. This is especially important for persons over the age of 35 or persons with pre-existing health problems. 8.
BEFORE YOU BEGIN of this manual. To help us assist you, note the product model number and serial number before contacting us. The model number and the location of the serial number decal are shown on the front cover of this manual. Congratulations for selecting the revolutionary PROFORM® 450 UR exercise cycle. Cycling is one of the most effective exercises for increasing cardiovascular fitness, building endurance, and toning the entire body.
ASSEMBLY To hire an authorized service technician to assemble the exercise cycle, call 1-800-445-2480. Place all parts of the exercise cycle in a cleared area and remove the packing materials. Do not dispose of the packing materials until assembly is completed. In addition to the included hex keys, assembly requires an adjustable wrench screwdriver . and a Phillips Use the drawings below to identify the small parts used in assembly.
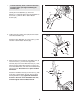
1. 1 To make assembly easier, read the information on page 5 before you begin assembling the exercise cycle. 1 17 Identify the Front Stabilizer (2), which has Wheels (17) attached. Attach the Front Stabilizer to the Frame (1) with two M10 x 85mm Button Screws (56). 2 56 2. Tighten the two Leveling Feet (29) into the bottom of the Rear Stabilizer (3). 2 Attach the Rear Stabilizer (3) to the Frame (1) with two M10 x 85mm Button Screws (56). 3 1 29 29 3.
4. Attach the Water Bottle Holder (18) to the Handlebar Post (6) with two M4 x 19mm Screws (33). 4 6 18 33 5. Have a second person hold the Handlebar (7) near the Handlebar Post (6). Connect the Right Controller Wire (65), which is marked with a tag, to the right connector on the Split Wire Harness, which is also marked with a tag. Then, connect the Left Controller Wire (54) to the left connector on the Split Wire Harness (25).
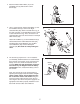
7. Have a second person hold the Console (9) near the Handlebar Post (6). Connect the console wire harness to the Upper Wire Harness (55). Next, connect the game wire on the Console to the Split Wire Harness (25). 7 9 Game Wire Attach the Console (9) to the Handlebar Post (6) with four M4 x 16mm Screws (58). Be careful not to pinch the wires in the Console. 6 25 Console Wire Harness 55 58 8. Turn the Seat Post Knob (20) counterclockwise several turns to loosen it.
10. Identify the Left Pedal (40), which is marked with a sticker. Using an adjustable wrench, firmly tighten the Left Pedal counterclockwise into the Left Crank Arm (15). Tighten the Right Pedal (not shown) clockwise into the Right Crank Arm. Important: Tighten both Pedals as firmly as possible. After using the exercise cycle for one week, retighten the Pedals. For best performance, keep the Pedals tightened. 10 Press the tab on the side of the Left Pedal (40) and adjust the strap to the desired position.
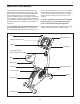
HOW TO OPERATE THE EXERCISE CYCLE HOW TO ADJUST THE HEIGHT OF THE SEAT HOW TO ADJUST THE LATERAL POSITION OF THE SEAT For effective exercise, the seat should be at the proper height. As Seat you pedal, there should be a slight bend in your knees Seat Post when the pedals Knob are in the lowest Seat Post position. To adjust the seat, first turn the seat post knob counterclockwise several turns to loosen it.
CONSOLE DIAGRAM FEATURES OF THE CONSOLE Interactive Games The revolutionary console offers an array of features designed to make your workouts more effective and enjoyable. When you use the manual mode of the console, you can change the resistance of the pedals with the touch of a button. While you exercise, the console will display continuous exercise feedback. You can even measure your heart rate using the handgrip pulse sensor. The console also features four motivational interactive games.
4. Follow your progress with the display. HOW TO USE THE MANUAL MODE Note: If there is a sheet of clear plastic on the face of the console, remove the plastic. The upper left corner of the display will show the elapsed time. Note: When a program is selected, the display will show the time remaining in the program instead of the elapsed time. 1. Begin pedaling or press any button on the console to turn on the console. A moment after you begin pedaling or press a button, the display will light. 2.
The console can show speed and distance in either miles or kilometers. The letters MPH or KM/H will appear in the display to show which unit of measurement is selected. To change the unit of measurement, first press and hold down the Program button for several seconds. Next, press the decrease button to select the desired unit of measurement. Then, press the Program button to save your selection. HOW TO USE A SMART PROGRAM 1. Begin pedaling or press any button on the console to turn on the console.
As you exercise, you will be prompted to keep your pedaling pace near the target pace setting for the current segment. When an upward arrow appears in the display, increase your pace. When a downward arrow appears, decrease your pace. When no arrow appears, maintain your current pace. the program ends, the pedals will automatically adjust to the resistance level for the next segment. The program will continue in this way until the last segment ends. To stop the program at any time, stop pedaling.
HOW TO PLAY THE FAT BLOCKER GAME Your goal is to maneuver the Complete Row blocks so that they form a complete row of black squares across the entire arena. Each time you complete a row of black squares, the row will disappear, and all blocks above will move downward one row. The Fat Blocker game requires quick thinking and fast reflexes. In addition to the console buttons, you will use the four-button game controllers on the handlebar to play the game. Follow the steps below to play the Fat Blocker game.
HOW TO PLAY THE CALORIE DESTROYER GAME Between the drones and the laser blaster are five shields. You can hide the laser blaster below a shield if desired. However, each time a shield is hit by a laser, a piece will be vaporized. The Calorie Destroyer game is a fast-paced game that pits you against a squadron of laser-firing drones. In addition to the console buttons, you will use the fourbutton game controllers on the handlebar to play the game. Follow the steps below to play the Calorie Destroyer game.
HOW TO PLAY THE BLACKJACK GAME Blackjack is a casino-style card game in which you compete against the dealer to win credits. Your goal during each hand of the game is to have the highest point total that does not exceed 21 points. You will use the interactive touch screen on the display to play the game. Follow the steps below to play Blackjack. Note: For detailed instructions on how to play Blackjack, consult a card game rule book or other card game resource. 1.
HOW TO PLAY THE TEXAS HOLD ‘EM GAME the display. The black X in the display indicates the location of the dealer button. The black arrow indicates which player’s turn it is. Texas Hold ‘Em is a popular poker game in which you compete against other players to win credits. Your objective is to form the best five-card poker hand from your two hole cards and the five community cards shared by all the players. You will use the interactive touch screen on the display to play the game.
MAINTENANCE AND TROUBLESHOOTING Inspect and properly tighten all parts of the exercise cycle regularly. The exercise cycle can be cleaned with a soft, damp cloth. To prevent damage to the console, keep liquids away from the console and keep the console out of direct sunlight. HOW TO ADJUST THE BELT If the pedals slip while you are pedaling, even while the resistance is adjusted to the highest setting, the belt may need to be adjusted. To adjust the belt, the pedals and side shields must first be removed.
EXERCISE GUIDELINES Burning Fat—To burn fat effectively, you must exercise at a low intensity level for a sustained period of time. During the first few minutes of exercise, your body uses carbohydrate calories for energy. Only after the first few minutes of exercise does your body begin to use stored fat calories for energy. If your goal is to burn fat, adjust the intensity of your exercise until your heart rate is near the lowest number in your training zone.
SUGGESTED STRETCHES 1 The correct form for several basic stretches is shown at the right. Move slowly as you stretch—never bounce. 1. Toe Touch Stretch Stand with your knees bent slightly and slowly bend forward from your hips. Allow your back and shoulders to relax as you reach down toward your toes as far as possible. Hold for 15 counts, then relax. Repeat 3 times. Stretches: Hamstrings, backs of knees, and back. 2 2. Hamstring Stretch Sit with one leg extended.
PART LIST—Model No. PFEX44177.1 Key No. Qty. 1 2 3 4 5 6 7 8 9 10 11 12 13 14 15 16 17 18 19 20 21 22 23 24 25 26 27 28 29 30 31 32 33 34 1 1 1 1 1 1 1 2 1 2 1 1 1 2 1 1 2 1 1 1 2 1 1 4 1 2 1 1 2 2 1 1 2 1 Description Key No. Qty.
EXPLODED DRAWING—Model No. PFEX44177.
ORDERING REPLACEMENT PARTS To order replacement parts, please see the front cover of this manual.