PRO.FORM 7 4 5 0 Model No. 831.299470 Serial No. USER'S MANUAL Find the serial number in the location shown below. Write the senal number in the space above for reference. Serial Number Decal F____x E_ F:_ C I _ EE EQUIPMENT [_"l LlJ I= Llllll-] l_(il_ HELPLINE[ 1-800-736-6879 SEARS, ROEBUCK AND CO. HOFFMAN ESTATES, IL 60179 _,_,_..g_ Patent Pending _ _egautlons and_nstru_.4 _s _a_al befo[e us gg _ ,menDSave thls man_al__; www.proform.
PRO'FORM'745CS TABLE OF CONTENTS IMPORTANT PRECAUTIONS ................................................................. BEFORE YOU BEGIN ....................................................................... ASSEMBLY ............................................................................... OPERATION AND ADJUSTMENT ............................................................. HOW TO FOLD AND MOVE THE TREADMILL .................................................. TROUBLE-SHOOTING .......................
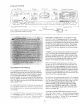
IMPORTANT PRECAUTIONS ;ons, read ihe see 66-7278 and 3
The decals shown below have been placed on your treadmill. please call our toll-free HELPLINE to order a free replacement Apply the decal in the location shown. Note: This decal is shown at 38% of actual size. 4 If a decal Is missing, or if It Is not legible, decal (see the front cover of this manual).
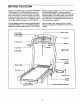
BEFORE YOU BEGIN Thank you for selecting the revolutionary PROFORM e 745CS treadmill. The 745CS treadmill combines advanced technology with innovative design to help you get the most from your exercise program in the convenience and pdvacy of your home. And when you're not exercising, the unique 745CS can be folded up, requiring less than half the floor space of other treadmills. Monday through Saturday, 7 a.m. until 7 p.m. Central Time (excluding holidays).
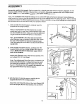
-ASSEMBLY Assembly requires two people. Set the treadmill in a cleared area and remove all packing matenals. Do not dispose of the packing materials until assembly is completed. Assembly requires your own Phillips screwdriver (]_=======, wire cutters _, and rubber mallet {_:z_:_. Note: The underside of the treadmill walking belt is coated with high-performance lubricant. During shipping, a small amount of lubricant may be transferred to the top of the walking belt or the shipping carton.
_4-JaserLaJ_andraiLExtensic n(85)Jnto_heJeft_oskas_ shown.AligntheholesintheHandrailExtension withthe holesin thepost.If necessary, taptheHandrail Extension witha rubbermallettofullyinsertit.Next,attach the HandrailExtensionbytightening threeSmallScrews (76)intothe indicatedholes.Note:If thereIs onlyone hole in the top of the post,tightenthethirdSmall Serewinto the holein theleftside ofthe pest, Post 76._ 85 Cutout \ 110 Identifythe Left Foam Gnp (110), which has a large cutout in the right side.
If you purchase the optional heart rate monitor (see page 19), follow the steps below to install the receiver Included with the heart rate monitor. 1 .. 116 1. Make sure that the power cord is unplugged. Remove the six or seven indicated Screws (46) from the back of the Console Base (116). 2. Connect the Short Jumper Wire (B) to the wire on the Receiver (A). Connect the other end of the Jumper Wire to the PULSE jack on the back of the Console (see drawing 2b).
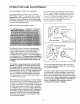
OPERATION THE PERFORMANT AND ADJUSTMENT LUBE TM WALKING BELT Your treadmill features a walking belt coated with PERFORMANT LUBE TM, a high-performance lubricant. IMPORTANT: Never apply silicone spray or other substances to the walking belt or the walking platform. Such substances will deteriorate the walking belt and cause excessive wear. This product is for use on a nominal 120-volt circuit, and has a grounding plug that looks like the plug illustrated in drawing 1 below.
CONSOLE DIAGRAM Program Manual/iFIT.com Indicators Indicators Note: If there is a thin sheet of clear plastic on the face of the console, remove it. home stereo, portable stereo, or computer and play special iFIT.com CD programs (one CD is provided). IFIT.cem CD programs automatically control the speed and incline of the treadmill as a personal trainer guides you through every step of your workout. High-energy music provides added motivation.
HOW TO TURN ON THE POWER g Plug in the power cord (see HOW TO PLUG IN THE POWER CORD on page 9). B Locate the on/off switch on the front of the treadmill. Make sure the on/off switch is in the on position. change the speed of the walking belt as desired by pressing the SPEED A and £' buttons. To change the speed setting quickly, press the QUICK SPEED °.¢9 buttons. Note: After the buttons are pressed, it may take a moment for the treadmill to reach the selected speed setting.
TIME display--When the manual mode or an iFIT.com program is selected, this display shows the elapsed time. When a personal trainer program is selected, this display shows both the time remaining in the program and the time re- r_ Stand on the foot rails and place your hands on the metal contacts on the pulse bar. Your palms must be resting on the upper contacts, and your fingers must be touching the maining in the current segment of the program.
_1 One speed setting and one incline setting are programmed for each segment. When only three seconds remain in the first segment, a series of tones will sound and the treadmill will automatically adjust to the speed and incline settings for the second segment. Insert the key into the console. See HOW TO TURN ON THE POWER on page ft. B The program will continue in this way until the TtME display counts down to zero. The walking belt will then slow to a stop. Select one of the personal trainer programs.
HOW TO CONNECT YOUR PORTABLE STEREO Note: If your stereo has an RCA-type AUDIO OUT jack, see instruction A below. If your stereo has a 3.Smm LINE OUT jack, see instruction B. If your stereo has only a PHONES jack, see instruction C. To use iFIT.com CD's, the treadmill must be connected to your portable CD player, portable stereo. home stereo, or computer with CD player. See pages 14 and 15 for connecting instructions. To use iFIT.corn videocassettes, the treadmill must be connected to A.
HOW TO CONNECT YOUR HOME STEREO HOW TO CONNECT YOUR COMPUTER Note: If your stereo has an unused LINE OUT Jack, see instruction A below. It the LINE OUT jack is being used, see instruction B. Note: If your computer has a 3.5mm LINE OUT jack, see instruction A. If your computer has only a PHONES jack, see Instruction B. A. Plug one end of the audio cable into the jack on the front of the treadmill near the power cord. Plug the other end of the cable into the included adapter.
HOW TO CONNECT YOUR VCR Note: if your VCR has an unused AUDIO OUT iack, see instruction A below. If the AUDIO OUT jack is being used, see instruction B. If you have a TV with a built-in VCR, see instruction B. If your VCR is connected to your home stereo, see HOW TO CONNECT YOUR HOME STEREO on page 15. ........._,._ .,.,_ ........... _!_ >_...... ,,............_ _ .... _ ..... , _ .... ,..... _" To use iFIT.
During the CD or video program, an electronic "chirping" sound will alert you when the speed and/or incline of the treadmill is about to change. CAUTION: Always listen for the "chirp" and he prepared for speed and/or Incline changes. In some instances, the speed and/or incline may change before the personal trainer describes the change. TIME display Is flashing, press the START button or the SPEED A button on the console • adjust the volume of your CD player or VCR.
B When the on-screen countdown ends, the program will begin and the walking belt will begin to move. Hold the handrails, step onto the walking belt, and begin walking. Ournewinternetsiteatwww.iFtT.com allowsyouto accessa largeselectionofprogramsthatinteractively controlyourtreadmilltohelpyouachieveyourspecific exercisegoals.Inaddition,youcanplayiFIT.com audioandvideoprogramsdirectlyfromtheintemet.By addinganoptionalupgrademoduletotheconsole,you canusevirtuallyendlessfeaturesonourintemetsite. Explorewww.
THE OPTIONAL CHEST PULSE SENSOR An optional chest pulse sensor adds even more features to the console. The chest pulse sensor provides hands-free operation and continuously monitors your heart rate during your workouts. To purchase the optional chest pulse sensor, see your local SEARS or call toll-free 1-800-366-7278. The console features an information mode that keeps track of the total number of hours that the treadmill has been operated and the total number of miles that the walking belt has moved.
HOW TO FOLD AND MOVE THE TREADMILL HOW TO FOLD THE TREADMILL FOR STORAGE Before folding the treadmill, adjust the incline to the lowest position. If this is not done, the treadmill may be permanently damaged. Next, unplug the power cord. CAUTION: You must be able to safely lift 45 pounds (20 kg) in order to raise, lower, or move the treadmill. 1. Hold the treadmill with your hands in the locations shown at the right.
HOW TO LOWER THE TREADMILL FOR USE 1. Hold the upper end of the treadmill with your right hand as shown. Using your left hand, pull the latch knob to the left and hold it. Pivot the treadmill down until the frame is past the pin. Slowly release the latch knob. 2. Hold the treadmill firmly with both hands, and lower the treadmill to the floor. Do not drop the treadmill frame to the floor. CAUTION: To decrease the possibility of injury, bend your legs and keep your back straight.
t"ROU BI:E=SHOOTING Most treadmill problems can be solved by following the simple steps below. Find the symptom that applies, and follow the steps listed. If further assistance Is needed, call our toll-free HELPLINE at 1-800-736-6879, Monday through Saturday, 7 a.m. until 7 p.m. Central Time (excluding holidays). PROBLEM: The power does not turn on SOLUTION: a.
PROBLEM: The walking_belt slows when walked on SOLUTION: a. Use only a UL-listed surge suppressor, rated at 15 amps, with a 14-gauge cord of five feet or less in length. b. If the walking belt is overtightened, treadmill performance may decrease and the walking belt may become damaged. Remove the key and UNPLUG THE POWER CORD. Using the allen wrench, turn both rear roller adjustment bolts counterclockwise, 1/4 of a turn.
CONDITIONING GUIDELINES ergy. Only after the begin to use stored is to burn fat, adjust mill until your heart your training zone. first few minutes does fat calories for energy. the speed and incline rate is near the lowest your body If your goal of the treadnumber in For maximum fat burning, adjust the speed and incline of the treadmill until your heart rate is near the middle number in your training zone.
SUGGESTED STRETCHES The correct form for several basic stretches is shown at the right. Move slowly as you stretch--never bounce. 1. Toe Touch Stretch Stand with your knees bent slightly and slowly bend forward from your hips. Allow your back and shoulders to relax as you reach down toward your toes as far as possible. Hold for 15 counts, then relax. Repeat 3 times. Stretches: Hamstrings, back of knees and back. 2. Hamstring Stretch Sit with one leg extended.
NOTES 26
PART LIST--Model No. 831.299470 R1000A To locate the parts listed below, refer to the EXPLODED DRAWING attached in the center of this manual. Key No. Q_. 1 2 3 4* 1 1 4 1 5 6** 7 8 9" 10"* 11 12 13 14 15 16 1 1 1 1 1 1 1 1 2 1 8 8 17 18 19 20 21 22 23 24 25 26 27 28 29 30 4 2 1 2 1 1 1 1 1 1 1 1 1 18 31 32 1 2 33 34 35 36 37 2 1 1 3 2 38 39 40 41 42 43 44 46 46 47 4 6 1 2 1 1 2 2 10 15 Description Key No. Q_.
EXPLODED DRAWING--Model 4* No. 831.299470 RIO00A 37 52 27 112 _0 30 62 29 74 98 88 3O 41 15 75 30 32 •-. 25 24 71 45 89 51 16 7O -58 100 55 101 57 67 65 16 101 SAVE THE EXPLODED DRAWING FOR FUTURE REFERENCE. To identify the parts shown on this exploded drawing, refer to the PART LIST on page 27 of the USER'S MANUAL.
EXPLODED DRAWINGmModel NO. 831.299470 Rlo_ 9O 46 _ 107108 10"* 76_ 76 46 85 109 118"* 0 89 48 107 84 o 85 76 ° 83 101 "97 15 101 15 101 "97 95 86 .
SE/ U S The model number and sedal number of your PROFORM e 745CS treadmill are listed on a decal attached to the frame. See the front cover of this manual to find the location of the decal. Model No. 831.299470 QUESTIONS? All replacement parts are available for immediate purchase or special order when you visit your nearest SEARS Service Center. To request service or to order parts by telephone, call the toIFfree numbers listed at the left.