USER'S MANUAL Model No. PCTL93040 Serial No. Serial Number Decal QUESTIONS? As a manufacturer, we are committed to providing complete customer satisfaction. If you have questions, or if there are missing parts, please call: 1-888-936-4266 Mon.–Fri. 8h00 until 18h30 EST (excluding holidays). CAUTION Read all precautions and instructions in this manual before using this equipment. Save this manual for future reference. Visit our website at www.proform.
TABLE OF CONTENTS IMPORTANT PRECAUTIONS . . . . . . . . . . . . . . . . . . . . . . . . . . . . . . . . . . . . . . . . . . . . . . . . . . . . . . . . . . . . . . . .2 BEFORE YOU BEGIN . . . . . . . . . . . . . . . . . . . . . . . . . . . . . . . . . . . . . . . . . . . . . . . . . . . . . . . . . . . . . . . . . . . . . .4 ASSEMBLY . . . . . . . . . . . . . . . . . . . . . . . . . . . . . . . . . . . . . . . . . . . . . . . . . . . . . . . . . . . . . . . . . . . . . . . . . . . . . . .
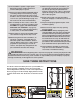
16. The treadmill is capable of high speeds. Adjust the speed in small increments to avoid sudden jumps in speed. 17. Never leave the treadmill unattended while it is running. Always remove the key, unplug the power cord and move the on/off circuit breaker to the off position when the treadmill is not in use. (See the drawing on page 4 for the location of the on/off circuit breaker.) 18. Do not attempt to raise, lower, or move the treadmill until it is properly assembled.
BEFORE YOU BEGIN Thank you for selecting the revolutionary PROFORM® CROSSWALK 380x treadmill. The CROSSWALK 380x treadmill combines advanced technology with innovative design to help you get the most from your exercise program in the convenience and privacy of your home. And when you’re not exercising, the unique CROSSWALK 380x treadmill can be folded up, requiring less than half the floor space of other treadmills.
ASSEMBLY Assembly requires two persons. Set the treadmill in a cleared area and remove all packing materials. Do not dispose of the packing materials until assembly is completed. Note: The underside of the treadmill walking belt is coated with high-performance lubricant. During shipping, a small amount of lubricant may be transferred to the top of the walking belt or the shipping carton. This is a normal condition and does not affect treadmill performance.
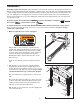
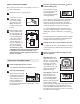
3. Identify the Right Handrail (72), which has a large hole in the left side. Feed the Wire Harness (42) up into the bracket on the Right Handrail and out of the large hole in the left side. (Note: It may be helpful to use needlenose pliers to pull the Wire Harness out of the large hole.) Press a Handrail Cap (76) onto the lower end of the Right Handrail as shown. Remove any plastic ties from the bracket.
6. Place the Console Base (47) on the Right Handrail (72) and the Left Handrail (not shown). Attach the Console Base with four 3/4” Screws (2) (only two Screws are shown). Do not overtighten the Screws. Insert the Wire Harness (42) through the two indicated plastic ties on the Console Base (47). Next, touch the Right Handrail (72) to discharge any static. Refer to the inset drawing. Find the 3-wire connector on the end of the Wire Harness (42). Insert the connector into the red socket beneath the console.
OPERATION AND ADJUSTMENT THE PERFORMANT LUBETM WALKING BELT plug. Plug the power cord into a surge suppressor, and plug the surge suppressor into an appropriate outlet that is properly installed and grounded in accordance with all local codes and ordinances. Important: The treadmill is not compatible with GFCI-equipped outlets. Your treadmill features a walking belt coated with PERFORMANT LUBETM, a high-performance lubricant.
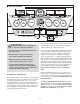
CONSOLE DRAWING Key Clip Two workout programs are also offered. Each program automatically controls the speed of the treadmill as it guides you through an effective workout. CAUTION: Before operating the console, read the following precautions. • Do not stand on the walking belt when turning on the power. The console also features iFIT.com interactive technology. Having iFIT.com technology is like having a personal trainer in your home.
HOW TO TURN ON THE POWER 3 Note: If there is a thin sheet of clear plastic on the console, remove the plastic. Press the Start button or the Speed s button to start the walking belt. 1 Plug in the power cord (see page 8). A moment after the button is pressed, the walking belt will begin to move. Hold the handrails and begin walking. 2 Locate the on/off circuit breaker on the front of the treadmill near the power cord. Make sure that the breaker is in the reset position.
Distance/Laps display—This display shows the distance that you have walked or run and the number of 1/4mile laps you have completed. The display will alternate between one number and the other every few seconds, as shown by the indicators in the display. 6 Measure your heart rate, if desired. To measure your heart rate, stand on the foot rails and place your thumb on the pulse sensor. Do not press too hard, or the circulation in your thumb will be restricted and your pulse will not be detected.
The program will continue in this way until no time remains in the Time display. The walking belt will then slow to a stop. HOW TO USE A WORKOUT PROGRAM 1 Insert the key into the console. During the program, the incline of the treadmill can be adjusted with the Incline buttons. If the speed setting for the current period is too high or too low, you can manually override the setting by pressing the Speed buttons on the console.
HOW TO CONNECT YOUR PORTABLE STEREO HOW TO CONNECT THE TREADMILL TO YOUR CD PLAYER, VCR, OR COMPUTER Note: If your stereo has an RCA-type AUDIO OUT jack, see instruction A below. If your stereo has a 3.5mm LINE OUT jack, see instruction B. If your stereo has only a PHONES jack, see instruction C. To use iFIT.com CD’s, the treadmill must be connected to your portable CD player, portable stereo, home stereo, or computer with CD player. See pages 13 and 14 for connecting instructions. To use iFIT.
HOW TO CONNECT YOUR HOME STEREO HOW TO CONNECT YOUR COMPUTER Note: If your stereo has an unused LINE OUT jack, see instruction A below. If the LINE OUT jack is being used, see instruction B. Note: If your computer has a 3.5mm LINE OUT jack, see instruction A. If your computer has only a PHONES jack, see instruction B. A. Plug one end of the audio cable into the jack beneath the console. Plug the other end of the cable into the included adapter. Plug the adapter into the LINE OUT jack on your stereo. A.
HOW TO CONNECT YOUR VCR HOW TO USE IFIT.COM CD AND VIDEO PROGRAMS Note: If your VCR has an unused AUDIO OUT jack, see instruction A below. If the AUDIO OUT jack is being used, see instruction B. If you have a TV with a built-in VCR, see instruction B. If your VCR is connected to your home stereo, see HOW TO CONNECT YOUR HOME STEREO on page 14. To use iFIT.com CD’s or videocassettes, the treadmill must be connected to your portable CD player, portable stereo, home stereo, computer with CD player, or VCR.
• Adjust the volume of your CD player or VCR. If the volume is too high or too low, the console may not detect the program signals. If the speed setting is too high or too low, you can manually override the setting at any time by pressing the Speed buttons on the console. However, when the next “chirp” is heard, the speed will change to the next setting for the CD or video program.
7 HOW TO USE PROGRAMS DIRECTLY FROM OUR WEB SITE When the on-screen countdown ends, the program will begin and the walking belt will begin to move. Hold the handrails, step onto the walking belt, and begin walking. Our Web site at www.iFIT.com allows you to access basic programs, audio programs, and video programs directly from the internet. Additional options are soon to be available. See www.iFIT.com for details.
HOW TO USE THE UPPER BODY ARMS As you walk on the treadmill, you can either hold the handrails or use the upper body arms. To exercise your arms, shoulders, and back for a total body workout, move the upper body arms forward and back as you walk on the treadmill. To vary the intensity of your upper body exercise, the resistance of the upper body arms can be adjusted. To increase the resistance, turn the resistance knobs clockwise; to decrease the resistance, turn the knobs counterclockwise.
HOW TO MOVE THE TREADMILL Before moving the treadmill, convert the treadmill to the storage position as described above. Make sure that the frame is securely held by the latch pin. 1. Hold the upper ends of the handrails. Place one foot on the base as shown. 2. Tilt the treadmill back until it rolls freely on the front wheels. Carefully move the treadmill to the desired location. To reduce the risk of injury, use extreme caution while moving the treadmill. Do not move the treadmill over an uneven surface.
TROUBLESHOOTING Most treadmill problems can be solved by following the steps below. Find the symptom that applies, and follow the steps listed. If further assistance is needed, please call our Customer Service Department tollfree at 1-888-936-4266, Monday through Friday, 8h00 until 18h30. Eastern Time (excluding holidays). PROBLEM: The power does not turn on SOLUTION: a.
PROBLEM: The walking belt slows when walked on SOLUTION: a. Use only a single-outlet surge suppressor that meets all of the specifications described on page 8. b. If the walking belt is overtightened, treadmill performance may decrease and the walking belt may become damaged. Remove the key and UNPLUG THE POWER CORD. Using the allen wrench, turn both rear roller adjustment bolts counterclockwise, 1/4 of a turn.
CONDITIONING GUIDELINES WARNING: Before beginning this or any exercise program, consult your physician. This is especially important for individuals over the age of 35 or individuals with preexisting health problems. The pulse sensor is not a medical device. Various factors, including your movement, may affect the accuracy of heart rate readings. The sensor is intended only as an exercise aid in determining heart rate trends in general. The following guidelines will help you to plan your exercise program.
ORDERING REPLACEMENT PARTS To order replacement parts, call toll-free 1-888-936-4266, Monday through Friday 8h00 until 18h30 Eastern Time (excluding holidays).
LIMITED WARRANTY ICON OF CANADA, INC. (ICON) warrants this product to be free from defects in workmanship and material, under normal use and service conditions, for a period of one (1) year from the date of purchase. This warranty extends only to the original purchaser. ICON's obligation under this warranty is limited to replacing or repairing, at ICON's option, the product through one of its authorized service centers. All repairs for which warranty claims are made must be pre-authorized by ICON.
PART IDENTIFICATION CHART Remove this chart and use it to identify small parts during assembly. Save this chart and the EXPLODED DRAWING/PART LIST for future reference.
PART LIST—Model No. PCTL93040 Key No. Qty.
92 102 38 95 94 71 36 41 102 99 11 92 15 37 76 106 123 29 102 38 93 87 108 105 96 97 85 98 107 104 73 2 114 91 102 100 13 83 82 84 74 1 90 26 15 111 110 112 113 127 24 22 124 2 15 14 109 5 86 89 26 16 13 12 102 22 102 19 18 85 17 10 EXPLODED DRAWING Model No.