ModeJ No. 831.295030 SedaJ No. User's Manual SeriaU Number DecaU . Assembly . Operation . Maintenance . Part List and Drawing \ \ ,_ CAUTION Read aH precautions and instructions in this manuaJ before using this equipment. Save this manual for future reference. Sears, Roebuck and Co.
TABLE OF CONTENTS iMPORTANT PRECAUTIONS ................................................................ BEFORE YOU BEGIN ...................................................................... ASSEMBLY ............................................................................... OPERATHON AND ADJUSTMENT ............................................................ HOW TO FOLD AND MOVE THE TREADMHLL .................................................. TROUBLESHOOTHNG .......................................
iMPORTANT PRECAUTIONS J WARNING" following " f.... , To reduce the risk of burns, ire, eJectric shock, or mjur important precau tions and information before operating the treadmill 1. it is the responsibility of the owner to ensure that all users of this treadmill are adequately informed of all warnings and precautions. 2. Use the treadmill only as described. Place the treadmill on a level surface, with at least eight feet of clearance behind it and two .......... feet on each side.
21.When folding or movi ng the treadmill, make sure that the storage latch is fully closed. 22. inspect and properly treadmill regularly. tighten all parts of the 23. Never insert any obiect into any opening. 24.DANG ER: AIwoye unplug the powe, cord immediately after use, before cleaning the treadmill, and before performing the maintenance and adjustment procedures de= scribed in this manual Never remove the motor hood unJeee instructed to do so by an authorized service representative.
BEFORE YOU BEGIN Thank you for selecting the new PROFORM ®CROSSWALK 365s treadmill, The CROSSWALK 365s treadmill combines advanced technology with innovative design to help you get the most from your exercise in the convenience of your home, And when you're not exercising, the CROSSWALK 365s treadmill can be folded up, requiring less than half the floor space of other treadmills, For your benefit, read this manual carefully before using the treadmill, if you have questions after reading this manual, call 1
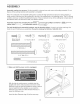
ASSEMBLY Assembly requires two persons.
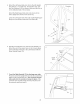
2, With the heUpof another person, carefully Uower the Uprights (69) as shown, Note: Utmay be heUpfuUto pUace one foot on one of the Extension Legs (63) as you tip the Uprights, Make sure that the Extension Legs remain in the Uprights. Attach each Extension Leg (63) with two 1" Tek Screws (39) and a Round Base Pad (57) as shown, Attach the tower Tek Screw, without the Round Base Pad, first. \ 69 66 64 _9 / 66 64 Attach two more Round Base Pads (57) to the base of the Uprights (69) with two 1" Tek S
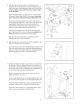
5, Attach the Left Upper Body Arm (24) to the UeftUpright (69) with two 3 1/2" BoUts(45), two Washers (38), and two Star Washers (106) as shown, Make sure the Arm is on the indicated side of the crossbar, Crossbar Attach the Right Upper Body Arm (not shown) to the other Upright (not shown) in the same way, Lower the Left Upper Body Arm (24) and the Right Upper Body Arm (not shown) toward the Foot Rails (98), 38 45 98 6, Hold the Console Base (47) near the Left Handrail (71), Attach the end of the groun
8, Set the ConsoUeBase (47) on the Right Handrail (72) and the Left Handrail (71), Attach the ConsoUe Base with four 3/4" Screws (2), Start all four Screws before tightening them; do not overtighten the Screws.
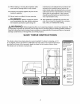
OPERATmON AND ADJUSTMENT THE PERFORMANT LUBE TM WALKmNG BELT an equipment-grounding conductor and a grounding plug, Plug the power cord into a surge suppressor, and plug the surge suppressor into an appropriate outlet that is propedy installed and grounded in accordance with aH JocaJ codes and ordinances. Important: The treadmill is not compatible with GFCl-equipped outJets.
CONSOLE DIAGRAM Displays Max 165 155 145 140 130 f M_a i 125 120 115 110 105 EART RATETRAININGZONES Age 2O 3O 4O 5O 60 125 115 110 103 95 90 7O 8O m FAT TOUCH CALS. m PULSE TUME DISTANCE SPEED PULSE Pulse Sensor Note: ff there is a thin sheet of pUastb on the consob, remove the pUastb. Cli Next, stand on the foot rails of the treadmill. Find the clip attached to the key (see the drawing above), and slide the clip onto the waistband of your clothes.
To stop the walking belt, press the Stop button. The Time/%stance display will begin to flash. while inserting the key into the console. An "E" Note: During the first few minutes that the treadmill is used, inspect the alignment of the walking belt, and align it if necessary (see page 16). for English miles or an "M" for metric kilometers wiii appear in the Speed display. Press the Speed Change the incline of the treadmill unit of measurement. When the desired unit of as desired.
HOW TO USE THE UPPER BODY ARMS As you waUkon the treadmill you can either hoUdthe handrails or use the upper body arms, To exercise your arms, shouUders, and back for a totaUbody workout, move the upper body arms forward and back as you waUkon the treadmill To vary the intensity of your upper body exercise, the resistance of the upper body arms can be adjusted, To increase the resistance, turn the resistance knobs cUockwise; to decrease the resistance, turn the knobs counterclockwise, 13
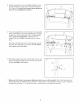
HOW TO FOLD AND MOVE THE TREADMILL HOW TO FOLD THE TREADMmLL FOR STORAGE Before folding the treadmill, adjust the incline to the towest position, ff this is not done, the treadmill may be permanently damaged. Next, unplug the power cord. CAUTmON: You must be able to safely tift 45 pounds (20 kg) to raise, tower, or move the treadmill. HoUdthe treadmHUwith your hands in the Uocations shown at the right, To decrease the possibility of injury, bend your tegs and keep your back straight.
HOW TO LOWER THE TREADMmLL FOR USE 1, HoHdthe upper end of the treadmHHwith your right hand, Press the storage Hatchto the Heft.Pivot the treadmHHdown until the frame and foot rail are past the storage Hatch, 2, HoHdthe treadmHHfirmHywith both hands, and Howerthe tread° mHHto the floor, Do not drop the treadmill frame to the floor. To decrease the possibility of injury, bend your tegs and keep your back straight.
Most treadmill problems can be solved by following the simple steps below. Find the symptom that applies, and follow the steps listed, mffurther assistance is needed, call totFfree 1-800-4-MY-HOME ® (1-800-469-4663).
PROBLEM: The walking SOLUTION: a, Use only a single-outlet surge suppressor that meets all of the specifications described on page 10, b, belt slows when walked on if the walking belt is overtightened, treadmill performance may decrease and the walking belt may become damaged, Remove the key and UNPLUG THE POWER COBB, Using the allen wrench, turn both rear roller adjustment bolts counterclockwise, 1/4 of a turn, When the walking belt is properly tightened, you should be able to lift each side of the wa
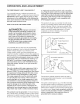
CONDiTiONiNG WARNJNG: GUmDEUNES ergy, Only after the first few minutes does begin to use stored fat calories for energy, is to burn fat, adjust the speed and incline mill until your heart rate is near the lowest your training zone, Before beginning th s or any exercise program, consult your physician. This is especially important for indMduals over the age of 35 or individuals with preexisting health problems.
SUGGESTED STRETCHES The correct form for several basic stretches is shown at the right, Move slowly as you stretch--never 1. Toe Touch Stretch Stand with your knees bent slightly and slowly bend forward from your hips, Allow your back and shoulders to relax as you reach down toward your toes as far as possible, Hold for 15 counts, then relax, Repeat 3 times, Stretches: Hamstrings, back of knees and back, 2.
PART LiST--Model Key No. Qty. 1 2 3 4 5 6 7 8 9* 10 11 12 13 1 15 1 1 9 1 1 1 1 1 1 2 5 14 15 2 6 16 17 18 19 2O 21 2 1 1 1 2 1 22 23 2 1 Description Key No. Qty.
m x 0 20 m 98 / I -24 27 112 56 / 111 109 74 98 ' 67 , / 5 // 10J 23 _49 13- 13 2 / 40 13 i_ // ,/ // / / // /, , i i // , / 5O 107 /,/ 76 / ,/ // // / , / Z © ] 14 63 Oo O0 39 1 95 t,O 58 15 100 70 62 -_ 63 /e 39 66 64 00 0 84 .
Your Home For repair - in your home - of all major brand appliances, lawn and garden equipment, or heating and cooling systems, no matter who made it, no matter who sold it! For the replacement parts, accessories, and user's manuals that you need to do-it-yourself. For Sears professional installation of home appliances and items like garage door openers and water heaters. 1-800-4-MY-HOME ® Anytime, day or night (U.S.A.