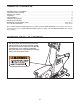
Model No. 831.15995.1 Serial No. Write the serial number in the space above for future reference. ELLIPTICAL TRAINER EXERCISER User’s Manual Serial Number Decal (Under Seat) • Assembly • Adjustments • Troubleshooting • Part List and Drawing CAUTION Read all precautions and instructions in this manual before using this equipment. Save this manual for future reference. Sears, Roebuck and Co.
TABLE OF CONTENTS WARNING DECAL PLACEMENT . . . . . . . . . . . . . . . . . . . . . . . . . . . . . . . . . . . . . . . . . . . . . . . . . . . . . . . . . . . . . .2 IMPORTANT PRECAUTIONS . . . . . . . . . . . . . . . . . . . . . . . . . . . . . . . . . . . . . . . . . . . . . . . . . . . . . . . . . . . . . . . . 3 BEFORE YOU BEGIN . . . . . . . . . . . . . . . . . . . . . . . . . . . . . . . . . . . . . . . . . . . . . . . . . . . . . . . . . . . . . . . . . . . . . . 4 ASSEMBLY . . . . . . . . . . . . .
IMPORTANT PRECAUTIONS WARNING: To reduce the risk of serious injury, read the following important precautions before using the elliptical trainer. 1. Read all instructions in this manual and all warnings on the elliptical trainer before using the elliptical trainer. Use the elliptical trainer only as described in this manual. 10. The elliptical trainer is designed to support a maximum user weight of 250 pounds. 11. The elliptical trainer is designed to be used with the included resistance.
BEFORE YOU BEGIN after reading this manual, call 1-800-4-MY-HOME® (1-800-469-4663). To help us assist you, please note the product model number and serial number before calling. The model number is 831.15995.1. The serial number can be found on a decal attached to the elliptical trainer (see the front cover of this manual). Thank you for selecting the versatile PROFORM® CROSSOVER ELLIPTICAL TRAINER.
ASSEMBLY • As you assemble the elliptical trainer, make sure all parts are oriented as shown in the drawings. Make Things Easier for Yourself Everything in this manual is designed to ensure that the elliptical trainer can be assembled successfully by anyone. However, it is important to realize that the versatile elliptical trainer has many parts and that the assembly process will take time. Most people find that by setting aside plenty of time, assembly will go smoothly.
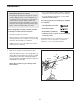
2. Attach the Seat Stabilizer (9) to the Seat Base (2) with two M10 x 78mm Carriage Bolts (149) and two M10 Nylon Locknuts (81). 2 81 2 9 149 3. Attach the Upright Stabilizer (10) to the Upright Base (1) with two M10 x 78mm Button Screws (101) and two M10 Split Washers (114). 81 3 101 114 114 10 1 4. Identify the Right Rail (6). Carefully tip the Upright Base (1) and the Seat Base (2) onto the left side.
5. Insert the connector of the Upper Wire Harness (188) into the socket of the Middle Wire Harness (37). Next, connect the two Wire Harnesses (159) together in the same manner. Note: The Upper Wire Harness connector is wider than the Wire Harness connectors. 5 Pull 188 159 The connectors should slide easily into the sockets and snap into place. If a connector does not slide easily and snap into place, turn it over and then insert it.
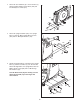
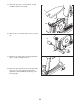
7. Attach the Backrest (22) to the Upright (3) and the Upright Base (1) with four M6 x 16mm Screws (130). 7 130 22 3 130 1 8. Connect the Sensor Wire Harness (187), the Wire Harness (159), and the Upper Wire Harness (188) to the Console (71). Push the excess wire into the Upright (3). 8 85 188 The connector should slide easily into the socket and snap into place. If a connector does not slide easily and snap into place, turn it over and then insert it.
11. Attach the Leg Lever Bracket (14) to the Seat Base (2) with two M8 x 40mm Button Screws (142) and two M8 Split Washers (140). 11 142 140 140 2 14 12. Grease an M10 x 75mm Button Bolt (129). Attach the Leg Lever (4) to the Leg Lever Bracket (14) with the Bolt and an M10 Nylon Locknut (81). Do not overtighten the Locknut; the Leg Lever must be able to pivot easily. 12 14 129 4 13.
15. Attach the Seat (23) to the Seat Base (2) with four M6 x 16mm Screws (130). 15 23 130 2 130 16. Slide the two Foam Pads (64) onto the Leg Lever (4). 130 16 64 64 4 17. Adjust the Feet (48) under the Upright Stabilizer (10) to steady the elliptical trainer. 17 10 18. Make sure that all parts have been properly tightened. The use of the remaining parts will be explained in ADJUSTMENTS, beginning on the following page.
ADJUSTMENTS This section explains how to adjust the elliptical trainer. See the EXERCISE GUIDELINES on page 22 for important information about how to get the most benefit from your exercise program. Also, refer to the accompanying exercise guide to see the correct form for each exercise. Make sure that all parts are properly tightened each time the elliptical trainer is used. Replace any worn parts immediately. The elliptical trainer can be cleaned with a damp cloth and a mild, non-abrasive detergent.
ATTACHING THE LEG LEVER To use the Leg Lever (4), first attach the low pulley station (see ATTACHING THE LOW PULLEY STATION on page 11). Then, attach the Long Cable (164) to the Leg Lever (4) with a Cable Clip (157). Always attach both Long Cables to the Leg Lever before using the Leg Lever. Note: The elliptical trainer must be in the collapsed position while the leg lever is used. 4 164 157 EXTENDING THE SEAT BASE 7 To use the Pedal Legs (7, 8), turn the Base Knob (44) to loosen it.
MOVING THE ELLIPTICAL TRAINER To move the elliptical trainer, first unplug the Transformer (not shown) from the 120-volt outlet and secure the elliptical trainer in the collapsed position (see EXTENDING THE SEAT BASE on page 12). Then, using the handle on the Upright Stabilizer (10), tilt the elliptical trainer onto the Stabilizer Wheels (47). Finally, move the elliptical trainer to the new location. 10 WARNING: The elliptical trainer is heavy; lift with your knees to prevent injury to your back.
CONSOLE OPERATION FEATURES OF THE CONSOLE Ten crossover training programs are also offered. Each crossover training program combines elliptical exercise with strength training exercises to give you a combined cardiovascular and strength workout. The console also features iFIT.com interactive technology. Having iFIT.com technology is like having a personal trainer in your home.
To reset the display modes to their default settings, press the RESET button. The SCAN display mode will be selected. ELLIPTICAL TRAINING MANUAL OPERATION 6. Measure Your Heart Rate if Desired. 1. Plug In the Transformer. If there are thin sheets of plastic on the metal contacts on the pulse sensors, peel off the plastic. Place your hands on the pulse sensors, with your palms on the metal contacts. Avoid moving Contacts your hands.
4. Begin Pedaling or Press the START/STOP Button to Start the Program. STRENGTH TRAINING When you begin pedaling, the TOTAL TIME display will be started. This display and the program can be started and stopped with the START/STOP button. MANUAL OPERATION 1. Plug In the Transformer. See PLUGGING IN THE ELLIPTICAL TRAINER on page 14. Important: Always plug in the transformer when using the elliptical trainer. Each program consists of several time periods of different lengths.
4. Select a Strength Training Program. Note: If you do not enter the numbers of sets and repetitions that you plan to do, the console will count the total number of repetitions that you do during your workout. To select one of the six strength training programs, press the STRENGTH TRAINING PROGRAMS button repeatedly. When a strength training program is selected, the name of the selected program will appear in the CROSSOVER TRAINING display for a few seconds.
When the time in the CROSSOVER TRAINING display reaches 00:00, the name of the first strength exercise and a time period of 2 minutes will appear in the display. Collapse the seat base, and perform as many repetitions of the exercise as you can while the time is counted down in the display. Note: If desired, change the resistance setting by pressing the SYSTEM RESISTANCE + and – buttons.
• Adjust the volume of your CD player or VCR. If the volume is too high or too low, the console may not detect the program signals. IFIT.COM ELLIPTICAL TRAINING IFIT.COM CD AND VIDEO PROGRAMS To use iFIT.com CDs or videocassettes, the elliptical trainer must be connected to your portable CD player, portable stereo, home stereo, computer with CD player, or VCR. See HOW TO CONNECT YOUR CD PLAYER, VCR, OR COMPUTER on pages 20 and 21. To purchase iFIT.com CDs and videocassettes, call toll-free 1-833-533-1333.
HOW TO CONNECT YOUR PORTABLE STEREO HOW TO CONNECT YOUR CD PLAYER, VCR, OR COMPUTER To use iFIT.com programs, a stereo audio cable must be plugged into the iFIT jack on the back of the console. Note: If your stereo has an RCA-type AUDIO OUT jack, see instruction A below. If your stereo has a 1/8" LINE OUT jack, see instruction B. If your stereo has only a PHONES jack, see instruction C. iFIT Jack A.
HOW TO CONNECT YOUR HOME STEREO B. Plug one end B of a 1/8" to 1/8" stereo audio cable (available PHONES at electronics stores) into the jack beneath 1/8” Audio the console. Y-adapter Cable Plug the other end of the cable into a Headphones/ 1/8" Y-adapter Speakers (available at electronics stores). Plug the Y-adapter into the PHONES jack on your computer. Plug your headphones or speakers into the other side of the Y-adapter. Note: If your stereo has an unused LINE OUT jack, see instruction A below.
EXERCISE GUIDELINES EXERCISE INTENSITY CARDIOVASCULAR EXERCISE GUIDELINES Whether your goal is to burn fat or to strengthen your cardiovascular system, the key to achieving the desired results is to exercise with the proper intensity. The proper intensity level can be found by using your heart rate as a guide. The chart below shows recommended heart rates for fat burning, maximum fat burning, and cardiovascular (aerobic) exercise.
Staying Motivated—For motivation, keep a record of each workout. List the date, the exercises performed, the resistance used, and the numbers of sets and repetitions completed. Record your weight and key body measurements at the end of every month. Remember, the key to achieving the greatest results is to make exercise a regular and enjoyable part of your everyday life.
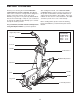
PART IDENTIFICATION CHART See the drawings below to identify small parts used in assembly. The number in parentheses by each drawing is the key number of the part, from the PART LIST in the center of this manual. Note: Some small parts may have been pre-attached for shipping purposes. If you cannot find a part in the parts bag, check to see if it has been pre-attached. If a part is missing, call toll-free 1-888-533-1333.
PART LIST—Model No. 831.159951 Key No. Qty.
Key No. Qty.
EXPLODED DRAWING A—Model No. 831.
EXPLODED DRAWING B—Model No. 831.
EXPLODED DRAWING C—Model No. 831.
FULL 90-DAY WARRANTY For 90 days from the date of purchase, if failure occurs due to defect in material or workmanship in this ELLIPTICAL TRAINER EXERCISER, contact the nearest Sears Service Center throughout the United States and Sears will repair or replace the ELLIPTICAL TRAINER EXERCISER, free of charge. This warranty does not apply when the ELLIPTICAL TRAINER EXERCISER is used commercially or for rental purposes.