
Owner's Manual


10
8
9
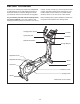
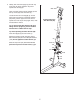
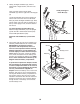
8. Identify the Right Handlebar (10), which is
marked with a “Right” sticker, and orient it as
shown.
Have a second person hold the Right
H
andlebar (10) near the right side of the Upright
(5).
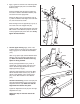
Locate the indicated wire tie in the Upright (5).
Tie the lower end of the wire tie to the Pulse
Wire (34) inside the Right Handlebar (10). Next,
pull the upper end of the wire tie upward out of
the top of the Upright. Then, untie and discard
the wire tie.
Tip: Avoid pinching the Pulse Wire (34).
Attach the Right Handlebar (10) to the Upright
(5) with two M8 x 16mm Patch Screws (102)
and two M8 Split Washers (103).
Attach the Left Handlebar (11) in the same
way.
102
103
34
10
33
11
5
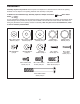
Wire Tie
Slot
Battery Cover
Screw
Batteries
Jack
Batteries
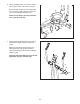
9. The Console (33) can use four D batteries (not
included); alkaline batteries are recommended.
IMPORTANT: If the Console has been
exposed to cold temperatures, allow it to
warm to room temperature before inserting
batteries. Otherwise, you may damage the
console displays or other electronic compo-
nents. Remove the screw, remove the battery
cover, insert the batteries into the battery com-
partment, and reattach the battery cover. Make
sure to orient the batteries as shown by the
diagram inside the battery compartment.
To purchase an optional AC adapter, contact
the store where you purchased this product
or call the telephone number on the cover of
this manual. To avoid damaging the console,
use only a manufacturer-supplied AC
adapter. Remove the battery cover, remove the
batteries, and plug one end of the AC adapter
into the jack inside the battery compartment on
the console; plug the other end into an outlet
installed in accordance with all local codes and
ordinances. Route the wire on the AC adapter
through the slot in the battery cover and reat-
tach the battery cover.
Avoid pinching the
Pulse Wire (34)