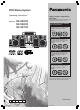
DVD Stereo System Operating Instructions Model No. SC-VK91D SC-VK81D SC-VK71D Region number supported by this player Region numbers are allocated to DVD players and software according to where they are sold. For Saudi Arabia, Kuwait, the Middle East and South Africa •The region number of this player is “2”. •The player will play DVD-Video marked with labels containing “2” or “ALL”. Example: 2 2 3 4 For Southeast Asia •The region number of this player is “3”.
Dear customer Thank you for purchasing this product. For optimum performance and safety, please read these instructions carefully. VK91D : indicates features applicable to SC-VK91D only. VK81D : SC-VK81D only. ¡ These operating instructions are applicable to models SC-VK91D, SC-VK81D and SC-VK71D for a variety of regions. ¡ Unless otherwise indicated, illustrations in these operating instructions are of SC-VK71D for Southeast Asia.
Table of contents Accessories ................................................................................... 3 Caution for AC Power Supply Cord ............................................ 4 Disc information ............................................................................ 5 Simple setup STEP1 Positioning ............................................................. 6 STEP2 Speaker connections ............................................. 7 STEP3 Video connections .........................
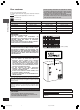
Caution for AC Power Supply Cord (For Saudi Arabia and Kuwait) (“GS” area code model only) For your safety, please read the following text carefully. WARNING: DO NOT CONNECT EITHER WIRE TO THE EARTH TERMINAL WHICH IS MARKED WITH THE LETTER E, BY THE EARTH SYMBOL n OR COLOURED GREEN OR GREEN/YELLOW. Getting started THIS PLUG IS NOT WATERPROOF — KEEP DRY. This appliance is supplied with a moulded three pin mains plug for your safety and convenience. A 5-ampere fuse is fitted in this plug.
Disc information Discs that can be played Logo Indication in these operating instructions RAM Recorded using Version 1.1 of the Video Recording Format (a unified video recording standard). • Recorded with DVD-Video recorders, DVDVideo cameras, personal computers, etc. • Remove discs from their cartridges before use. JPEG Recorded using the DCF (Design rule for Camera File system) standard. • Recorded with Panasonic DVD-Video recorders.
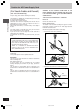
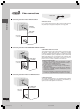
Simple setup 1 STEP Front speakers VK91D VK81D Speakers are designed identically so that no left or right channel orientation is necessary. Positioning VK71D Place the speakers so that the tweeter is on the outside. Optimum location Distance: A=B=C=D=E Center speaker Tweeter Tweeter Simple setup Center speaker is placed directly on the television. Put the center speaker on a rack or shelf.
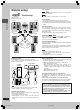
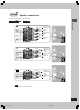
2 STEP Speaker connections + VK91D L TO SB-PS81A TO SB-PC81A TO SB-VK91 SURROUND (6 ) R CENTER (6 ) L HIGH (6 ) R MAIN L Gray (+) Center Blue ( ) speaker COMPONENT VIDEO OUT PR Y PB VIDEO OUT Gray (+) Blue ( ) Red (+) Black ( ) S VIDEO OUT Front speaker (right) (75 ) FM ANT SPEAKERS R L SUBWOOFER (6 ) VOLT ADJ AC IN EXT LOOP AM ANT LOW (12 ) TO SB-WVK91 Gray (+) Blue ( ) Surround speaker (right) Simple setup Twist and pull off the vinyl tip of the speaker cords.
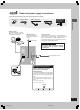
3 STEP Video connections Video cable 7 Connecting a television with a VIDEO IN terminal Simple setup VIDEO OUT terminal Do not connect the unit through a video cassette recorder, because the picture may not be played correctly due to the copy guard.
4 STEP Radio and power supply connections Connect the AC power supply cord after all other connections are complete. FM indoor antenna AM loop antenna AC power supply cord For Saudi Arabia and Kuwait For Saudi Arabia, Kuwait, the Middle East, South Africa, Southeast Asia, Russia and Ukraine Simple setup For Australia and N.Z. AM loop antenna Stand the antenna up on its base. Keep loose antenna cord away from other wires and cords.
STEP 5 The remote control Do not; Simple setup Remote control • mix old and new batteries. • use different types at the same time. • heat or expose to flame. • take apart or short circuit. • attempt to recharge alkaline or manganese batteries. • use batteries if the covering has been peeled off. Batteries Mishandling of batteries can cause electrolyte leakage which can damage items the fluid contacts and may cause a fire.
7 STEP Setting the time This is a 24-hour clock. 1 2 3 Select “CLOCK”. Set the time (press within 7 seconds or so). Press to finish setting the time. Simple setup CLOCK/TIMER • The time is shown for about 5 seconds when you select “CLOCK” again. • Reset the clock regularly to maintain accuracy. SKIP DEMO function When the unit is first plugged in, a demonstration of its functions may be shown on the display. If the demo setting is off, you can show a demonstration by turning on the demo.
Control reference guide Main unit Getting started 1 2 3 4 5 6 7 8 9 Å ! # $ % & ( ) ~ + Disc trays Disc check button [DISC CHECK] ....................................... 15 Remote control signal sensor AC supply indicator [AC IN] This indicator lights when the unit is connected to the AC mains supply. f/I] Standby/on switch [f Press to switch the unit from on to standby mode or vice versa. In standby mode, the unit is still consuming a small amount of power. Multi re-master button [MULTI RE-MASTER] ..
Remote control Ö function in exactly the same way as the buttons @ @ [ [ \ ] ^ _ { | } V 5 6 \ ] ^ _ - 7 { | ? } , V 8 0 1 9 Shift button [SHIFT] To use functions labeled in orange: While pressing [SHIFT], press the corresponding button. 3 Super Surround, Dolby Pro Logic II button [S.SRND, 0PLII] ................................................................... 26 Clock/timer, Setup button [CLOCK/TIMER, SETUP] ......................................
Discs — Basic play DISC 1 5 Numbered buttons SUBTITLE SUBTITLE OPEN/CLOSE DISC CHANGE DISC CHECK ,+ VOLUME , CANCEL , DVD/CD TOP MENU Disc operations DVD/CD DIRECT PLAY 1 5 , DVD/CD MENU GROUP , STOP VOLUME DOWN, UP , REW/ , /FF ENTER FL DISPLAY RETURN SKIP SLOW/SEARCH SHIFT 1 2 3 Place a disc in the disc tray. OPEN/CLOSE 4 OPEN/CLOSE • Load double-sided discs so the label for the side you want to play is facing up. (A page 35, Tray/disc handling procedure) Open the disc tray.
• Frame-byframe DVD-A Motion picture parts DVD-A WMA MP3 JPEG only. A folder on WMA/MP3 and JPEG discs is treated as a “Group”. • VCD forward direction only. • Pressing [J] also activates (during pause) forward direction. Starting play from a selected group Select + Confirm Select On-screen item select Confirm Enter number WMA MP3 JPEG Information screen + + Example: To select 123: [1] A [2] A [3] A [ENTER] • Press [SHIFT]+[CANCEL] to cancel the number(s).
Discs — Convenient functions CD mode VCD CD WMA MP3 CD MODE DISC 1 5 PROGRAM SUBTITLE PLAY MODE The unit usually plays the disc in the play position and then stops. Turn CD mode on to play all loaded discs, except for DVDs and JPEG discs. AUDIO Numbered buttons REPEAT P.MEMORY , CANCEL Press [SHIFT] + [CD MODE]. Every time you press the button: CD MODE ON ¡™ CD MODE OFF Note , DVD/CD PAGE Disc operations While stopped ENTER • HighMAT menus and video CD playback control are disabled.
• Play mode functions DVD-A DVD-V WMA MP3 JPEG To select an item using the cursor buttons 8, 9] to select an item, then press Press [ENTER] and [8 [ENTER] again to confirm the number. All the items on the disc, title or group are selected when you select “ALL”. DVD-A DVD-V VCD CD WMA MP3 JPEG Common procedures for all group and random play While stopped 4 Press [:, DVD/CD] to play. Press [PLAY MODE].
Discs — Using navigation menus Using a content screen to find a track CD (CD text only) 1 Press [TOP MENU] or [MENU] to display the content screen. CD-Text Numbered buttons 1. 2. 3. 4. 5. 6. 7. 8. 9. 10.
Playing HighMAT discs Playing the programs WMA MP3 JPEG RAM 1 1 Press [DIRECT NAVIGATOR]. While stopped Press [TOP MENU]. • Titles appear only if you 2 Press [8, 9, ;, :] to select the item following the onscreen instructions. Example New Playlist Item Long Name Display Te M e nu 1 P l ay l i s t 1 Menu: Take you to the next menu which shows playlists or another menu PAG E 1 / 3 Direct Navigator have entered them. • You cannot change program and disc titles. No.
Discs — Using on-screen menus (Refer to page 13 for remote control buttons’ positions) 1 2 3 4 Select Go to the next menu Select Confirm Return to the previous menu Press once. Confirm Select the menu. Make the settings. Press to exit. Disc operations (When pressed twice, the elapsed play time indicator appears A see below.) Items shown differ depending on the type of software.
L Picture Menu L Display Menu Picture Mode Video Output Mode When playing NTSC discs • 480I (Interlace) ¡™ 480P (Progressive) Transfer Mode If you have chosen “480P” (A see above), select the method of conversion for progressive output to suit the type of material.
Discs — Changing the player’s setting (Refer to page 13 for remote control buttons’ positions) 1 2 3 4 Select 5 Select Select + + Shows Setup menu. Go right Confirm Select the tab. Select the item. Confirm Make the settings. Press to exit. Setup menu • The settings remain intact even if you switch the unit to standby. • Underlined items are the factory preset.
L “Audio” tab • Off • On: Dynamic Range Compression Adjust for clarity even when the volume is low through compressing the range of the lowest sound level and the highest sound level. Convenient for late night viewing. (Only works with Dolby Digital) • On • Off 0.0/1.0/2.0/3.0/4.0/5.0 ms • Center (C): • Surround (LS/RS): 0.0/5.0/10.0/15.0 ms Audio during Search Speaker Setting (A see below) Set the delay time for your center and surround speakers.
The radio L AM allocation setting (main unit only) BAND TUNER , REW/ , /FF For Saudi Arabia, Kuwait, the Middle East, South Africa and Southeast Asia The step is factory-set to 9 kHz, but you can change it to receive broadcasts allocated to 10 kHz steps. 1. Select “FM”. 2. Press and hold [BAND, TUNER]. After a few seconds the display changes to show the current minimum frequency. Continue to hold the button down. The minimum frequency changes and the step is changed.
Cassette tapes To stop tape playback Press [L] (main unit: [L, STOP]). DECK 1/2 , TAPE , STOP , REW/ , /FF , DECK1 VOLUME DOWN, UP , DECK2 DECK 1 DECK 2 To select the reverse mode While TAPE is selected as the source Press and hold [PLAY MODE]. Every time you press and hold the button: : One side is played. : Both sides are played. (forward → reverse) Play stops at the end of the reverse side. : Both sides are played repeatedly until [L] (main unit: [L, STOP]) is pressed.
Sound field and sound quality L To down-mix Dolby Digital or DTS (multiplechannel) signals to 2 channels MULTI RE-MASTER SUPER SURROUND , DVD/CD SUPER SOUND EQ Press [SHIFT] + [MIX 2CH]. SOUND EQ VK91D and VK81D only , STOP SUBWOOFER To cancel, press [SHIFT]+[MIX 2CH] again. VOLUME DOWN, UP When “D.MIX” flashes on the display DVD-A The DVD-Audio contains multiple-channel signals that cannot be down-mixed.
Sound field and sound quality Speaker level adjustments This is one of the ways to get appropriate surround effects. Adjust the speaker level to the same level as the front speakers. Preparation: Press [:, DVD/CD] and then [L] (main unit: [L, STOP]). During play Press [SHIFT] + [M.RE-MASTER] (main unit: [MULTI RE-MASTER]). Every time you press the button: Setting 1 Press [SHIFT] + [TEST] to output a test signal.
Recording 3 Select the source to be recorded. REC , DVD/CD , TAPE , STOP , DECK2 , DECK1 Radio recording: Tune to the required station. (A page 24) Disc recording: Insert the disc(s) you want to record. Press [:, DVD/CD] and then [L] (main unit: [L, STOP]). Prepare the desired disc recording mode. • To record programmed tracks (A do steps 1–3 on page 17). Ensure disc is stopped. 1 2 1 2 Tape-to-tape recording: Press [; :, TAPE] and then [L] (main unit: [L, STOP]).
Using the timers PLAY/REC CLOCK/TIMER SLEEP To cancel the timer Press [rPLAY/REC] to clear the timer indicator from the display. (The timer comes on at the set time everyday if the timer is on.) To change the settings (when the unit is on) To change the play/record times Do steps 1, 2, 3 and 5. To change the source or volume 1. Press [rPLAY/REC] to clear the timer indicator from the display. 2. Make changes to the source or volume. 3. Do steps 4 to 5.
Enjoying karaoke For Saudi Arabia, Kuwait, the Middle East, South Africa, Southeast Asia, Russia and Ukraine Vocal mute function Microphone(s) (not included) Use this function when enjoying sources not formatted for karaoke. The voice portion of the track is blocked out but not the background music. Preparation: RAM VCD , STOP , DVD/CD REC MIC VOL MIN, MAX VOLUME DOWN, UP , DECK1 Press [SHIFT]+[AUDIO] to select “LR”. Press [SHIFT] + [V.MUTE] to switch the function on or off.
Enjoying karaoke function To record your karaoke performance 1 Select the source and start play. Preparation: 2 Start singing and adjust volume with [–, + VOLUME] • Do the preparatory steps 1–2 on page 28. • When singing along with discs (main unit: [VOLUME DOWN, UP]) and [MIC VOL MIN, MAX] on the main unit. To turn the vocals on and off DVD-V 1 Press [SHIFT] + [AUDIO] during play. 2 Press [8] or [9] then [ENTER], or [;, :] to select the mode.
Convenient functions Muting the volume Headphones (not included) Press [MUTING]. VOLUME DOWN, UP Other functions Volume is reduced to minimum. PHONES DISP MODE To cancel Press [MUTING] again or reduce the volume to minimum (--dB), then raise it to the required level. Muting is also canceled when you switched the unit to standby. Auto-off function TV DIMMER AUTO OFF TV/VIDEO When disc or tape is selected as the source To save power, the unit turns off if it is left unused for ten minutes.
The unit’s display shows the level of each sound range with the four types of display described below. Press [DISP MODE] on the main unit. Every time you press the button: Normal display → Peak-hold display → Aurora display (off) ← Reflection display Normal display This display indicates the strength of the sound in each tonal range. Peak-hold display The peak sound value of each sound range is held on the display for about one second after it occurs.
Using other equipment Before connection • Disconnect the AC power supply cord. • Turn off all equipment and read the appropriate operating instructions. • The equipment connections described are examples. • Peripheral equipment and optional cables are sold separately unless otherwise indicated. Using an external unit Using a subwoofer Other functions You can playback the sound from a video cassette recorder, tape deck, laser disc player, etc., through this unit’s speaker.
Glossary Tray/disc handling procedure Decoder A decoder restores the coded audio signals on DVDs to normal. This is called decoding. Not adhering to the following may cause problems. Opening/closing a disc tray Dolby Digital This is a method of coding digital signals developed by Dolby Laboratories. Apart from stereo (2-channel) audio, these signals can also be multi-channel audio. A large amount of audio information can be recorded on one disc using this method.
Troubleshooting guide Before requesting service, make the following checks. If you are in doubt about some of the check points, or if the remedies indicated in the chart do not solve the problem, consult your dealer for instructions. Power Page • • Insert the AC power supply cord securely. No response when buttons pressed. • • Some operations may be prohibited by the disc. The unit may not be operating properly due to lightning, static electricity or some other external factor.
Marker Cannot add markers. • You cannot add markers to DVD-RAM or if the disc’s play time doesn’t appear on the unit’s display. — There are already markers. • The unit reads and displays the markers added with a DVD video recorder. You can clear them but they will reappear when you switch the unit to standby, change the source, or change the disc. — • • The end of an item becomes point B when it is reached. — A-B repeat is canceled when you press [SHIFT]+[QUICK REPLAY]. — No sound.
Troubleshooting guide Unit displays Although the unit is on standby mode, the display lights up and changes continuously. • • Turn off the demo function. If you set the clock, demo function will be turned off automatically. 11 11 The display is dark. • • • • • • Press [SHIFT]+[DIMMER] to brighten the display. 32 You inserted a disc the unit cannot play; insert one that can. You inserted a blank disc. 5 — You haven’t inserted a disc; insert one.
Specifications AMPLIFIER SECTION CASSETTE DECK SECTION RMS Output Power: Dolby Digital Mode Front – High Ch 90 W per channel (6 Ω), 1 kHz, Front – Low Ch 45 W per channel (12 Ω), 100 Hz, Surround Ch 45 W per channel (6 Ω), 1 kHz, Center Ch 100 W per channel (6 Ω), 1 kHz, Subwoofer 95 W per channel (6 Ω), 100 Hz, Total RMS Dolby Digital mode power PMPO output power 10% THD 10% THD 10% THD 10% THD 10% THD 650 W 7300 W VK81D RMS Output Power: Dolby Digital Mode Front Ch 80 W per channel (6 Ω), 1 kHz, Surr
Specifications SPEAKER SECTION VK91D Front speakers SB-VK91 Type Speaker unit(s) Super Woofer Woofer Tweeter Input power (IEC) Output sound pressure Cross over frequency Frequency range Dimensions (WxHxD) Mass VK91D Surround speakers SB-PS81A Type Speaker unit(s) Woofer Tweeter Input power (IEC) Output sound pressure Cross over frequency Frequency range Dimensions (WxHxD) Mass VK91D Dimensions (WxHxD) Mass Dimensions (WxHxD) Mass Dimensions (WxHxD) Mass 3 way, 3 speaker system (Bass reflex) Impedanc