
Instructions / Assembly


Barn Door Hardware Kit
ASSEMBLY INSTRUCTIONS
BARN DOOR HARDWARE KIT
ASSEMBLY INSTRUCTIONS
Step 10. Hanging the Door
Place the assembled door onto the secured rail and tighten
each anti-jump block. Ensure all parts are operating correctly
by sliding the door side-to-side.
1
2
Step 11. Floor-Mounted Door Guide Installation
guide inside the morticed door, line up close to the opening.
placement then mark holes with a pencil and pre-drill 1/4"
the provided anchors.
1 3/16" (30 mm)
1/4" (8mm)
Step 12. OPTIONAL Wall-Mounted Door Guide Installation
Line up close to the opening, position and secure the
wall-mounted door guide directly into the wall or trim,
extending the guide as necessary to allow the door to
travel side-to-side. Tighten to secure in place.
1 3/16" (30 mm)
1/4" (8mm)
®
www.millikenmillwork.com
Note: Pre-routed door bottom
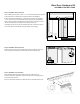
Step 10. Hanging the Door
Place the assembled door onto the secured rail and tighten each anti-jump
block. Ensure all parts are operating correctly by sliding the door side-to-side.
Image for bent strap shown
Step 11. Floor-Mounted Door Guide Installation
Once the door is plumb, position the oor-mounted door guide inside the
morticed door, line up close to the opening. Slide the door side-to-side to
ensure functionality for nal placement then mark holes with a pencil and
pre-drill 1/4" holes. If drilling directly into a concrete oor, use the provided
anchors.
BARN DOOR HARDWARE KIT
ASSEMBLY INSTRUCTIONS
Step 10. Hanging the Door
Place the assembled door onto the secured rail and tighten
each anti-jump block. Ensure all parts are operating correctly
by sliding the door side-to-side.
1
2
Step 11. Floor-Mounted Door Guide Installation
guide inside the morticed door, line up close to the opening.
placement then mark holes with a pencil and pre-drill 1/4"
the provided anchors.
1 3/16" (30 mm)
1/4" (8mm)
Step 12. OPTIONAL Wall-Mounted Door Guide Installation
Line up close to the opening, position and secure the
wall-mounted door guide directly into the wall or trim,
extending the guide as necessary to allow the door to
travel side-to-side. Tighten to secure in place.
1 3/16" (30 mm)
1/4" (8mm)
®
www.millikenmillwork.com
Note: Pre-routed door bottom
Step 12. OPTIONAL Wall-Mounted Door Guide Installation
Line up close to the opening, position and secure the wall-mounted door
guide directly into the wall or trim, extending the guide as necessary to allow
the door to travel side-to-side. Tighten to secure in place.
BARN DOOR HARDWARE KIT
ASSEMBLY INSTRUCTIONS
Step 10. Hanging the Door
Place the assembled door onto the secured rail and tighten
each anti-jump block. Ensure all parts are operating correctly
by sliding the door side-to-side.
1
2
Step 11. Floor-Mounted Door Guide Installation
guide inside the morticed door, line up close to the opening.
placement then mark holes with a pencil and pre-drill 1/4"
the provided anchors.
1 3/16" (30 mm)
1/4" (8mm)
Step 12. OPTIONAL Wall-Mounted Door Guide Installation
Line up close to the opening, position and secure the
wall-mounted door guide directly into the wall or trim,
extending the guide as necessary to allow the door to
travel side-to-side. Tighten to secure in place.
1 3/16" (30 mm)
1/4" (8mm)
®
www.millikenmillwork.com
Note: Pre-routed door bottom